Product Photography for Beginners: The Complete Guide to Your First Professional Product Shoot
Everyone starts product photography by placing their item on a kitchen counter and hoping the ceiling light is good enough. It never is. You take the photo, look at your screen, and realize your premium skincare serum looks like a cheap knockoff from a yard sale. You do not need a massive budget to fix this, but you absolutely need to stop winging it.
Definition
Product photography refers to the process of capturing high-quality images of items for commercial use. It involves controlling lighting, backgrounds, and camera angles to present merchandise clearly and attractively for online listings.
Product photography for beginners is not about buying expensive lenses. It is about understanding how to control light and how to prep your item so the camera sees it clearly. To be fair, learning the deep mechanics of photography is a great pursuit if you want to become a full-time photographer, but most ecommerce founders just want to launch their inventory.
DIY photography saves you thousands of dollars upfront, but the genuine trade-off is the hours of trial and error required to get the lighting right. This guide breaks down the exact beginner product photo setup you need to get professional results on your very first try.
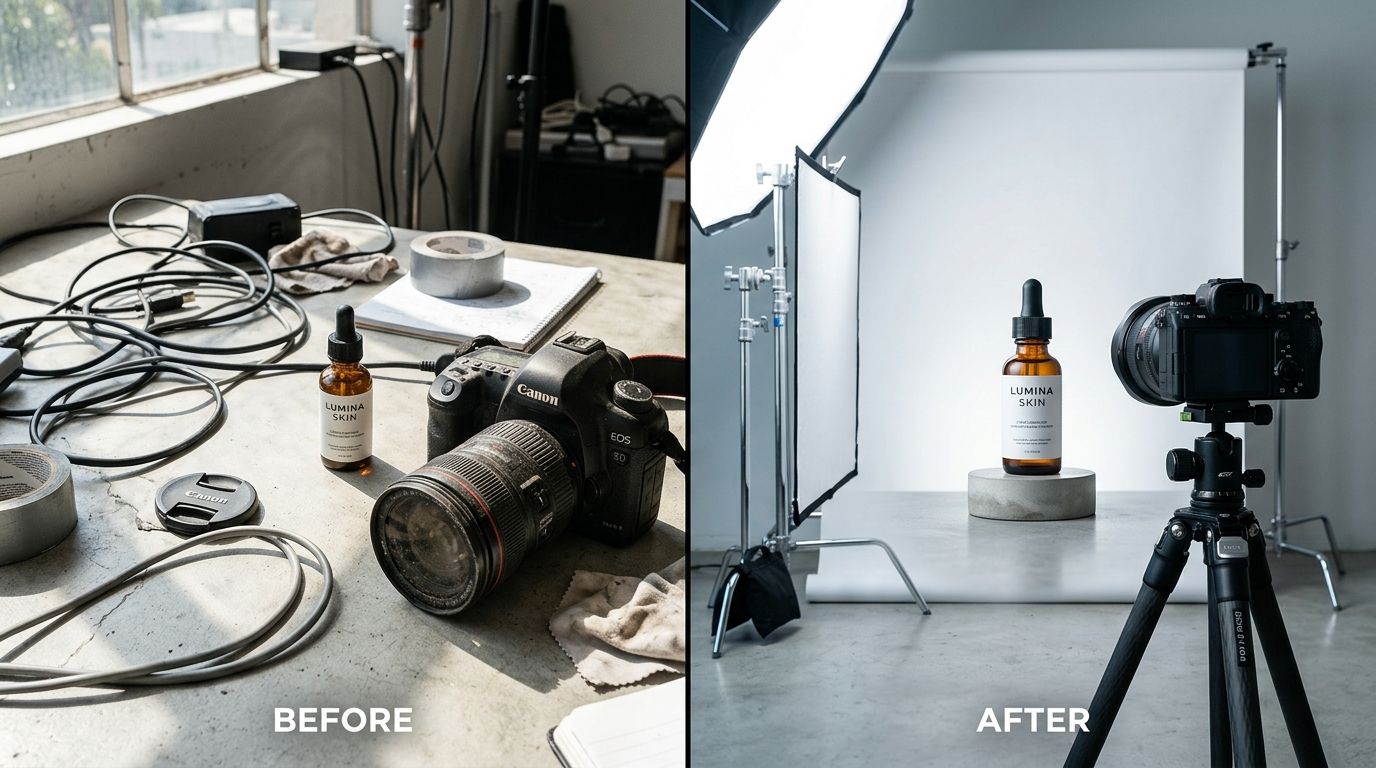
A standard beginner setup often involves makeshift lighting and basic white poster board, which works perfectly fine for your first fifty sales.
What equipment do I actually need to start product photography?
The most common mistake a beginner makes is heading straight to an electronics store. Professional cameras are complex machines that assume you know how to balance aperture, shutter speed, and ISO. If you shoot in auto mode on a three thousand dollar DSLR, your photos will look exactly like they were taken on a smartphone.
You can piece together a highly functional studio in a spare bedroom if you know what to buy. Our guide on building an essential product photography setup breaks down the exact items that actually matter. The short version is that you only need three physical things to get started.
The camera you already own
Modern smartphones have incredible sensors perfectly suited for beginner ecommerce photography. A recent iPhone or Android device will capture more than enough detail for a Shopify product page or an Amazon listing. The trick is making sure you wipe the lens with a microfiber cloth before you start. A smudge on your phone lens will ruin the contrast of your image and add a hazy glow that no editing app can fix.
A tripod to lock your frame
Your hands shake. Even if you think they do not, they do. When you shoot in lower light environments, your phone keeps its digital shutter open slightly longer to gather light. If your hand moves during that fraction of a second, the product details become soft and blurry. Buy a cheap twenty dollar tripod with a smartphone mount. Locking your camera in place also leaves your hands free to adjust the product without losing your framing.
Lighting modifiers over expensive lamps
You do not need massive studio strobe lights. You need ways to control the light you already have. Go to a craft store and buy two large pieces of white foam core board. You will use these as bounce cards. When light hits one side of your product, it leaves a dark shadow on the opposite side. Placing a white board just out of frame on the shadow side bounces light back onto the product, filling in the dark spots.
| Method | Cost | Time Effort |
|---|---|---|
| Manual DIY | Low | High |
| AI Photography | Moderate | Low |
The step-by-step process for a beginner product photo setup
Having the gear is only five percent of the job. The execution dictates the final result. Starting product photography ecommerce campaigns requires a systematic approach to every single item you shoot. If you skip steps during the physical setup, you will pay for it during the editing phase.
Prepping the product for the camera
Cameras see things the human eye ignores. A tiny speck of dust looks like a boulder when magnified on a product page. A single fingerprint on a glass bottle looks like a massive smudge. Before you place your item on the shooting surface, clean it thoroughly. Keep a lint roller, a can of compressed air, and glass cleaner on your shooting table. Wear cotton gloves if you are handling highly reflective items.
Pay attention to the label. If there is a visible seam on the packaging, turn the product until the seam is hidden from the camera. If your item refuses to stand perfectly straight, use a small piece of sticky tack under the base to prop it up.
Placing the light source
Understanding how light behaves is the hardest part of the job. If you are struggling with harsh shadows and blown out highlights, our walkthrough on mastering product lighting shows you exactly where to place your lamps. For your very first shoot, stick to natural window light.
Find a large window that gets plenty of daylight but does not have the sun shining directly through the glass. Direct sunlight creates aggressive, ugly shadows. Indirect sunlight provides a soft, even glow. Place a table next to the window. Tape a large piece of seamless white paper to the wall and let it drape down across the table in a gentle curve. This is called a sweep. It eliminates the horizon line behind your product, giving you that infinite white background look.
Capturing the shot
Lock your phone in the tripod. Frame the product so it takes up the majority of the screen. Tap the screen exactly where the product label is to tell the phone where to focus. On most modern phones, a small sun icon will appear next to the focus box. Drag that sun icon down slightly. Phones naturally overexpose images to make them look brighter. Dragging the exposure down ensures you capture all the rich details and true colors of your packaging.
Take the photo using a two-second timer. Tapping the capture button physically shakes the camera. A timer gives the tripod a second to settle before the image is recorded.
Editing and the modern AI alternative
No product photo is finished the moment you press the button. A raw image always looks a little dull. Post-production is where the contrast is adjusted, the background is forced to pure white, and minor imperfections are digitally erased.
Basic retouching expectations
You do not need to pay a subscription fee for complex desktop software to get clean results. You can use free mobile apps to boost the brightness, sharpen the edges, and crop the image into a clean square for your store. If you want to learn the fastest workflow for this, check out our guide on how to edit photos without Photoshop. The goal is to make the background disappear so the shopper only focuses on what they are buying.
Why skipping the manual shoot is a valid strategy today
If reading through the steps of wiping down bottles, taping paper sweeps to walls, and manually balancing window light sounds exhausting, there is another way. The technology for generating visual assets has advanced to the point where setting up a physical studio is optional.
General-purpose AI image tools struggle to keep brand packaging accurate, but purpose-built tools handle this flawlessly. Upload a basic, well-lit smartphone photo of your product to CherryShot AI. Select a visual mode like Classic for pure white catalog shots or Lifestyle for contextual environments. CherryShot AI isolates your product, fixes the lighting, and generates campaign-ready photos in minutes.
The per-image cost drops to under five dollars. The turnaround time drops from a full weekend of DIY frustration to a twenty-minute coffee break. When you can generate imagery for an entire new product line instantly, you stop worrying about tripod placement and start focusing entirely on revenue.
Streamline your product imagery process
Stop spending weekends on complex manual setups. Upload your existing smartphone photos to CherryShot AI to generate clean, professional product assets that fit your brand aesthetic.
Try CherryShot AIFrequently Asked Questions
How do I start product photography for beginners?
Begin with a smartphone, a window, and white poster board. Mastering the way light interacts with your product remains the primary objective. Avoid purchasing expensive equipment before you understand basic lighting principles. Set your product near a window for indirect light, then use the poster board to fill in shadows. Take multiple test shots while adjusting angles to find a clean, professional look before worrying about complex staging or additional accessories.
What equipment do I need to start product photography?
Your smartphone serves as the most important tool for initial shoots. A basic tripod keeps the frame steady, while a white foam board functions as an effective light reflector. Use a roll of white paper as your seamless background surface. Artificial light sources are only necessary if you shoot in low light conditions. Stick to these few items to keep your setup simple and effective for your first series of catalog images.
What is the easiest way to start taking product photos?
Upload a standard, well-lit smartphone photo to an AI-driven platform like CherryShot AI. This method replaces the time-consuming process of physical background removal and studio lighting. Your images receive instant, professional-grade processing that mimics traditional studio results. This approach allows you to focus on selling products rather than managing complicated technical photography setups. You save hours of manual editing while achieving a consistent aesthetic across your entire inventory or store listings.
How long does it take to get good at product photography?
Expect one weekend of focused practice to grasp basic lighting and camera settings. Consistency requires several months of shooting to produce high-end retail imagery. Difficult subjects, specifically glass or polished metal, require significant time to master due to complex surface reflections. Your initial attempts will feel tedious, but repeated practice turns these manual technical hurdles into second nature. Stay patient as you develop your eye for composition and light throughout your learning phase.
Should a beginner use AI photography or learn to shoot themselves?
Choose manual photography if you plan to build a career as a professional studio photographer. Select AI-driven solutions if you run an ecommerce business that requires fast, high-quality images for new inventory. Learning manual techniques offers creative satisfaction, but it consumes vast amounts of time that business owners often lack. Prioritize the method that keeps your store operational and your images professional without delaying your product launches or inventory updates.
A great product photo is the closest an online shopper will ever get to holding your item before they buy it. Whether you tape white paper to a wall and shoot it yourself or upload a quick snap to CherryShot AI to handle the heavy lifting, your images must project absolute quality. Choose the method that gets your products online faster.