DIY Product Photography Studio Setup: 3 Budget Tiers That Actually Work
Building a home product photography studio comes down to controlling light and eliminating background distractions. You do not need a massive commercial warehouse to execute a proper product photography studio setup. A dedicated corner in a spare room with consistent lighting and a seamless backdrop is enough to produce clean catalog shots. The biggest mistake founders make is buying expensive camera gear before they figure out how to manage their physical space.
Definition
A product photography studio is a controlled environment designed to highlight merchandise with consistent light and neutral surfaces. It functions as a workspace where the operator manages reflections, shadow direction, and color accuracy to create professional assets for online sales.
Any brand attempting to scale their online presence needs high quality visuals on demand. The invoice for standard catalog images should never threaten your margins. Most home studios fail because ecommerce operators buy cheap ring lights and expect luxury results. Quality comes from understanding diffusion and framing.
You can build a highly effective product photography corner setup for under one hundred dollars if you know what actually drives image quality. Alternatively, you can spend thousands on strobe lighting and still get terrible results if you ignore the basics of composition.
A proper home studio focuses on light control over expensive camera bodies.
It is worth noting, natural light is incredibly beautiful but completely unpredictable. If you plan to shoot your new inventory at nine o'clock at night after packing orders, that beautiful window light is useless to you.
The Baseline Reality of a Budget Product Photography Studio
Creating a DIY product photography setup requires accepting a few physical limitations. A home studio is exceptionally good at shooting small to medium items like skincare bottles, coffee bags, or boxed electronics. It falls apart quickly when you try to shoot larger lifestyle scenes or full body apparel.
I will readily admit that shooting highly reflective products like silver jewelry at home is a nightmare that will likely make you hate your life. You will spend hours fighting glare from nearby windows and trying to hide the reflection of your own living room walls in the surface of a watch face.
To succeed at home, you have to match your setup tier to your actual business needs. If you shoot five products a month, your needs are drastically different from a brand launching fifty new SKUs a week. We can break these setups into three distinct budget tiers.
| Budget Tier | Primary Light Source | Ideal Volume |
|---|---|---|
| Under $100 | Natural Window Light | Low (1-10 items) |
| $300-$600 | Continuous LED Lights | Medium (10-50 items) |
| $1,500+ | Strobe Lighting | High (50+ items) |
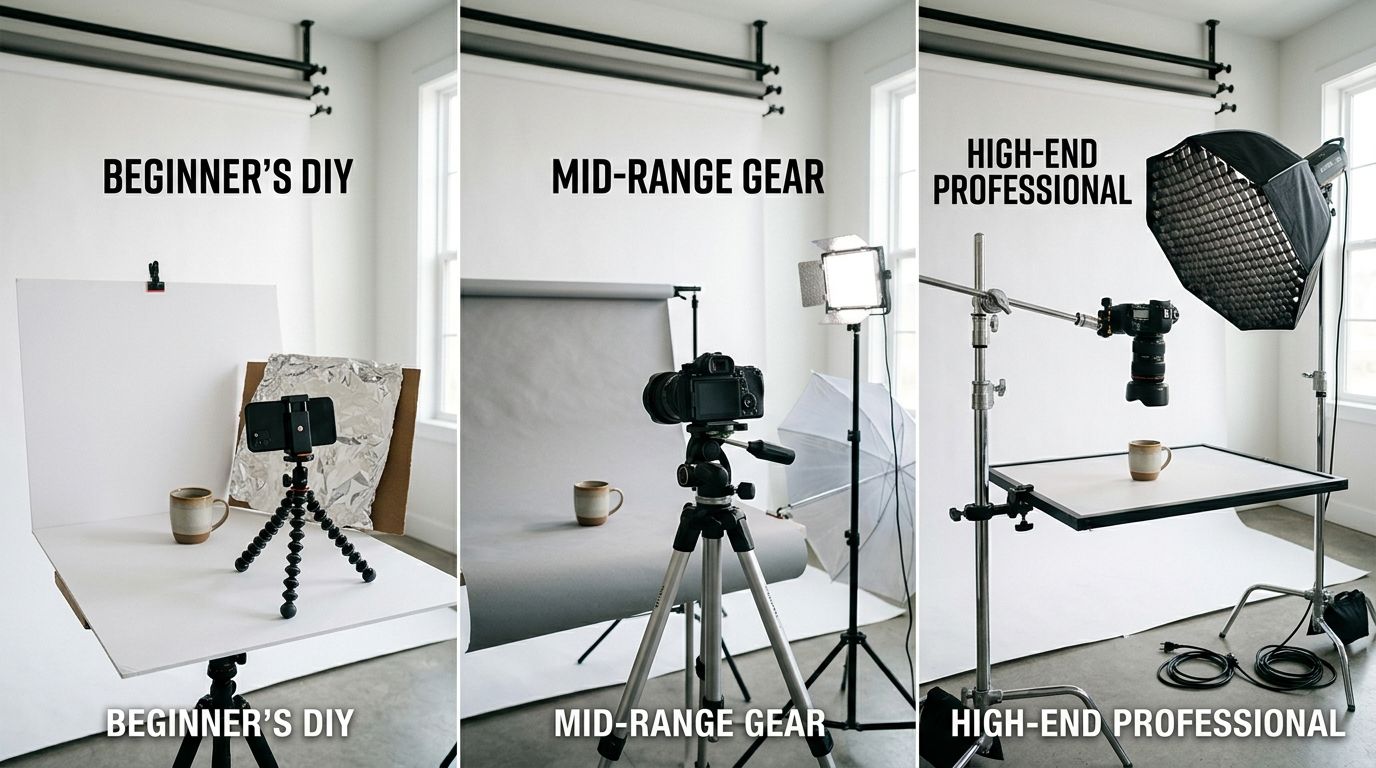
Tier 1: The Ultra Budget Corner Setup (Under $100)
You do not need to dip into your business credit line to take clear product photos. The ultra budget tier relies on the camera you already own and the most powerful light source available on the planet.
Gear breakdown and space requirements
This tier uses window light and foam core boards. Find the largest window in your home that gets bright indirect sunlight. Direct sunlight creates harsh shadows that are incredibly difficult to manage. You will place a standard folding table right next to this window.
Next, buy a large roll of white seamless paper or a thick poster board. Tape the top of the paper to a wall or a tall chair and let it drape down onto your table. This creates a seamless curve that eliminates the distracting horizon line behind your product. This technique is the foundation of basic table top studio photography.
Your smartphone is perfectly adequate for this setup. Mastering professional phone photography will yield better results than buying a cheap camera and using it on auto mode. You absolutely need a cheap tripod to hold the phone completely still. When relying on window light, you might need a slightly longer exposure time, and holding the phone in your hand will introduce blur.
To fill in the dark shadows on the side of the product facing away from the window, place a piece of white foam board just out of frame. This bounces the window light back onto the subject. It is astonishingly effective.
Tier 2: The Dedicated Space (Between $300 and $600)
Window light is free but it dictates your schedule. When you are running a business, you need to shoot on your own time. The mid budget tier is about buying consistency. You are paying for the ability to shoot at midnight and get the exact same results as you would at noon.
Moving to controlled lighting
At this tier, you move away from the window and into a space where you can control the environment. Spare bedrooms or dry basements are perfect. You want a room where you can close the blinds and start from complete darkness.
Invest in two continuous LED softbox lights. Continuous lights stay on constantly, allowing you to see exactly where the shadows fall before you take the photo. This makes the learning curve much smoother than using flash photography. A proper lighting setup for sellers typically involves placing one light at a forty-five degree angle as your key light, and a second light on the opposite side turned down slightly lower as your fill light.
You will also upgrade your background system. Instead of taping paper to chairs, buy a cheap background stand. This allows you to easily swap out colors and textures. Spending time choosing product backgrounds that align with your brand identity elevates the perceived value of your items immensely. A sturdy tripod for your camera or phone is non negotiable at this stage.
Tier 3: The Pro Home Studio ($1,500 and up)
This is the tier where ecommerce brands try to replicate a commercial studio in a residential space. It requires significant investment and a steep learning curve.
Strobes, tethering, and heavy modifiers
The pro setup replaces continuous LED panels with studio strobes. Strobes output a massive burst of light that allows you to shoot at very tight apertures. This keeps the entire product perfectly sharp from front to back. You will need heavy duty C-stands to hold large light modifiers overhead without tipping over.
At this level, you are shooting with a dedicated DSLR or mirrorless camera. More importantly, you are shooting tethered. A cable runs from your camera directly to a laptop, allowing you to review focus and lighting on a large screen immediately. Spotting a dust speck on a laptop monitor during the shoot takes two seconds to fix. Spotting it on a tiny camera screen after you have packed everything away forces a complete reshoot.
The breakeven point and the AI alternative
Before spending two thousand dollars on strobes and background rollers, you have to do the math on your time. Setting up lights, steaming backdrops, taking test shots, and editing raw files takes hours. If you launch a new product line every week, your home studio becomes a full time job.
This is exactly when brands outgrow the DIY product photography setup. When the bottleneck shifts from equipment cost to sheer production time, general purpose AI image tools or outsourcing to expensive freelancers look tempting.
CherryShot AI changes this calculation. Instead of spending an hour tweaking a softbox for a single flat lay, you snap a basic reference photo on your phone and upload it. You select a visual mode like Minimalist or Loud Luxury. You get campaign ready images back in minutes. The per image cost drops drastically, and the turnaround time collapses from a weekend project to an afternoon task. You bypass the pro studio investment entirely.
Making the Space Work in a Small Apartment
If you are working with limited square footage, the concept of a photography space setup can feel impossible. You do not need a permanent installation. The secret to small apartment studios is modularity.
Do not buy bulky lighting gear that cannot be broken down quickly. Use folding tables that slide under a sofa when not in use. Wall mounted background rollers are incredibly useful if your landlord allows them. You pull the paper down when you need to shoot and roll it right back up to the ceiling when you are done.
The biggest issue in a small room is color contamination. If your walls are painted blue, your bright studio lights will bounce off those walls and cast a blue tint across your product. You fix this by boxing in your shooting area. Stand two large white foam boards on either side of your table. This creates a neutral tunnel that prevents the room color from bleeding onto your merchandise. It is a simple trick that solves the most frustrating part of white sweep photography at home.
Scale your product imagery production today
Review your current catalog volume against the time you spend on manual studio setups. If your photography process takes more time than your actual product development, you are ready to automate your visual workflow with AI.
Try CherryShot AIFrequently Asked Questions
How much space do I need for a product photography studio?
A dedicated area of four by four feet serves as the minimum footprint for basic tabletop photography. This size accommodates your shooting table, a backdrop sweep, and two light stands without crowding the workspace. Larger subjects like apparel on mannequins require at least ten by twelve feet to properly isolate the product from the wall and minimize unwanted shadows.
What do I need for a DIY product photography setup?
Essentials include a stable table, a neutral background, a consistent light source, and a tripod for camera stability. You begin with a desk near a window, white poster board, a foam core reflector, and a phone tripod. Mastering light control and keeping the camera rigid are more significant factors than the specific model of camera or lens you use.
Can I do product photography in a small apartment?
Small apartments provide sufficient room for photography when you prioritize a modular setup. Use folding tables stored under furniture and clamp lights attached to existing surfaces instead of traditional stands. Surrounding your subject with white foam boards effectively neutralizes color casts from your walls and ensures clean light that replicates a larger, more professional studio environment.
What is the minimum setup for good product photos?
The smallest viable kit consists of a smartphone with manual exposure control, a stable tripod, a window with indirect light, a curved piece of white paper, and a reflector card. This setup costs less than fifty dollars and produces clean catalog images during daylight hours. Focus on steady placement and soft, directional lighting to maintain high output quality on a limited budget.
Is it worth setting up a home studio or just use AI?
A home studio provides value if you have specific technical requirements involving highly reflective surfaces or specialized angles. Frequent product releases and standard catalog photos create a production bottleneck that physical studios rarely handle efficiently. AI image generation removes the need to manage lights and physical backgrounds entirely, making it the superior choice for scaling high volumes of product imagery without the operational overhead.
Key Takeaways
- Controlling your light source matters far more than the price tag on your camera body.
- Window light requires zero budget but forces you to work on the schedule of the sun.
- Small apartment setups require modular gear and white foam core boards to block wall reflections.
- Once you consider spending over a thousand dollars on studio gear, AI generation is usually the more profitable choice.
Deciding to build a home studio comes down to volume and complexity. If you enjoy the technical process of lighting and styling, a dedicated corner setup gives you total creative control. If you just want beautiful photos so you can launch your next product and get back to running your business, skip the gear shopping entirely and head over to CherryShot AI.