Electronics Product Photography: Stop Fighting Glare
Photographing electronics is largely an exercise in managing your own reflections. Consumer tech products are covered in glass, polished chrome, and high-gloss polycarbonate. If you point a light directly at a smartwatch or a bluetooth speaker, you do not capture the product. You capture a harsh white circle of glare. If you try to shoot these items without a rigid light control strategy, you are just taking pictures of your own camera gear reflected in the chassis of your product.
Definition
Electronics product photography is the specialized process of capturing high-quality images of technical devices while controlling light reflections on glossy, metallic, or glass surfaces. It involves managing ambient glare and balancing hardware illumination with backlit displays to present a clear, attractive product for commercial use.
I remember sitting in a commercial studio in Brooklyn watching a photographer spend forty-five minutes adjusting a single piece of black foam core by a fraction of an inch just to kill a window reflection on a plastic bezel. We were paying a steep day rate to watch someone fight basic physics. Any brand still running a full studio shoot for standard catalog electronics images in 2026 is paying for logistics and trial-and-error, not quality.
There is a better way to handle tech products. It requires understanding why these surfaces fail on camera and shifting your workflow away from the physical limitations of a traditional studio.
The Three Headaches of Tech Product Photography
Before you can fix bad tech imagery, you need to identify exactly which material property is ruining your shots. Consumer electronics generally suffer from three distinct visual failures when photographed improperly.
The Chrome and Gloss Trap
Metallic bezels and glossy plastics are essentially mirrors. You cannot actually light a mirror. If you aim a strobe at a mirrored surface, the light bounces directly back into your camera lens. When you look at a beautiful image of a glossy smartphone or a polished metal laptop casing, you are not looking at lit metal. You are looking at a perfectly smooth white room reflecting off the metal. This is the hardest concept for new brand operators to grasp. You have to light the environment around the product, never the product itself.
Screen Glare and Washed Out UI
LCD and OLED screens emit their own light. Your photography strobes emit an incredibly powerful burst of external light. When these two collide, the external light always wins. The result is a washed-out, invisible screen with a massive white glare spot in the center. Photographing screens effectively requires tricking the camera into seeing both light sources perfectly balanced, which usually demands tedious post-production.
Texture Loss on Matte Hardware
Not every tech product is glossy. Many modern gadgets use matte black silicone or textured anodized aluminum. The problem here is the exact opposite of gloss. Matte black absorbs light aggressively. If you shoot a black smart home hub with flat, front-facing light, it turns into a two-dimensional dark void. You lose the industrial design lines. You lose the premium feel. To show texture, you need sharp directional lighting that creates micro-shadows across the material surface.
How to Photograph Electronics the Traditional Way
If you are committed to doing this physically with a camera, you need to abandon the idea of a simple point-and-shoot setup. Electronics demand a highly engineered physical environment.
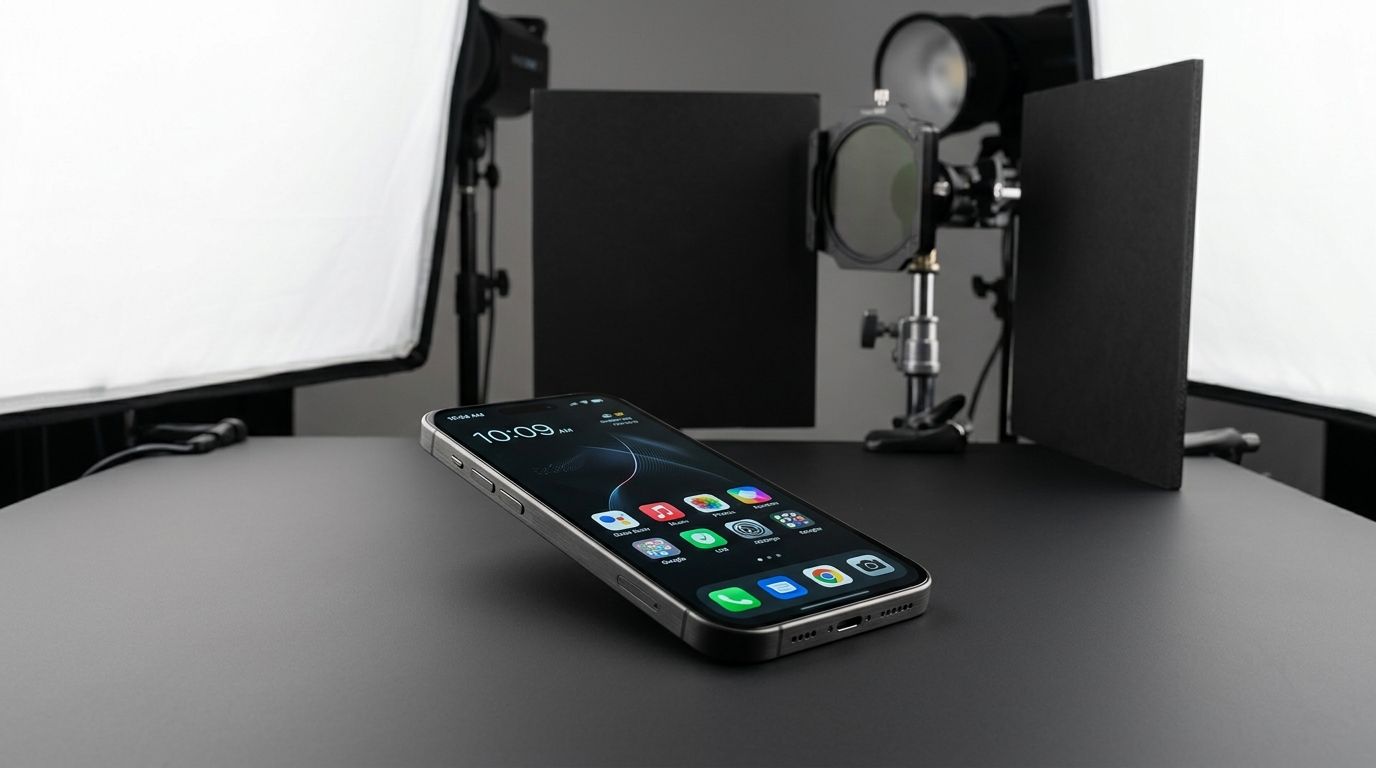
Building a Tunnel of Light
To stop glare on glossy hardware, you need to use massive diffusion panels. Place a sheer white diffusion material tightly over the product. Then, point your studio strobes through that diffusion material. This turns a harsh, tiny light bulb into a massive, soft glowing ceiling. The glossy product will reflect this soft ceiling instead of the bulb, resulting in a smooth gradient of light across the plastic.
You then have to manage the shadows. Understanding the nuances of how a proper lighting setup controls ecommerce glare is mandatory here. You will use pieces of black cardboard, known in the industry as flags, to block out unwanted reflections from the rest of the room. You literally build a dark box around your product, open only to your lens and your diffused light source.
The Double Exposure Screen Trick
You cannot capture the hardware and the glowing screen in a single click. The physics of camera sensors simply do not allow it. Instead, you lock your camera on a heavy tripod. You take one photo with your strobes firing to capture the physical device perfectly. Then, without touching the camera, you turn off all the room lights. You turn the device screen on. You take a second photo using a long exposure just to capture the glowing pixels. Later, you have to blend these two images together. If you lack Adobe subscriptions or advanced retouching skills, figuring out how to handle photo editing without expensive software becomes a severe operational bottleneck.
| Approach Type | Traditional Studio | AI Workflow |
|---|---|---|
| Lighting Control | Manual physical flags | Automated math |
| Turnaround | Multiple weeks | Minutes |
| Screen handling | Manual compositing | In-engine rendering |
Bypassing the Physics Problem Entirely
The brands getting the most results in the consumer electronics space right now are simply refusing to play the physical photography game. They are moving their catalog production to AI. Upload a flat product image, select a visual environment, and CherryShot AI generates campaign-ready photos in minutes. The reflection problem disappears completely because the engine renders the materials mathematically instead of capturing them physically.
When you let software handle the lighting math, you are no longer constrained to boring white studio sweeps. You can place your smart speaker on a marble kitchen counter bathed in morning light or drop your new wireless headphones onto a concrete desk. Choosing the right background context for your product drastically improves conversion rates, and AI lets you test dozens of environments without booking a location shoot.
(Worth noting: this is less about replacing photographers entirely and more about eliminating the scheduling dependency that adds three weeks to every product launch. A good photographer still makes sense for massive billboard hero imagery. For the volume of images required for product pages, email campaigns, and social media, the traditional math simply does not work anymore.)
To be entirely transparent, AI generation does have a limit when dealing with highly specific screen UI elements. If your product relies on showing exact pixel-perfect software interfaces displaying complex data on the device screen, you will likely still need to do a quick manual composite of that screen graphic over the final generated hardware image. The AI will nail the chassis, the reflections, and the environment perfectly, but highly specific typography on a tiny rendered screen often requires a human touch.
Frequently Asked Questions
How do I photograph electronics without reflections?
Control the environment around the product to eliminate reflections on glossy electronics. These surfaces act like mirrors that capture everything in the room, including your light sources. Use large diffusion panels to soften incoming light while placing black foam flags to block unwanted glare. Building this controlled light tunnel ensures that only soft, clean reflections touch your product surface, preventing the harsh white circles caused by direct flash.
What is the best way to photograph screens for ecommerce?
Use a double exposure technique to capture hardware and screens simultaneously. External lighting illuminates the product chassis, while the screen emits its own light during a secondary long exposure. Perform this on a locked tripod to keep your framing perfectly aligned. Overlaying these two images in editing creates a final shot where the hardware details remain sharp and the screen content appears bright, clear, and perfectly balanced against the device housing.
How do I photograph chrome electronics products?
Surround the chrome product with smooth, continuous white surfaces to achieve a clean look. You are photographing the reflections on the metal rather than the object itself. Aim your studio lights at these white surfaces to bounce soft illumination back onto the product. Using a light tent or curved diffusion paper helps create the high-end, polished metallic appearance typical of professional tech catalogs without picking up unwanted room clutter.
Can AI photograph electronics products?
AI rendering engines generate photorealistic reflections, shadows, and textures mathematically, bypassing traditional studio challenges. Upload a flat reference image to produce professional results without expensive polarization filters or complex physical lighting setups. This workflow turns manual, time-consuming tasks into a fast, automated process. It reduces the cost per image significantly while maintaining the high visual standards required for large electronics catalogs and modern digital storefronts.
What equipment do I need for electronics product photography?
Capture fine hardware details using a high-resolution camera paired with a reliable macro lens. A sturdy tripod remains essential to keep your framing locked for necessary compositing work. Supplement your camera gear with two continuous lights or strobes, large diffusion umbrellas, and various black and white foam boards for bouncing or blocking light. A circular polarizer filter helps reduce surface glare, providing better control over the final look of your electronics.
Key Takeaways
- Shooting electronics is an exercise in blocking reflections, not just adding light.
- Screens require a double exposure technique to balance the hardware and the glowing interface.
- Glossy surfaces and chrome cannot be lit directly and must reflect a clean white environment.
- AI product photography removes these physical constraints by rendering materials mathematically.
Audit your product images before your next campaign
Review your current catalog to identify where glare or poor screen rendering is hurting your brand credibility. You can quickly generate professional alternatives that eliminate these common visual errors using AI. Try it now to see the difference in your conversion metrics.
Try CherryShot AIStop paying commercial day rates just to watch a crew fiddle with black cardboard for three hours. The visual standard for tech products is incredibly high, but the method for achieving it has fundamentally changed. When you are ready to drop your per-image cost and launch your hardware faster, let CherryShot AI handle the heavy lifting for your catalog.