How to Make Products Look More Expensive in Photos: 11 Techniques
Buyers do not touch your product before they buy it. They only see the pixels on their screen. A fifty dollar moisturizer shot under flat overhead lighting looks exactly like a five dollar drugstore brand. That same ten dollar serum shot with tight directional lighting and heavy shadows suddenly looks like a luxury import. You make products look expensive by controlling shadows, isolating the subject in negative space, and removing visual clutter.
Definition
Perceived product value refers to the psychological impression of worth a customer forms based solely on visual presentation. By using specific lighting, staging, and composition techniques, brands can shift a customer's expectation from budget to premium status without altering the physical product.
Making a product look expensive is never about buying better camera gear. It is entirely about controlling the environment around the product. A luxury aesthetic requires you to stop illuminating everything in the frame. You have to start hiding parts of the product in shadow to create mystery and depth.
If your product looks cheap online, you are actively leaving money on the table. Shoppers anchor their price expectations to the visual presentation before they ever read your copy or look at your ingredient list.
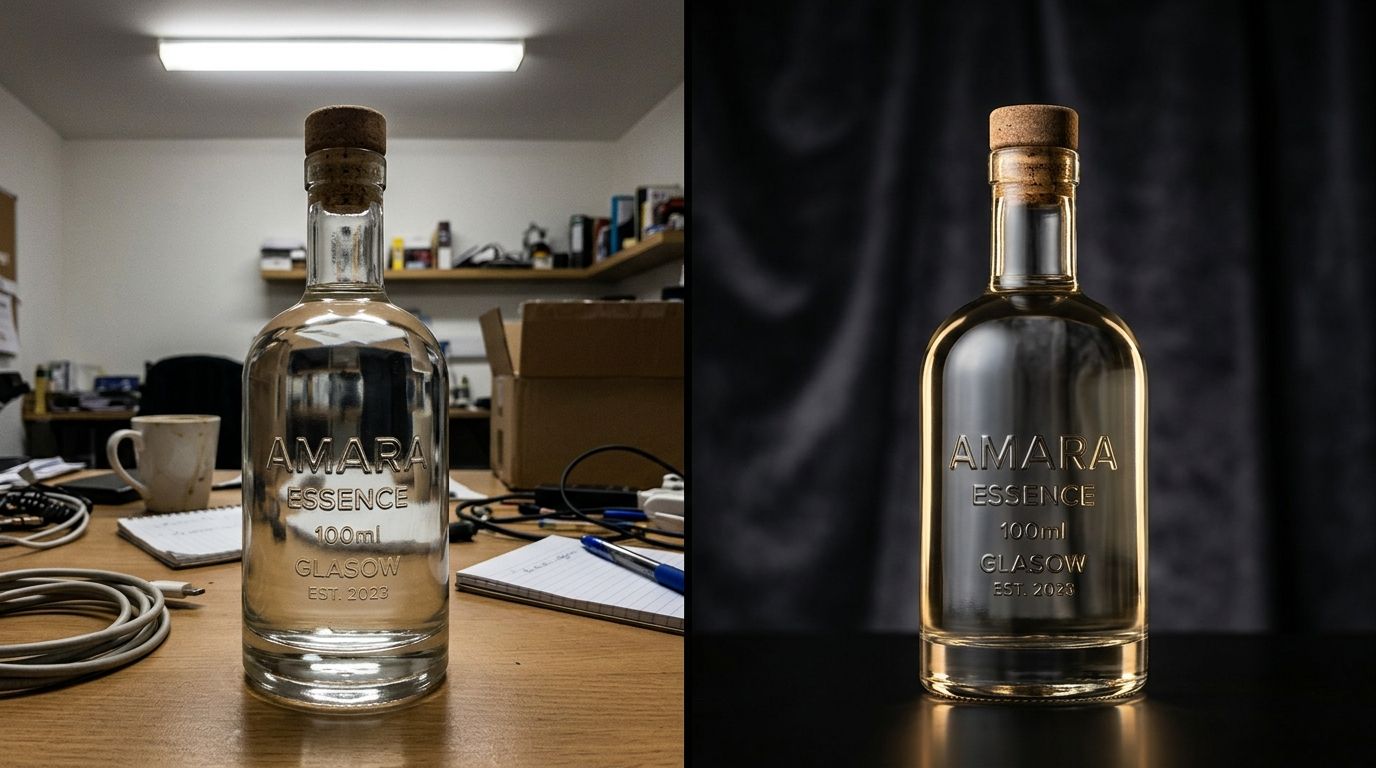
Dramatic shadows and minimalist staging instantly signal a higher price point without changing the physical product.
It is worth noting that you cannot fix a truly terrible label design with lighting alone. If the physical packaging is fundamentally flawed, photography can only mask so much. But for most decent products, the gap between their current perceived value and their potential perceived value is entirely driven by the photography.
The psychology of premium visual cues
Why do we automatically assume something is expensive just by looking at a photo? It comes down to visual scarcity. In retail psychology, scarcity translates to physical space. Walk into a discount warehouse and you will see products jammed onto shelves from floor to ceiling under blindingly bright lights. Walk into a high-end boutique and you will see a single handbag resting on a pedestal under a precise spotlight.
Your e-commerce photography must mimic the boutique experience. When you cram too many elements into a frame, you signal a discount mentality. When you give a product room to breathe, you signal that the item is valuable enough to command the entire stage.
| Strategy | Discount Look | Premium Look |
|---|---|---|
| Lighting | Flat/Overhead | Directional/Shadowed |
| Spacing | Cluttered/Tight | Negative Space |
| Environment | Pure White/Utility | Neutral/Textured |
| Angles | Straight-On | Hero Low-Angle |
The obvious trade-off here is that setting up a bespoke studio shot takes hours of tweaking bounce cards and manipulating flags. It is incredibly tedious work. You cannot just point a camera and press a button. You have to craft the light. Here are the precise ways to do exactly that.
11 techniques to elevate perceived value
1. Introduce deep directional shadows
Flat light kills value. When you blast a product with light from all sides, you erase its texture and shape. It ends up looking like a sticker pasted onto a background. To fix this, you need to rely on a single, strong light source from one side. Let the opposite side of the product fall into deep shadow. Getting this right requires an understanding of professional lighting setups, but the result is a dramatic image that looks rich and sophisticated.
2. Float the product in negative space
Do not crop your images tightly around the product. Pull the camera back. Give the item plenty of empty space on all sides. This negative space acts as a luxury frame. It tells the viewer's brain that the product does not need to shout to be noticed. It is confident enough to sit alone in the center of the frame.
3. Swap pure white for tonal neutrals
Pure white backgrounds are for Amazon listings. They are a utility requirement, not an aesthetic choice. If you want to build a brand identity that commands higher margins, you need impactful backgrounds that set a mood. Swap out the stark white for warm beige, cool slate, or charcoal. These subtle tones make the product colors pop while creating a much richer viewing experience.
4. Shoot from a hero angle
Position your lens slightly below the product and angle it upward. This is called the hero angle. It distorts the perspective just enough to make the product look monumental. Automobile manufacturers and luxury watchmakers have used this trick for decades. It makes a small desktop item feel like a towering piece of architecture.
5. Match light hardness to the material
Not all products require the same type of light. If you are shooting a leather bag or a textured fabric, you need hard light to highlight every grain and stitch. If you are shooting a glossy glass bottle, hard light will just create ugly white glare spots. For reflective items, you need massive, heavily diffused soft light that wraps around the curve of the glass smoothly.
6. Introduce architectural props
Ditch the scattered leaves, coffee beans, and wooden crates. Those elements belong in rustic lifestyle shots. For a premium look, you need a strategic use of props that focuses on geometry. Use marble plinths, concrete blocks, frosted acrylic blocks, or metal spheres. These architectural elements provide a rigid, structural contrast to your product without fighting for the viewer's attention.
7. Cool down your background tones
Warm backgrounds can sometimes feel cozy and approachable, which is great for everyday goods. But luxury often leans slightly cold. By cooling down the color temperature of your background environment while keeping your product properly color balanced, you create a striking separation. The product feels vibrant and alive while the environment feels clinical and precise.
8. Use deliberate reflections
Placing a product on a piece of black acrylic or glass creates an instant reflection. This grounds the product and adds a layer of complexity to the image. It is a classic cosmetic industry technique. Just ensure you are wiping away every single speck of dust before shooting, because glossy surfaces magnify tiny imperfections.
9. Limit the color palette
Expensive imagery rarely features more than three colors. Monochromatic setups are even better. If you are shooting a green bottle, shoot it on a darker green background with a lighter green prop. This monochromatic approach feels intentional and highly designed. Rainbow palettes confuse the eye and dilute the brand message.
10. Focus on microscopic detail
A buyer cannot touch the fabric or feel the weight of the metal. You have to prove the quality by getting extremely close. Take macro shots that show the perfection of a seam, the embossing on a logo, or the heavy texture of a cream. When you are brave enough to show your product up close, the customer assumes you have nothing to hide.
11. Remove human context in hero shots
Having a model hold the product is helpful for scale, but hands and faces often distract from the pure aesthetic of the item. For your main hero imagery, remove the human element entirely. Let the product stand completely on its own as an object of desire. Save the human interaction for secondary gallery images.
Using AI to cheat the luxury budget
Traditionally, executing those eleven techniques required a massive budget. You had to hire a specialized commercial photographer, rent a studio filled with expensive grip equipment, and buy heavy stone props. The invoice for a handful of luxury shots could easily clear five figures.
CherryShot AI changes this completely. Our platform allows you to bypass the physical constraints of a studio. You upload a basic, flat image of your product. You select our Luxury or Loud Luxury visual mode. Within minutes, the AI generates campaign ready photos featuring deep shadows, architectural props, and perfect negative space.
You get the premium visual positioning without the weeks of back and forth planning. When you can generate high-end imagery for pennies on the dollar, you can afford to test different aesthetics until you find the exact look that maximizes your conversion rate.
Audit your product page images before your next campaign
Review your top three bestsellers against the eleven techniques mentioned above. See which ones lack directional shadows or effective negative space, and try generating a premium version of your product photo using CherryShot AI to see the conversion impact.
Try CherryShot AIFrequently Asked Questions
What backgrounds make products look most expensive?
Textured neutrals and dark matte surfaces consistently signal luxury. Pure white backgrounds are entirely functional, and they suggest basic utility or mass-market retail. To elevate a product, use charcoal gray, warm beige, slate, or natural stone textures. These backgrounds absorb excess light and keep the visual focus entirely on the product itself. Choosing off-white or cream tones instead of stark digital white creates a significantly more sophisticated and premium visual baseline for your shop.
Does lighting affect how expensive products look?
Lighting is the single biggest factor in perceived product value. Flat and even lighting makes items look cheap because it removes all depth and texture. Premium photography relies on directional lighting that creates intentional shadows. These shadows give the product a three-dimensional feel and highlight the specific quality of the materials. When you master your lighting ratios, you control exactly how the customer perceives the price tag attached to your goods.
What angle makes products look most premium?
The hero angle is the gold standard for premium positioning. This technique involves shooting from slightly below the product while looking up. It mimics the perspective of looking at a towering piece of architecture. This angle makes the item appear larger, more authoritative, and more important. Straight-on angles work for standard catalog grids, but they rarely evoke a luxury feel on their own without the added height of a hero shot.
How do I make handmade products look professional?
You remove the rustic context. The biggest mistake makers commit is surrounding their handmade goods with craft supplies or messy workbenches. To make a handmade item look like a high-end boutique purchase, shoot it exactly like a factory-manufactured luxury good. Use clean backgrounds, minimal props, and sharp focus. The contrast between a perfectly clean environment and the organic texture of a handmade item instantly drives up the perceived value of your product.
Can AI make product photos look more expensive?
Yes, AI tools can instantly map professional lighting ratios and premium backgrounds onto standard images. Instead of spending hours adjusting lights and sourcing expensive stone props in a physical studio, you can upload a basic shot to a tool like CherryShot AI. By selecting a luxury visual mode, the AI generates the deep shadows, rich textures, and environmental context required to command a higher price point in minutes for your online catalog.