To photograph clothing for an online store, you must steam the garment, position it on a model or flat surface, light it evenly to reveal fabric texture, and capture front, back, and detail angles. AI product photography platforms now compress this entire workflow, allowing you to upload a basic flat lay and generate realistic on-model campaign images in minutes. Any brand still running a full commercial studio shoot for basic catalog updates in 2026 is paying for logistics rather than visual quality.
The most effective clothing ecommerce photography setup uses a continuous lighting kit with large softboxes, a clean white backdrop, and a 50mm or 85mm lens to prevent edge distortion. High conversion rates demand a minimum of four specific images per garment: a full-length front view, a back view, a macro fabric detail shot, and an on-model lifestyle image.
Key Takeaways
- Steam and lint-roll every garment before shooting to cut post-production retouching time by half.
- Use a 50mm or 85mm camera lens to capture accurate proportions without wide-angle distortion.
- Capture four essential angles per item to reduce return rates caused by poor fit expectations.
- AI photography platforms replace traditional studio overhead by turning flat apparel photos into on-model imagery.
of shoppers cite product imagery as the most influential factor in their purchasing decisions. Salsify Consumer Research, 2024
Choosing the Right Apparel Presentation Style
Shooting apparel requires deciding how the garment will hold its shape for the camera. Customers need to understand the drape, fit, and cut of the fabric before they feel confident enough to click the checkout button. You have three primary methods to showcase these critical details on your product pages.
Clothing Flat Lay Photography
Clothing flat lay photography works well for rigid items like raw denim jeans, structured jackets, or basic graphic t-shirts. You lay the garment flat on a clean surface, position the camera directly above facing downward, and meticulously arrange the sleeves to show the natural cut of the pattern. You must stuff the inside of the garment with tissue paper to give it slight volume, which prevents the clothing from looking entirely two-dimensional. This method is incredibly fast for high-volume catalog shoots but ultimately fails to show how the garment moves when worn.
(Worth noting: I prefer using seamless paper rolls over fabric backdrops for flat lays because paper entirely eliminates the need to iron the background between setups.)
Ghost Mannequin Clothing Photography
Ghost mannequin clothing photography solves the movement and volume problem by placing the item on a specialized modular mannequin with removable neck and arm pieces. The photographer takes two photos. The first shot captures the garment on the mannequin. The second shot captures the garment inside out to expose the inner collar and sizing tags. A retoucher then blends these two images together in post-production. The final result is a three-dimensional hollow shape that perfectly highlights the intended fit without the distraction of a model.
This approach dominates athletic wear and technical outerwear categories where structural details matter more than styling context. It demands strict consistency in camera height and lighting to ensure every product aligns perfectly when displayed on a category grid page.
On Model Clothing Photography
Showing apparel on a human figure remains the absolute strongest driver of e-commerce conversion. On model clothing photography provides instant scale and lifestyle context that mannequins simply cannot replicate. A shopper looking at a midi dress needs to see exactly where the hem hits the calf on a real person. Booking professional models, renting commercial studio space, and hiring hair and makeup teams rapidly inflates a marketing budget. A standard e-commerce collection requires 4 to 6 angles per SKU, which limits a traditional photography team to processing roughly 40 garments per day.
This daily cap creates a severe operational bottleneck during seasonal apparel launches.
Instead of managing complex shoot days, modern operators use AI to bridge the gap between simple flat lays and expensive model shoots. With platforms like CherryShot AI, you upload a basic photo of your garment lying flat or hanging on a simple rack. You select a specific AI model and define a visual mode, and the system generates photorealistic on-model imagery. This workflow removes the entire physical studio dependency while delivering the high-conversion lifestyle context your product pages desperately need.
Essential Equipment and Lighting Setup
Your studio gear dictates your baseline image quality. You do not need expensive cinema-grade equipment to learn how to take clothing photos for online selling, but you absolutely need tools that capture accurate color and fine texture.
Camera and Lens Selection
Mirrorless cameras dominate modern clothing e-commerce photography. A standard 24-megapixel sensor provides more than enough resolution to support the deep zoom features expected by modern online shoppers. The lens matters far more than the camera body. Wide-angle lenses distort human proportions, making shoulders look unusually broad and legs look disproportionately short. You must stick to a 50mm or 85mm focal length to capture the garment exactly as the human eye naturally perceives it.
Keep your camera aperture set between f/8 and f/11. This specific range ensures the entire garment remains perfectly sharp from the front buttons all the way to the back seams.
Lighting Configurations for Apparel
Fabric absorbs and reflects light entirely differently depending on the complexity of its weave. A silk slip dress requires soft and diffused lighting to highlight its subtle sheen, while a chunky wool sweater requires directional light to emphasize the deep knit texture. Continuous LED lighting kits are ideal for beginners because they allow you to see exactly how the shadows fall across the garment before you press the shutter.
Set up two large softboxes at a 45-degree angle pointing toward the garment. This classic cross-lighting configuration eliminates harsh, unflattering shadows while retaining just enough subtle contrast to show the depth and weight of the fabric. Add a white reflector panel near the floor to bounce ambient light back up under the garment, which prevents the lower hemlines from disappearing into dark shadows.
Preparation and Styling Workflows
Wrinkles completely destroy the perceived monetary value of a garment. Proper physical preparation is the most tedious phase of any fashion product photography guide, but rushing through it multiplies your post-production retouching costs exponentially.
Steaming, Pinning, and Prepping
Keep a commercial-grade standing steamer active on set at all times. Steam every single piece immediately before it goes on the model or the flat lay surface. Once the garment is placed, use styling clips and discrete double-sided tape to adjust the fit. If a shirt runs slightly large on a mannequin, gather the excess fabric at the back and clip it tightly. The front view will then look perfectly tailored and sharp.
Do not alter the garment so aggressively that the resulting photo misrepresents the actual consumer fit.
Ensure you document these specific on-set adjustments so your copywriting team knows if a product description needs to explicitly mention sizing quirks or fit recommendations. Organizing your shooting schedule by color also saves tremendous time, as jumping back and forth between bright white linen and deep black velvet forces constant lighting recalibrations.
Scaling with AI Photography Tools
Once the physical preparation is complete, capturing the base image is straightforward. The challenge lies in contextualizing that base image for the consumer. By integrating CherryShot AI into this workflow, brands drastically reduce the time spent styling models and adjusting complex lighting setups. You simply capture the clean, well-lit base image of the prepped garment and let the software handle the lifestyle integration.
This allows a lean team of two people to output the visual equivalent of a massive commercial fashion shoot in a single afternoon.
Post-Production and Image Standards
Getting the initial shot is only half the battle. Online stores require rigid visual consistency across every single thumbnail in the catalog grid.
Color Correction and Alignment
Color inaccuracy is a leading cause of e-commerce returns. If a navy blue sweater looks black on a mobile screen, frustrated buyers will return it. Shoot with a standardized color checker card in your very first frame to establish an accurate white balance baseline for the rest of the batch. During post-production, ensure your background color hits a pure white hex code (#FFFFFF) to comply with automated Google Shopping and Amazon marketplace requirements.
Crop all your final images to the exact same aspect ratio, typically 3:4 for fashion items. Align the subject so the shoulders or hemlines match perfectly when a customer scrolls rapidly through your main category page. Consistent alignment signals professionalism and trust to the buyer.
Frequently Asked Questions
Should I use a mannequin or model for clothing photos?
Models drive higher conversion rates because they provide scale, fit context, and lifestyle appeal. Mannequins remain cost-effective for high-volume technical apparel but lack the emotional connection required for fashion sales. Many brands now use AI tools to turn basic mannequin shots into on-model photos to secure the best of both approaches.
How do I photograph dark colored clothing clearly?
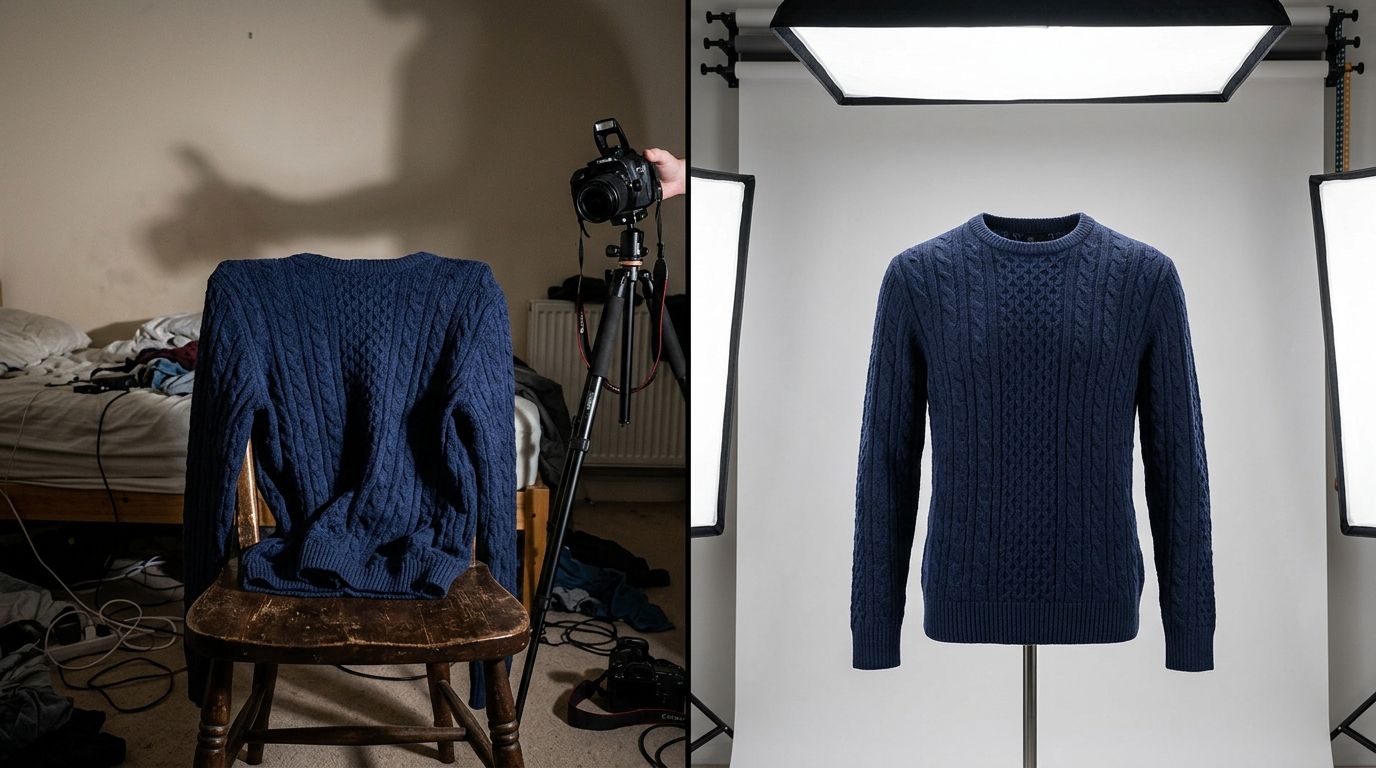
Use a white or silver reflector to bounce light directly into the shadows of the dark fabric. You must increase your exposure slightly and position your primary light at a steeper angle to highlight the texture of the material, which prevents black garments from looking like flat ink spots on the screen.
What is the best background for clothing product photos?
A pure white or light gray seamless paper sweep is the industry standard for clothing product photos.
How many photos do I need per clothing item?
You need a minimum of four images per garment. Your sequence must include a full-length front view, a full-length back view, a detailed macro shot of the fabric or hardware, and a styled lifestyle shot. Providing fewer than four angles leaves customers guessing about the fit, which directly increases your return rate and lowers overall trust in the brand.
If you want to see how fast you can turn basic flat lays into campaign-ready model shots for your own apparel line, CherryShot AI starts at $10 for 50 images at cherryshot.ai.
