How to Photograph Products With a White Background at Home
Achieving clean white background product photography at home requires more preparation than actual gear. You need to control how light falls on your subject versus the backdrop to prevent gray, muddy tones. While expensive studio lights are the industry standard, you can replicate these results with careful placement of natural light or simple diffusion materials. The primary goal is consistent exposure across every shot in your catalog.
Definition
White background product photography involves isolating an item against a neutral, high-key backdrop to ensure the product remains the sole focus. This technique is the foundation of ecommerce visual standards, requiring precise control over lighting to avoid shadows and background contamination.
Setting Up Your Home Studio
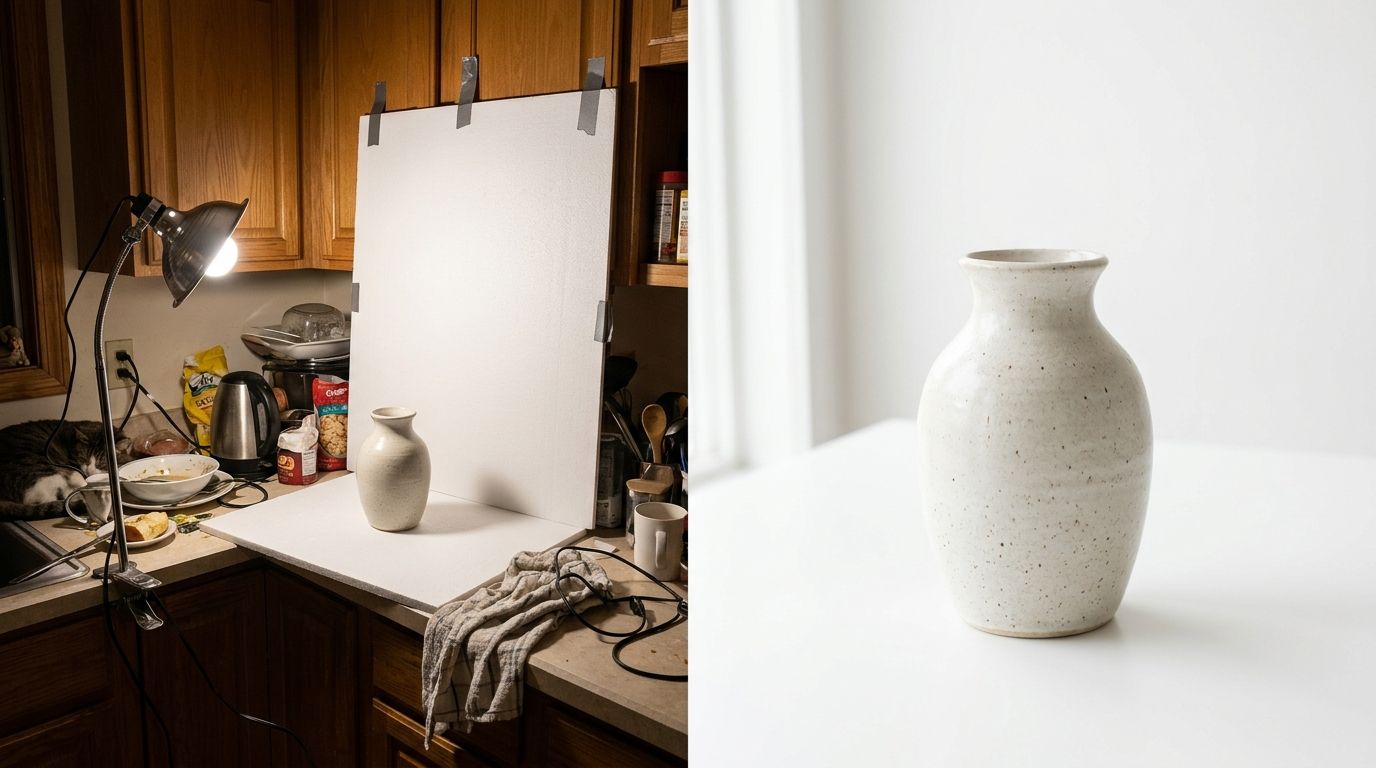
The space you choose dictates the quality of your output. A window with indirect sunlight is the best starting point for a budget-friendly setup. Avoid direct sun, as the harsh rays create uncontrollable contrast that ruins the crisp, clean look you are trying to achieve.
Essential Tools for the Job
You need a sturdy surface and a sweep. A sweep is simply a piece of white poster board or fabric that curves from the wall to the table. This eliminates the hard horizon line that often appears behind products. If you find your results lack the professional polish you see on major sites, remember that learning how to take good photos without a professional often comes down to mastering these physical foundations before you worry about expensive camera bodies.
Lighting Principles for Ecommerce
Lighting is the biggest variable in your workflow. If you want a consistent look for your store, you must have a repeatable lighting setup for ecommerce sellers that you can recreate every time you add a new SKU. Using a simple diffusion cloth over your light source prevents harsh specular highlights, which are the main culprits behind blown-out or distorted product edges.
| Tool | Primary Use | Budget Impact |
|---|---|---|
| White Foam Board | Reflects light to fill shadows | Minimal |
| White Seamless Paper | Creates the clean background | Low |
| Tripod | Maintains consistent framing | Moderate |
| Diffusion Cloth | Softens harsh light sources | Low |
Even with the right gear, your time is your most limited resource. If you find yourself spending more time on logistics than the actual business, you might consider alternatives. Many founders reach a point where they realize their time is better spent on growth than on managing physical sets.
Frequently Asked Questions
What do I need to photograph products on a white background at home?
You need a stable surface, a piece of white seamless paper or a clean sweep board, and a consistent light source. Diffused natural light from a window works well, but a desk lamp with a white lampshade provides better control. Use a tripod to keep your framing steady while you manage your exposure settings. Keep your workspace clear of clutter to minimize color reflection onto your items.
How do I get a pure white background without overexposing the product?
Separate your product from the background to prevent spillover light from washing out your details. Move the product further away from the backdrop so the light hits the background independently of the subject. Adjust your camera exposure to focus on the highlights of your product rather than the white surface. Use manual exposure settings to lock in the detail while allowing the background to drop into a clean bright white.
Is a lightbox worth buying for home product photography?
A lightbox offers a quick path to even, shadowless lighting if you sell small, static items like jewelry or collectibles. It simplifies the setup by containing the light within a reflective shell. However, it often limits your ability to create dynamic shadows or high-end artistic looks. Experienced sellers often find that understanding when DIY product photography makes sense is more valuable than owning specialized gear.
Can I achieve white background photos with just my phone?
Modern mobile sensors are more than capable of producing high-quality imagery when lighting is managed correctly. You must avoid digital zoom and rely on natural window light to keep noise to a minimum. Apps that allow manual control over shutter speed and white balance provide the precision needed for a clean look. Most successful sellers today handle product photography with an iPhone by keeping their compositions simple and light consistent.
Key Takeaways
- Use a curved sweep to eliminate the horizon line behind products.
- Control your distance between the subject and background to maintain exposure balance.
- Prioritize consistent lighting over expensive gear to keep your brand aesthetic unified.
- Leverage manual settings to avoid digital noise in your final export.
Streamline your product imagery today
If you are tired of spending entire afternoons on studio setups and still fighting with your lighting, it might be time to rethink your process. CherryShot AI allows you to get professional, campaign-ready product shots without the manual labor of a physical home studio.
Try CherryShot AIWhether you choose to build out a home studio or use CherryShot AI to automate the process, the goal remains the same: a clean, professional product catalog that drives conversions.