Product Photography for Crowdfunding: How to Shoot for Kickstarter and Indiegogo
Crowdfunding backers do not fund ideas. They fund the illusion of a finished product. If your product photography for Kickstarter looks like a weekend garage experiment, your campaign will fail. You need crisp hero shots, rich lifestyle context, and macro details that prove your prototype is ready for the factory line.
Definition
Crowdfunding product photography is the production of visual assets for pre-launch campaign pages. It focuses on demonstrating the viability and scale of a physical prototype before mass manufacturing begins.
The core challenge is physical reality. You likely have exactly one working prototype. It might be taped together on the inside or printed in a brittle resin. Taking that single fragile unit out to a cafe, a mountain trail, and a luxury kitchen for lifestyle context is a logistical disaster waiting to happen. If you drop it on a rock during a location shoot, your entire campaign timeline stops dead.
(To be fair to traditional studios, a brilliant photographer can light a rough 3D print to look like seamless injection-molded plastic. The trade-off is paying $2,500 for a day rate when that money should be going straight into your pre-launch ad budget.)
This is where pre-production product photography breaks the standard ecommerce rules. You cannot wait for final inventory. You have to build absolute visual trust using an object that is barely holding together.
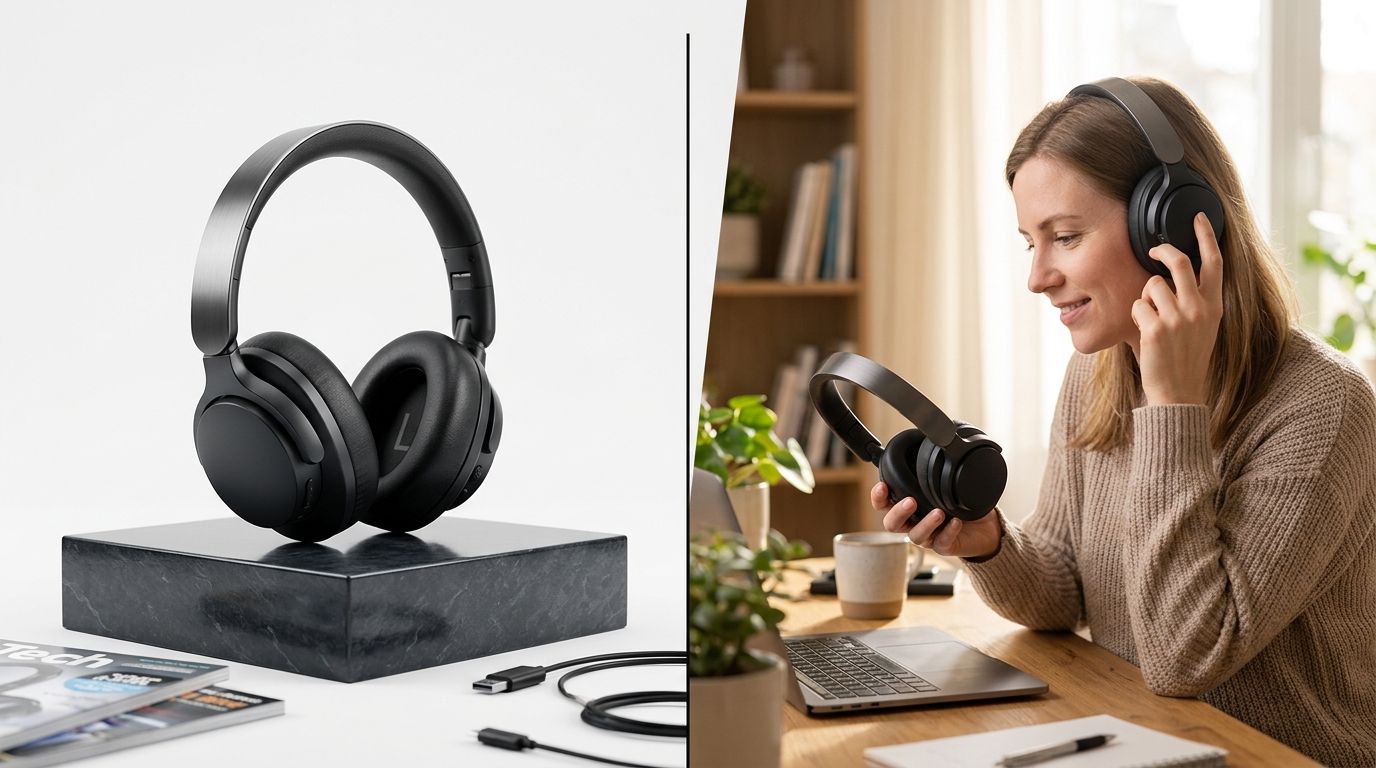
A campaign-ready product image placing a pre-production hardware prototype into a natural lifestyle setting.
Why crowdfunding visual storytelling breaks traditional production timelines
Running a successful Kickstarter or Indiegogo campaign requires you to collect leads for at least thirty days before you press the launch button. To run those lead-generation ads, you need compelling creative assets.
This means your product photos must be finalized forty-five days before your campaign even starts.
Hardware founders know the pain of this timeline. Your final aesthetics-like prototype usually arrives twenty days before launch. You do not have three weeks to wait for a freelance photographer to book a studio, shoot the unit, edit the photos, and send back a gallery. The moment you have a physical object in your hands, you need to prepare product images for launch almost instantly.
| Feature | Studio Shoot | AI Production |
|---|---|---|
| Turnaround Time | 2-3 weeks | Same day |
| Cost | $2,500+ | <$50 |
| Risk to Prototype | High (shipping/handling) | Low (single capture) |
The traditional method involves booking a studio tentatively, hoping the factory ships the prototype on time, and praying the shipping carrier does not lose the single box that holds your company's future. When the unit arrives, a team carefully places it on a sweep to get basic white-background shots. They then carry it to a rented Airbnb to try and capture the product in use. It takes days. It costs thousands. It leaves zero room for error.
The ultimate kickstarter product photos shot list
When you are selling a promise, you cannot leave any visual questions unanswered. A backer scrolling your campaign page is actively looking for a reason not to trust you. If they cannot tell how big the device is, they leave. If they cannot see how the ports align, they leave. Your shot list must be exhaustive.
The high-contrast hero product shot
This is the image that lives at the top of your campaign. It is the thumbnail on the platform discovery page. It needs to be perfectly lit, sharply in focus from edge to edge, and placed on a clean background that contrasts heavily with your product color. Do not get overly artistic here. The goal is absolute clarity. If you want to understand exactly what makes product photos convert at the top of a funnel, it always starts with an unobstructed view of the item.
Lifestyle context crowdfunding imagery
A hero shot tells the backer what the object is. A lifestyle shot tells them where it belongs in their life. If you are launching a high-end coffee grinder, we need to see it on a marble countertop next to a premium espresso machine. If you are launching a rugged travel backpack, we need to see it sitting on a train platform or a rocky trail. These images do the heavy emotional lifting for your campaign.
The human scale reference
Never assume a backer reads your technical specifications. You can list the dimensions in bold text, and people will still ask how big it is in the comments. You must include at least one photo showing a human hand interacting with the product. A hand holding the device, a finger pressing a button, or a person wearing the item immediately grounds the abstract concept in physical reality.
The macro texture shot
Prototypes often look flat in standard photography. To prove that you have thought about the manufacturing details, you need macro shots. Get the camera incredibly close to the surface. Show the knurling on a dial, the weave of a fabric, or the precision of a machined edge. This tells the backer you are obsessed with quality.
Solving prototype photography with AI
Because of the single-unit problem, bringing artificial intelligence into pre-production product photography is a massive advantage.
Instead of taking your delicate 3D-printed prototype to the beach, you take one clear, evenly lit photo of it on your desk. You ensure the angle is correct and the core features are visible.
You upload that single base image to CherryShot AI. You select a visual mode like Lifestyle, Minimalist, or Influencer. Within minutes, the AI generates campaign-ready photos placing your exact product into dozens of different premium environments. The shadows match. The lighting integrates flawlessly. The per-image cost drops from a freelance day rate down to under $5.
This completely changes the math of a product launch. You no longer have to guess which background will resonate with your audience. You can generate ten different settings, run them as split tests in your pre-launch ads, and let the data tell you which aesthetic gets the cheapest email signups. You can take good photos without a pro by focusing purely on capturing a clean base image and letting the software handle the set design and environmental lighting.
Navigating platform rules for pre-production imagery
Both Kickstarter and Indiegogo have strict rules about misleading backers. You have to be honest about the state of your project. If you are photographing a prototype, it is best practice to label it as a prototype in your campaign text.
When using AI for indiegogo product images, the line is very clear. You cannot use AI to generate a product that does not exist. You cannot use software to add a screen to a device that currently has no screen. You cannot fake functionality.
However, using AI to replace the background, adjust the environmental lighting, and provide lifestyle context for a real photograph of your actual prototype is perfectly valid and widely practiced. It is no different than a traditional photographer using Photoshop to composite a studio shot onto a stock photo of a kitchen. The core requirement is that the product itself is an honest representation of what you currently have in your hands.
Maximizing your launch budget
Most founders underfund their marketing and overfund their initial production runs. They spend thousands on a studio shoot because they think it is the only way to look professional.
The reality is that your backer does not care how much you paid for your photos. They only care about what the photos communicate. If an image clearly shows the product, establishes its scale, and places it in a relatable context, it has done its job.
By utilizing AI product photography for the heavy lifting of lifestyle and contextual shots, you can reserve your actual cash budget for paid acquisition. You generate the imagery in an afternoon instead of waiting three weeks for a studio delivery. You launch on time. You test multiple angles. You shift the bottleneck from waiting on logistics to executing your actual marketing strategy.
Key Takeaways
- Campaign assets must be ready 45 days before launch to support pre-campaign lead generation ads.
- A complete shot list includes a clear hero image, lifestyle context, human scale reference, and macro texture details.
- Shooting a single fragile prototype on location is an unnecessary risk that can derail an entire launch timeline.
- Using AI to generate lifestyle environments around a clean desk photo of your prototype reduces visual production costs to almost zero.
Audit your product page images before your next campaign
Review your current prototype shots to ensure they clearly communicate scale and intended use cases. If you find gaps in your visual storytelling, you can quickly generate missing lifestyle context using CherryShot AI.
Try CherryShot AIFrequently Asked Questions
What product photos do I need for a Kickstarter campaign?
A standard crowdfunding campaign requires four to six hero images on a clean background, ten to fifteen lifestyle context shots, and three to five macro detail shots. These images fill your campaign page, backer updates, and pre-launch advertising slots. Having a clear scale reference shot remains vital for managing backer expectations before they commit their funds.
Can I use AI-generated images on Kickstarter?
Kickstarter allows AI tools provided they do not mislead backers regarding the physical state of your project. You must accurately represent the current prototype rather than faking features or non-existent functionality. Practitioners use these tools to swap backgrounds, refine lighting, and build professional environments around authentic base photos of their real equipment.
How do I photograph a prototype for crowdfunding?
Photographing a prototype requires soft, diffused lighting to minimize visible imperfections like layer lines or rough edges. You should shoot slightly underexposed to preserve subtle surface textures that bright light often washes out. Keeping physical handling to a minimum prevents accidental breakage of fragile units during your capture process.
What images convert best on crowdfunding campaigns?
High-contrast lifestyle shots that demonstrate the product solving a specific problem drive the highest conversion rates. Potential backers look for proof that the item fits into their daily routines. A clean, brightly lit hero shot against a simple background serves as your campaign thumbnail, which acts as the primary driver for incoming traffic from browsing potential backers.
How much does photography for a Kickstarter campaign cost?
Professional studio photography for crowdfunding launches often ranges from $2,500 to $6,000 depending on studio rentals and specialized styling. Campaigns using a single prototype combined with AI environment generation frequently reduce these production costs to under $50. This shift allows teams to redirect saved capital toward performance marketing and paid acquisition.
Stop letting a single fragile prototype hold your marketing timeline hostage. When you need high-end campaign assets but only have a desk and a camera phone, CherryShot AI turns your basic captures into a complete, professional shot list in minutes.