Product Photography with iPhone: The 2026 Setup That Produces Marketable Images (and When to Use AI Instead)
Yes, you can use your iPhone for professional product photography. The lens currently sitting in your pocket is fully capable of capturing images that hold their own on any Shopify store or Amazon listing. The barrier to good photography is almost never the camera. The barrier is lighting, staging, and controlling shadows. If you place a skincare bottle on your kitchen counter under warm overhead lights, the newest iPhone will simply capture a very high-resolution photo of a terrible setup.
Definition
Smartphone product photography is the practice of using a mobile device to capture commercial-grade images for ecommerce storefronts. It relies heavily on natural light manipulation, physical stabilization, and computational processing to produce flat, evenly exposed catalog assets.
Many founders assume they need to spend two thousand dollars on a DSLR camera before they can launch. This is the wrong place to invest. An iPhone on a cheap tripod with good window light will beat a professional camera used poorly every single time.
Why the camera in your pocket is usually enough
A traditional studio shoot gives you absolute control. Professional photographers use large strobes, diffusers, and specific lenses to shape light perfectly around an object. When you shoot on an iPhone, you are relying heavily on computational photography. The phone is taking multiple photos the second you press the shutter and blending them together to balance the bright spots and the dark shadows.
For ecommerce catalog photos, this computational blending is usually exactly what you want. It keeps the text on your packaging sharp. It keeps the colors vibrant. It creates a flat, evenly exposed image that shows the customer exactly what they are buying.
(Worth noting: trying to fake a complex lifestyle background in your living room usually takes three times longer than just shooting the item against a blank wall and fixing it in post-production.)
The one major trade-off with iPhone photography
The clear limitation of shooting products on a phone is depth of field. A professional camera creates a natural, creamy blur behind the subject because of the physical size of the lens and the sensor. An iPhone fakes this blur using software.
If you turn on Portrait Mode to photograph a bottle of hot sauce, the phone has to guess where the bottle ends and the background begins. It often guesses wrong. It blurs the edges of the cap. It blurs the corners of the label. For standard catalog shots, this artificial blur makes the image look immediately amateur. Never use Portrait Mode for a clean product listing. Stick to the standard photo mode and rely on sharp details.
The 2026 iPhone product photography setup
Great product photos require a highly specific environment. You do not need expensive gear, but you do need strict rules about the light hitting your product. A basic setup requires three things. You need a dominant light source, a way to soften that light, and a way to bounce the shadows back.
Stop buying ring lights for product photography. Ring lights are designed for human faces. If you point a ring light at a glossy box or a glass jar, you will get a harsh, circular white reflection right in the middle of your label. Your best light source is a large window on an overcast day.
Set a table next to that window. Turn off every other light in the room. If you mix the daylight coming from the window with the yellow light bulb in your ceiling, your camera will get confused. The colors on your product will look muddy. Getting the right mix of light is the core of any essential photography setup. Keep it to one light source.
Managing shadows with foam board
If the window is on the left side of your product, the right side of your product will be covered in dark shadows. Go to a craft store and buy two pieces of white foam board. Prop one piece of foam board up on the right side of the product, facing the window. The sunlight will hit the white board and bounce back onto the dark side of your product. This fills in the shadows and creates an even, professional exposure without buying a second light.
The exact iPhone settings for product photos
Opening the camera app and pressing a button will not give you consistency. If you shoot twenty items, the phone will auto-adjust the brightness for every single one based on the color of the packaging. You will end up with a catalog that looks chaotic.
First, open your iPhone settings, navigate to the Camera section, and turn on the Grid. This places faint lines across your screen. Use these lines to ensure the table edge behind your product is perfectly straight.
Second, clean your lens. A smudge from your fingerprint will cause the light to streak across the image. It sounds obvious, but skipping this step ruins hundreds of DIY shoots.
Locking focus and exposure
When you line up your shot, tap the screen exactly where the brand name sits on your product. Hold your finger there for two seconds until a yellow box appears that says AE/AF Lock. This locks the auto-exposure and auto-focus. Now, if a cloud moves outside your window, the camera will not suddenly darken the image.
Next to that yellow box, you will see a small sun icon. Drag that sun icon slightly down. iPhones naturally try to make photos brighter than they need to be. By pulling the exposure down just a little bit, you preserve the rich colors and fine details in the highlights.
When to use your iPhone and when to use AI
Your iPhone is the perfect tool for capturing the product itself. It records the exact shape of your bottle, the true color of your fabric, and the specific texture of your packaging. Where the DIY approach fails is building the environment around that product.
Sourcing props, buying marble tiles, finding the right flowers, and setting up complex lifestyle scenes takes hours. If you are shooting reflective surfaces like metal watches or jewelry, capturing them perfectly on a phone is nearly impossible. This is exactly when DIY product photography has its limits. Your phone ends up reflecting in the silver, ruining the shot.
The most efficient workflow for modern brands is a hybrid approach. You shoot a very clean, simple image of your product with your iPhone against a blank wall or a piece of white poster board. You do not worry about styling. You just worry about getting the item in focus.
| Production Element | Pure iPhone Setup | iPhone + AI Workflow |
|---|---|---|
| Background Environment | Limited to your physical location | Any commercial or lifestyle setting |
| Prop Sourcing | Requires buying physical items | Generated digitally on demand |
| Setup Time | Hours of styling and arranging | Minutes to shoot a flat base image |
| Reflective Products | Difficult to avoid room reflections | Cleanly isolated in post-production |
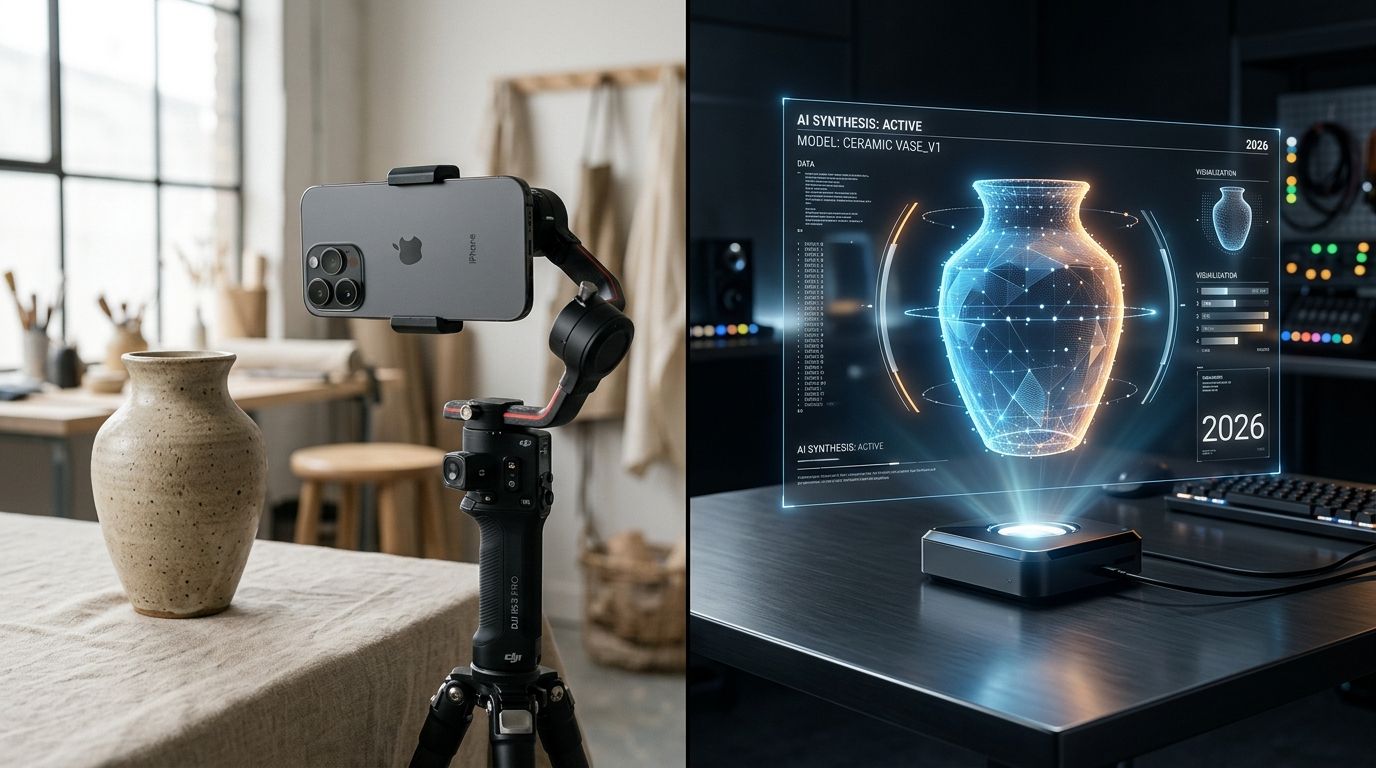
Generating campaign assets in minutes
Once you have that flat iPhone shot, you upload it to CherryShot AI. The software analyzes the image, isolates your product perfectly, and builds an entirely new environment around it. You can select the Lifestyle mode to drop your skincare jar onto a sunlit bathroom counter. You can choose the Minimalist mode to float your electronics over geometric podiums.
Understanding what makes product photos convert means recognizing that customers buy based on the feeling of the environment, not just the item itself. CherryShot AI gives you those high-end environments without the cost of renting a studio. Starting at $10 for 50 images, it turns a thirty-second iPhone snap into a marketing asset that looks like it took a crew of three people all morning to build.
Key Takeaways
- The camera quality is rarely the problem. Lighting and staging dictate the professional look.
- Turn off room lights and rely entirely on a single window with a bounce board to eliminate muddy colors.
- Never use Portrait Mode for standard catalog shots because it blurs critical edges.
- Use your iPhone for the simple base photo and use AI tools to generate the complex lifestyle backgrounds.
Frequently Asked Questions
Can I use my iPhone for product photography?
Modern iPhone lenses capture more than enough detail and resolution for professional Shopify or Amazon listings. The actual difference between an amateur snapshot and a commercial image comes down to controlling the environmental lighting rather than the camera sensor itself. Mount your device on a heavy tripod and bounce natural window light across the product using white foam board to fill in harsh shadows.
What iPhone settings work best for product photography?
Disable the built-in flash and activate the grid overlay in your camera settings to ensure straight horizon lines. Locking the focus and exposure prevents the device from automatically adjusting brightness mid-shoot if environmental conditions fluctuate. Press and hold your finger on the main subject on your screen until the yellow AE/AF Lock box appears, then drag the sun icon down slightly to preserve highlight details.
Is iPhone product photography good enough for Amazon or Shopify?
Modern iPhone cameras comfortably exceed the minimum resolution and pixel density requirements for strict Amazon product listings. The primary challenge for marketplace compliance involves achieving a pure white background without casting deep, distracting shadows from the object. Shoot the physical item against a clean neutral wall, then process the file through background removal software to achieve the exact RGB value required by the platform.
What products can I photograph well with an iPhone?
Flat lay apparel, packaged cosmetics, books, and matte ceramics perform exceptionally well when photographed with a smartphone. Problems arise with highly reflective surfaces because the wide lens captures the entire room environment, including the person taking the photo. Avoid shooting items like mirror-finish watches or silver jewelry with a phone, as the device itself will inevitably appear as a dark rectangle reflecting directly in the glass.
How do I use AI to improve my iPhone product photos?
The most effective workflow combines an iPhone for capturing the physical item and AI software for generating the surrounding environment. This approach isolates the crisp details of your physical packaging while eliminating the high costs of renting commercial studios or sourcing lifestyle props. Photograph your item straight on against a blank wall, then upload the file to CherryShot AI to place the object onto a sunlit bathroom counter or geometric podium.
The days of delaying a product launch for three weeks because you cannot book a studio are over. Get your lighting right, capture the raw details with your iPhone, and let CherryShot AI handle the rest.
Test your base image against a virtual studio right now
You do not need a massive catalog to see if this workflow fits your brand. Take a single flat photo of your product against a blank wall using the locked exposure settings discussed above. Upload it to CherryShot AI to drop it into a fully lit commercial environment and compare the results.
Try CherryShot AI