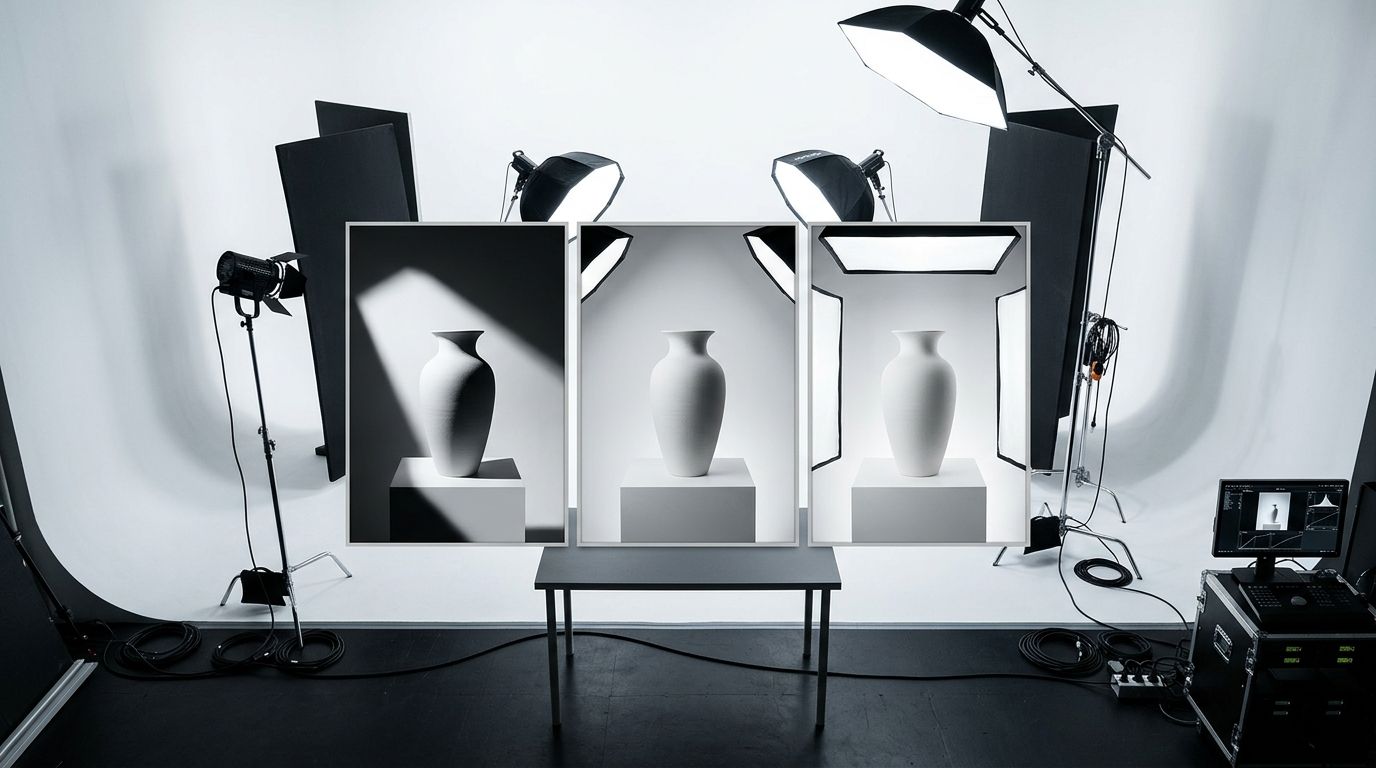
Product Photography Lighting Setup: The 3-Light, 2-Light, and 1-Light Setups Ranked for Ecommerce
The best product photography lighting setup for most ecommerce brands is a two-light configuration. It gives you a key light for shape and a fill light to control shadows, striking the perfect balance between quality and cost. But honestly, if you are agonizing over light stands and softboxes for standard catalog shots in 2026, you are solving the wrong problem.
Definition
A product photography lighting setup is the specific arrangement of physical lights, modifiers, and reflectors used to illuminate an item for ecommerce. This configuration determines the shape, texture, and background separation visible in the final image. Standard setups range from a single modified light source to complex three-point studio grids.
Most founders I talk to drastically overestimate how much gear they need to sell products online. They buy massive studio strobes they do not know how to sync. They set up three-point lighting grids in their living rooms. They spend forty-five minutes moving a backlight two inches to the left just to get a slightly better rim light on a shampoo bottle.
This is a colossal waste of margin and momentum. I have sat through enough studio shoots to know that lighting tweaks are the single biggest drain on an art director's day. If you want to understand how different setups impact your workflow, we need to look at exactly what each configuration requires.
Ranking the Setups: From Scrappy to Studio
The right ecommerce lighting setup depends entirely on your SKU count and how much floor space you are willing to sacrifice. Here is the reality of what it takes to run these setups in-house.
1. The Two-Light Setup (The Ecommerce Sweet Spot)
If you are going to buy physical lights, this is where you should stop. A two-light setup is the workhorse of the ecommerce industry. You place your main light (the key light) at a 45-degree angle pointing down at your product. You place your second light (the fill light) on the opposite side, dialed down to about half the power of your main light.
This is the fastest way to get commercial-grade softbox product photography. The key light creates the highlights that give your product dimension. The fill light ensures the shadows do not turn into pitch-black voids.
(Worth noting: a major trade-off of the two-light setup is that you still cannot perfectly blow out a white background. Without a dedicated third light pointing solely at the backdrop, your pure white paper will always register as a light grey on camera.)
You can run this setup in a spare bedroom. It is relatively easy to tear down and rebuild. When teams are figuring out their essential photography setup, I always steer them toward a two-light kit over anything more complex.
2. The One-Light Setup (The Scrappy Baseline)
A one-light setup is essentially a two-light setup where you substitute your fill light with a piece of white foam board. You place your single softbox at a 45-degree angle. On the dark side of the product, you prop up a cheap reflector to bounce that light back onto the item.
This is incredibly cheap. It is also surprisingly dramatic. Because a reflector can only bounce a fraction of the light it receives, the shadows on your product will be much heavier. This looks fantastic for moody lifestyle shots, skincare textures, or artisanal food. It looks terrible for standard Amazon listings.
Understanding when to use natural vs. artificial lighting is usually the first hurdle brands face. Many founders try to use a window as their one light source. The problem is that the sun moves. If a shoot takes three hours, the color temperature and angle of your light will change continuously, meaning your first photo and your last photo will not match.
3. The Three-Light Setup (The Overkill for Catalog)
Three point lighting product photography is what you learn in film school. You have a key light, a fill light, and a backlight (also called a rim light or hair light). The third light sits behind the product and points back toward the camera. It creates a bright halo around the edges of your item, separating it completely from the background.
It looks beautiful. It is also an absolute nightmare to manage if you are not a professional photographer.
Adding a third light exponentially increases the complexity of your shoot. If the backlight is too bright, it bleeds into your lens and washes out the image. If you angle it poorly, it reflects off glossy packaging and creates ugly glare spots. When we look closely at a studio vs. home setup comparison, the presence of a perfectly tuned third light is usually what separates the two. But paying a crew to tune that light for hundreds of basic catalog shots destroys your margin.
Continuous vs. Strobe: Picking the Right Product Photography Lights
Once you decide how many lights you want, you have to decide how they function. The market is split into two categories.
LED Lights Product Photography (Continuous)
Continuous lighting product photography means the light is always on. You turn the switch, the room lights up, and it stays that way. For 90% of in-house brand teams, LED lights are the correct choice. What you see with your eyes is exactly what the camera captures. If there is an ugly shadow on your packaging, you can see it instantly and move the light before you ever take a photo.
Strobes and Speedlights (Flashes)
Studio strobes fire a massive burst of light exactly when the camera shutter clicks. They are significantly more powerful than continuous lights. That power allows photographers to use very narrow apertures (like f/11 or f/16), ensuring the entire product is perfectly sharp from front to back.
The downside is that you cannot see the final result until you take the picture. You have to rely on weak "modeling bulbs" to guess where the shadows will fall. It requires a steep learning curve and radio triggers to sync the flash with your camera.
Common Mistakes with an Ecommerce Lighting Setup
Even with the right gear, setting up studio lighting for product photography goes wrong in highly predictable ways. I have audited hundreds of Shopify stores, and these three mistakes show up constantly.
First, brands mix color temperatures. They will set up a beautiful 5600K daylight-balanced softbox, but leave the warm, yellow 3200K overhead office lights turned on. The camera gets confused, and the resulting image has weird orange highlights and blue shadows that are nearly impossible to fix in Photoshop.
Second, they use bare bulbs. Placing a light directly in front of a product without a modifier creates harsh, ugly specular highlights. A light source must be larger than the subject to create soft, flattering shadows. You absolutely must shoot softbox product photography or use diffusion paper.
Third, they try to force pure white backgrounds with a single light. If your goal is capturing white background product photos, you need a tremendous amount of light hitting the backdrop. Attempting this without a dedicated background light just results in dull, grey imagery.
AI Lighting Correction: The 2026 Alternative
Here is the reality of ecommerce today. Any brand still running a full studio shoot for standard catalog images is paying for logistics, not quality. The invoice is not just the photographer. It is studio rental, the stylist's half-day, the art director's back-and-forth, and the three weeks between brief and delivery.
This is why AI lighting correction is rapidly replacing physical lighting grids for volume work. You no longer need to buy a $600 two-light kit and dedicate a corner of your office to light stands.
With tools like CherryShot AI, you can take a flatly lit photo of your product using ambient room light. You upload that image, select a visual mode like "Studio" or "Minimalist," and the AI understands the geometry of the product. It digitally applies the highlights, shadows, and background separation of a high-end three-point lighting setup.
The per-image cost drops to under $5. The turnaround goes from weeks to an afternoon. When you can generate perfectly lit imagery for a new colorway in twenty minutes instead of booking another shoot day, the bottleneck completely shifts from production to ideas.
| Lighting Setup | Best For | Required Floor Space | Setup Time |
|---|---|---|---|
| 1-Light + Reflector | Scrappy startups, moody lifestyle | Minimal (desk corner) | 10 minutes |
| 2-Light Setup | Standard ecommerce catalog | Moderate (spare room) | 25 minutes |
| 3-Light Setup | High-end jewelry, pure white bg | Large (dedicated studio) | 60+ minutes |
| AI Lighting (CherryShot) | Fast-moving catalog volume | Zero | Digital instant |
Key Takeaways
- A two-light setup offers the best balance of quality and speed for brands managing their own shoots.
- Continuous LED lights are significantly easier for beginners to master than studio strobes.
- Adding a third light exponentially increases the time spent tweaking shadows and reflections.
- AI tools now allow brands to digitally apply complex studio lighting without purchasing physical gear.
Frequently Asked Questions
What is the best lighting setup for product photography?
A two-light configuration provides the best balance of quality and efficiency for most ecommerce brands. This approach uses a key light to shape the product and a fill light to control harsh shadows on the opposite side. If you process high volumes of catalog imagery, digital lighting tools offer a faster alternative to managing physical light stands and softboxes on set.
How many lights do I need for product photography?
You need at least one primary light source paired with a physical reflector to capture commercial-grade product photos. Adding a second light gives you precise control over contrast and separates your item from the background. Complex shoots involving reflective jewelry or pure white backdrops require a dedicated third light pointed directly at the seamless paper to eliminate gray tones.
What type of lights should I use for product photography?
Continuous LED lights are the optimal choice for in-house teams because they show you exactly how shadows fall before you press the shutter. Professional studios favor high-powered strobe flashes to freeze motion and shoot at narrow apertures for complete edge-to-edge sharpness. Always attach large modifiers like softboxes or diffusion umbrellas to your light source to prevent harsh specular highlights on your packaging.
How do I set up product photography lighting at home?
Build your home setup in a room where you can completely block out the sun to prevent mixed color temperatures. Position your main light at a forty-five-degree angle pointing downward at the product resting on a paper sweep. Prop a piece of white foam board on the opposite side to bounce the beam back into the dark side of your item.
Can AI fix bad lighting in product photos?
Artificial intelligence software can digitally correct and entirely rebuild the lighting setup of an existing product photo. The system reads the physical geometry of your item and maps new highlights and shadows onto the surface. You can shoot a flatly lit image near a window and output a file with accurate three-point studio lighting applied in a matter of seconds.
Mastering light is a lifelong pursuit for professional photographers. But as an ecommerce founder, your job is to sell products, not fiddle with C-stands.
If you want to completely bypass the learning curve of physical lighting gear, try uploading a basic photo to CherryShot AI. You can apply perfect studio lighting in minutes and get your product live today.
Audit your current lighting setup without buying gear
Upload a flatly lit product photo from your phone and apply a digital three-point lighting grid instantly. See exactly how professional lighting improves your product details before you invest in physical softboxes and stands.
Try CherryShot AI