Shoes Photoshoot: The 7-Shot Formula That Shows Every Angle Buyers Need Before They Purchase
If you are selling footwear online, your photography is doing the heavy lifting of a physical fitting room. Missing a single crucial angle creates doubt. Doubt creates abandoned carts. Even worse, omitting the wrong angle creates a spike in your return rate. A structured shoes photoshoot must capture exactly seven angles to answer every buyer question before they click purchase.
Definition
The 7-shot footwear photography formula is a standardized set of camera angles designed to capture every functional and aesthetic detail of a shoe. It replaces subjective styling with a rigid shot list that answers specific buyer questions about fit, material, and proportion. Implementing this framework ensures consistency across an ecommerce catalog while reducing hesitation at checkout.
Most brands leave their shot lists up to the photographer. This is a mistake. A photographer is looking for the most aesthetically pleasing composition. A footwear buyer is looking to see if the toe box is too narrow, if the arch support looks substantial, and if the heel collar will blister their Achilles. You are not shooting art. You are shooting data disguised as art.
The brands scaling their footwear catalogs profitably have stopped improvising on set. They use a rigid, repeatable formula. Once you lock in these seven angles, you eliminate the friction between the product page and the checkout. Every shoe gets the exact same treatment. Every buyer gets the exact same visual reassurance.
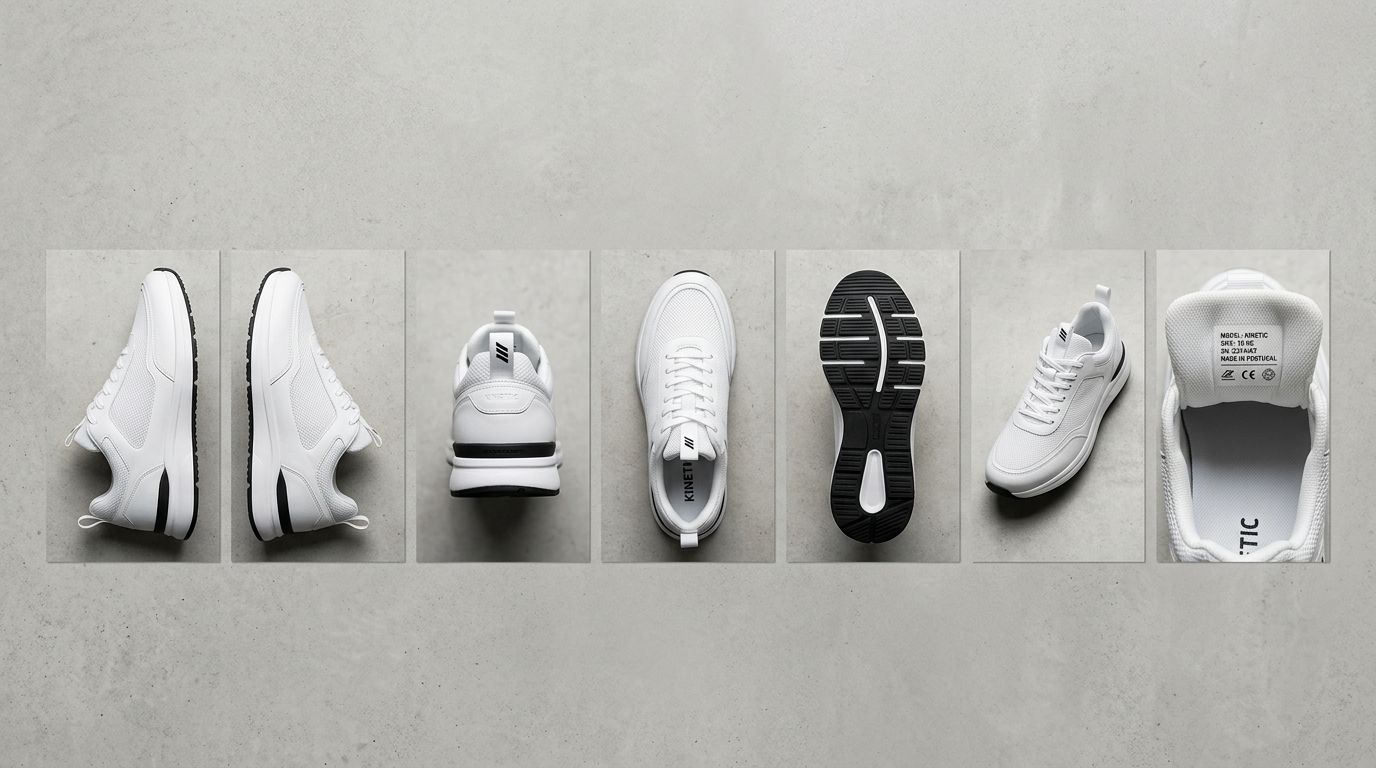
The standard seven-angle setup captures the hero profile, sole details, and material textures required to sell footwear online.
Why Footwear Demands a Strict Visual Formula
Shoes are high-liability ecommerce items. If a t-shirt is slightly lighter in color than expected, the customer might still wear it around the house. If a shoe pinches the toes or features a massive, clunky heel that was hidden in the photos, it goes straight back in the box. Return shipping costs destroy margin.
When you map out exactly how many product images you need, seven consistently emerges as the optimal number for complex products. Fewer images leave questions unanswered. More images start to create decision fatigue and slow down the page load. The goal is to provide a complete 360-degree understanding of the shoe without actually forcing the user to interact with a clunky 360-degree viewer.
The 7-shot formula is designed entirely around reducing that specific failure point. Every angle acts as an objection handler. By systematically adopting this approach, you are effectively using product photography to reduce ecommerce return rates proactively.
The 7-Shot Footwear Photography Setup
Do not skip any of these. Do not merge them. Execute them individually for every SKU and colorway in your catalog.
1. The Hero 45-Degree Outer Profile
This is your click-generator. The 45-degree angle is the most dynamic way to present a shoe. It shows the toe shape, the side branding, the lacing structure, and the tongue thickness all in one frame. Position the camera slightly elevated looking down at the shoe.
The outer profile is always preferred over the inner profile because footwear designers put their best branding elements on the lateral side. If a buyer only ever sees this one image on a collection page, it needs to tell the entire story of the silhouette.
2. The Direct Side Profile (Lateral View)
The direct side profile is not about dynamic appeal. It is about architectural truth. Buyers use this shot to evaluate the drop from heel to toe, the exact thickness of the midsole, and the overall bulk of the silhouette.
A common mistake in sneaker photoshoot product styling is shooting this from too high an angle. You must drop the camera perfectly level with the shoe. If the camera is tilted down, the sole will look artificially thin. If it is tilted up, the shoe looks like a platform boot.
3. The Top-Down View
This is the most frequently forgotten angle, yet it is the one buyers care about intensely. The top-down view shows the width of the toe box. People with wide feet will immediately look for this image to see if the toe tapers too sharply. It also clearly displays the insole branding and the lacing symmetry.
To nail this shot, you must stuff the shoe meticulously. If the toe box is empty, it will cave in slightly and look cheap. Use tissue paper to fill the volume precisely as a foot would.
4. The Heel and Collar View
Turn the shoe entirely around. This angle handles two critical buyer questions. First, what does the heel branding look like? Second, how aggressive is the Achilles padding? Running shoes and casual sneakers live or die by heel comfort.
You want to show the depth of the collar foam and the structure of the heel counter. This shot is particularly vital for slip-on shoes or boots where the entry mechanism dictates usability.
5. The Sole and Tread Pattern
Whether you are selling a rugged hiking boot or a smooth leather loafer, the buyer must see the bottom. Tread patterns imply traction, performance, and durability.
Prop the shoe up on an acrylic block or lean it against its pair to expose the sole. Make sure your lighting highlights the depth of the rubber lugs or the stitching on a leather outsole. A flatly lit sole looks like cheap plastic.
6. The Macro Detail Texture
Get uncomfortably close. Pick the defining feature of the shoe and fill the frame with it. This could be the heavy double-stitching on a leather welt, the breathable mesh on a runner's toe box, or the premium grain of a suede panel.
This shot justifies the price tag. When buyers cannot touch the material, macro photography is the only way to communicate quality. Ensure your lighting rakes across the surface to catch the texture.
7. The On-Foot or Lifestyle Context
A shoe floating on a white background lacks proportion. The buyer needs to see it interacting with a human ankle and a hemline. Does the shoe look massive on a foot? Does the collar cut awkwardly low? The on-foot shot anchors the product in reality.
(Worth noting: this formula assumes you are shooting a standard low-top or mid-top sneaker. A thigh-high boot requires adjusting the crop, but the angles remain exactly the same.)
How AI is Changing the Footwear Shoot
Running this 7-shot list perfectly across fifty SKUs takes a traditional studio days. You have to clean outsoles, tie perfect knots, hide support wire, and move lights constantly between the macro shots and the full-body lifestyle setups.
This is where standardizing your workflow pays off massively. When you use CherryShot AI, you only need to capture one or two clean reference photos. You do not need to build out a lifestyle set. You upload a flatly lit, basic studio shot of the shoe, and CherryShot AI generates the on-foot lifestyle context, the dynamic shadows, and the premium backgrounds.
The time savings scale aggressively. Instead of hiring a model to show how the sneaker looks with denim, you use the Lifestyle mode to generate campaign-ready context images in minutes. Your per-image cost plummets, and your turnaround time shrinks from weeks to an afternoon.
| Production Phase | Traditional Studio Process | AI-Driven Workflow |
|---|---|---|
| Lifestyle Context | Requires hiring models and building physical sets | Generates on-foot context from a single flat studio shot |
| Shadows & Lighting | Demands constant manual light adjustments between shots | Automatically renders dynamic shadows and varied lighting setups |
| Time to Publish | Often takes days or weeks per batch of SKUs | Processes campaign-ready images in a single afternoon |
There is a genuine trade-off to acknowledge here. AI image generation can occasionally struggle with highly technical translucent meshes or complex holographic materials where the light refraction is completely unique. For those specific hero elements, you may still need to rely heavily on your physical macro shot. But for bulk catalog volume, the efficiency is unmatched.
Shoe Photoshoot Setup Basics
If you are capturing these reference images in-house, your setup does not need to be expensive, but it must be controlled. Relying on mixed office lighting will ruin the color accuracy of your materials.
Start with a sweeping seamless white paper backdrop. This provides a clean horizon line. Position your primary light source to one side, angled at 45 degrees toward the shoe. Use a large softbox to diffuse the light, preventing harsh hotspots on glossy leather or patent materials. Place a white foam core board on the opposite side to bounce light back into the shadows.
Keep a lint roller, a suede brush, and a soft cloth on set. The camera sees every speck of dust. Cleaning the shoe in real life takes ten seconds. Editing dust out of seven different angles in post-production takes an hour. By focusing on practical, controlled capture, you give yourself the perfect foundation to feed into your AI workflows or your final ecommerce product photography for conversions.
Frequently Asked Questions
How many shots do I need for a shoe photoshoot?
Exactly seven core angles are required to construct a comprehensive and high-converting shoe product page. Capturing the outer profile, direct side perspective, top-down view, back heel, sole tread, macro material texture, and lifestyle context completely eliminates the visual guesswork that causes shoppers to abandon their carts. Ensure your photography team documents all seven of these specific positions for every new colorway to maintain absolute catalog consistency.
What is the best angle for shoe product photography?
The 45-degree outer profile serves as the absolute best angle for any primary footwear hero image. This dynamic perspective simultaneously reveals the toe box structure, the lateral brand marks, and the complete lacing system in a single comprehensive frame. Position your main camera on a tripod slightly elevated and angled downward at the product to consistently capture this crucial click-generating presentation.
Do I need to show shoes on feet for ecommerce?
Displaying shoes on a human model provides essential visual context regarding proportion and daily styling. Shoppers rely on these specific images to determine exactly where the collar sits on the ankle and how the overall silhouette interacts with fabric hemlines. Include at least one clear lifestyle shot showing the product worn naturally to help buyers calculate the true bulk of the footwear and prevent unnecessary returns.
Can AI create shoe product photos?
Artificial intelligence software can easily generate highly realistic footwear photography from basic flat input images. These specialized processing tools take standard studio shots and convincingly place them into complete lifestyle environments with accurate on-foot context and natural shadows. Process your clean white-background reference captures through an AI platform to quickly produce diverse marketing assets without paying for expensive physical set builds.
How do I set up a shoe photoshoot at home?
Building a functional home footwear studio requires a seamless white paper sweep and a single diffused light source. Proper controlled lighting prevents harsh hotspots on glossy leather materials while simultaneously revealing the true texture of your suede or mesh panels. Firmly stuff the toe box with tissue paper and lock your camera onto a tripod to maintain the correct structural shape during your capture process.
Key Takeaways
- Missing product angles directly inflate return rates by leaving buyers to guess about fit and proportion.
- The 7-shot formula covers all practical objections, from toe box width to tread traction.
- Proper stuffing and meticulous dust removal are non-negotiable for professional footwear presentation.
- AI workflows allow brands to turn simple reference shots into complete lifestyle imagery in minutes.
A systematic approach to your footwear catalog removes the guesswork from your production schedule. When every shoe gets exactly the coverage it needs, you stop paying for unnecessary studio hours and start building product pages that actually convert. If you want to scale this formula across your entire catalog without the traditional studio invoice, try running your next drop through CherryShot AI.
Audit your current shoe product pages against this formula
Take a look at your top-selling footwear SKU right now and count the exact angles provided. If you are missing the top-down view or the macro material detail, you are leaving conversion potential on the table. Run a quick test by generating those missing lifestyle and on-foot angles digitally.
Try CherryShot AI