Shoe Photography for Ecommerce: What the Top Listings Do Differently
Top footwear listings do not rely on accidental clicks, they are engineered to remove doubt. If you are selling shoes online, your photography must communicate material texture, fit, and aesthetic appeal in the first three seconds. Successful brands have stopped treating photography as a creative luxury, viewing it instead as a core technical component of the purchase flow.
Definition
Shoe photography for ecommerce is the practice of capturing footwear images that prioritize clarity, accurate color representation, and functional detail. These images act as the surrogate for a physical fitting room, directly influencing a customer's decision to add an item to their cart.
Why Your Current Shoe Photography Might Be Limiting Growth
Most ecommerce stores struggle because they rely on single, static shots that fail to tell a complete story. Understanding what makes product photos convert allows you to bridge the gap between a browser and a buyer. When a customer cannot hold a shoe, the image must do the heavy lifting.
The Cost of Inconsistency
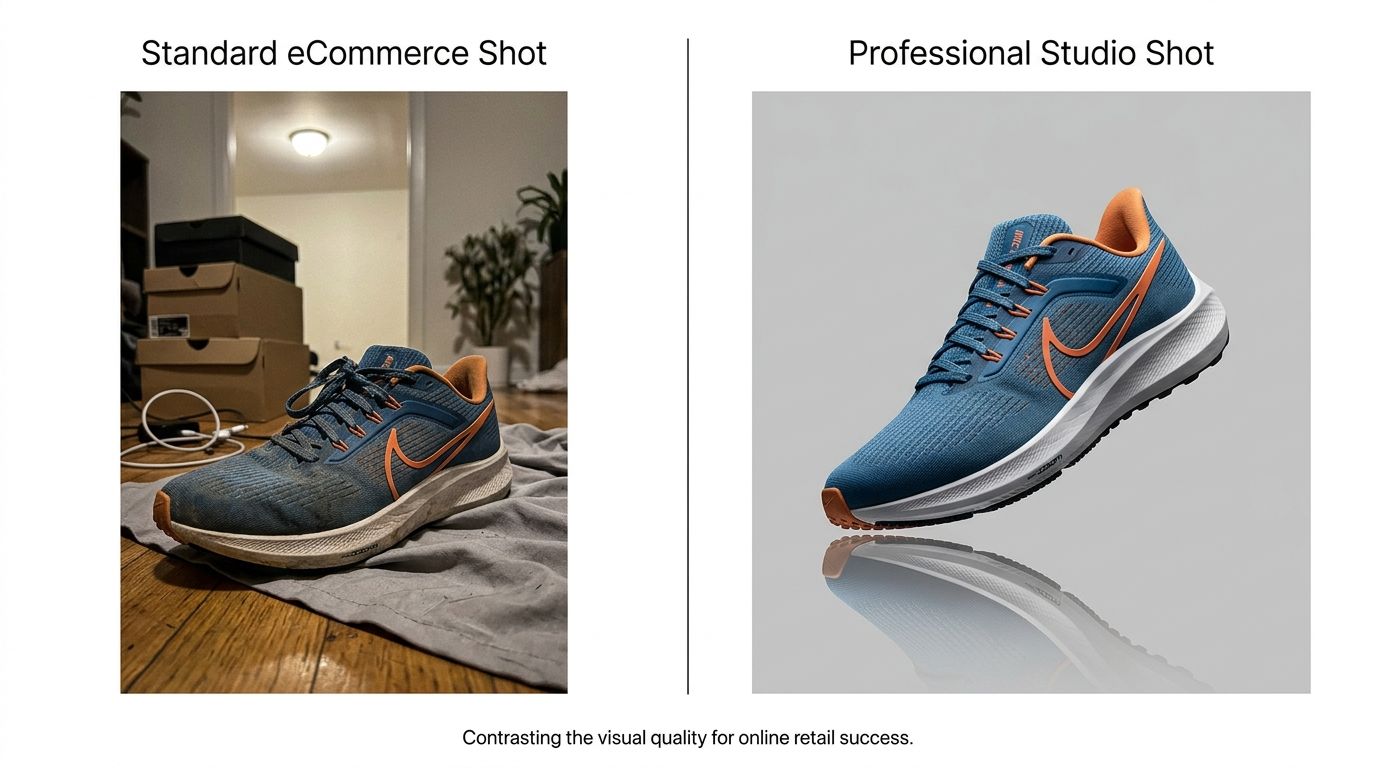
Every SKU deserves high-quality representation. Traditional studio setups often create a bottleneck where new product drops wait weeks for professional editing. If you are launching five new colorways, your imagery needs to hit the site simultaneously to drive momentum. This is exactly where using AI for ecommerce product photography becomes a strategic advantage. It shifts the focus from managing logistics to managing the brand aesthetic.
| Method | Turnaround | Scalability |
|---|---|---|
| Traditional Studio | 2-4 Weeks | Low |
| Freelance Photographer | 1-2 Weeks | Medium |
| AI Photography Tool | Minutes | High |
Executing the Perfect Shoe Shot
Angles matter more than lighting in the footwear category. A customer needs to see the sole grip, the heel height, and the interior lining.
Essential Angles
Start with the side profile to show the silhouette. Move to a three quarter front view to give depth. Finally, include a macro shot of the material to show stitch quality. When you learn ecommerce photos that convert, you realize that providing these multiple perspectives is not optional.
Frequently Asked Questions
What are the most important angles for shoe product photography?
You must capture the profile, the three quarter front view, and the top down shot for every listing. The profile view shows the silhouette and sole thickness while the three quarter angle provides a sense of depth and scale. Including a close up of the texture and materials ensures customers understand the quality before they purchase.
How do I photograph white shoes without overexposure?
Control your light intensity by using large softboxes or diffusing natural light to prevent harsh highlights on white surfaces. Shooting slightly underexposed allows you to recover detail in post production rather than blowing out the highlights. Consistent lighting setups help keep the shoe tones accurate to reality without losing texture in the bright white areas.
Should I photograph shoes on a model or flat?
Flat lays work perfectly for catalog consistency and showcasing the technical shape of the footwear. Models provide critical context regarding how the shoe fits and moves during wear. High performing listings often combine both approaches to answer different customer questions about style and comfort.
What is the best background for shoe photography?
Neutral backgrounds like light gray or crisp white remain the gold standard for main product images because they remove distractions. Lifestyle environments add brand personality and can significantly increase engagement when used as secondary shots in a gallery. Always prioritize a background that complements your brand identity rather than clashing with the colors of the product.
Key Takeaways
- Multiple angles are mandatory to provide a realistic sense of fit and style.
- Consistency across your product gallery builds trust and reduces return rates.
- Lighting should always be diffused to protect texture detail in bright colors.
- Use a mix of flat lay and lifestyle shots to address different buyer concerns.
Streamline your footwear imagery workflow
Stop waiting on studio schedules and start generating professional assets today. CherryShot AI helps you get from a single product shot to a full campaign in minutes, keeping your product launches fast and your costs low.
Try CherryShot AIInvesting in your visual catalog today saves you from the inevitable redesign costs of tomorrow. Focus on the angles that explain your product best and the results will follow.