What Makes a Product Photo Look Cheap? The Visual Tells That Signal Amateur Photography to Buyers
What makes product photo look cheap is rarely a single catastrophic error. It is a collection of subtle visual missteps like mixed lighting temperatures, missing grounding shadows, and warped lens distortion. Buyers notice these issues in milliseconds. They look at your product catalog and immediately lower the monetary value they are willing to assign to your brand.
Definition
Product photo quality refers to the technical accuracy of color, lighting, and perspective in ecommerce imagery. Cheap-looking photos fail to convey the physical reality or premium nature of an item, often due to inconsistent lighting or poor editing, which ultimately reduces the conversion potential of a product listing.
When you stare at an image and know something is wrong but cannot name the problem, you are usually seeing bad shadow logic or muddy midtones. There is an exception here for brands deliberately leaning into a raw, unedited aesthetic for viral social media content where polish breeds suspicion. But on your actual product pages, unprofessional product images actively erode consumer trust. The clear trade-off of running an improvised in-house shoot is that you save cash upfront on production costs, but bleed margin continuously on lost conversions down the line.
You do not need an art degree to diagnose why your product photos look amateur. You just need to know the specific visual tells that separate a premium brand catalog from a dropshipping storefront.
The Lighting Tells That Give You Away
Lighting is the single largest variable in perceived product value. Professional lighting creates depth, highlights texture, and defines shape. Amateur lighting flattens the product and destroys the material qualities you paid your manufacturer to get right.
Hard flash and mixed color temperatures
The most common reason product photography looks unprofessional is mixed color temperatures. This happens when a founder shoots a product near a window on a sunny afternoon while the overhead office lights are still turned on. Natural daylight sits around 5500 Kelvin, casting a blue hue. Standard indoor bulbs sit around 3200 Kelvin, casting a yellow hue.
When these two light sources hit a product simultaneously, your camera sensor panics. The shadows turn a sickly blue and the highlights turn muddy yellow. You cannot easily fix this in editing software without severely compromising the actual color of your product. This is why nailing an essential lighting setup is critical. If you do not control the light temperature hitting your merchandise, the image will always look like it was taken in a basement.
Direct, hard flash presents a similar problem. Unless you are shooting an editorial campaign specifically referencing harsh 1990s paparazzi aesthetics, a direct flash flattens the geometry of your product. It blows out the highlights and casts a pitch-black, jagged shadow directly behind the item. It is the fastest way to make a two-hundred dollar leather bag look like cheap plastic.
The muddy midtones
Pure white backgrounds are standard for a reason. They keep the eye focused entirely on the item. But achieving a pure white background in a real studio requires dedicated lights explicitly aimed at the backdrop to overexpose it.
Amateurs skip this step. They place the item on white paper and point one light at the product. Because light falls off exponentially over distance, the white paper behind the product renders as a muddy, depressing gray. A muddy background screams amateur production. It forces buyers to wonder what else you are cutting corners on. If you want to know why bad images lose sales, start by measuring the gray value of your supposedly white backgrounds.
| Feature | Amateur Approach | Professional Approach |
|---|---|---|
| Lighting | Mixed sources | Controlled single temperature |
| Shadows | Missing or hard | Natural, diffused logic |
| Background | Muddy gray | True pure white |
| Lens | Wide-angle distortion | Compression focus |
The Background and Context Tells
How a product sits in its environment tells the buyer everything they need to know about its quality. Professional studios obsess over context. Amateurs hope the buyer simply will not notice the background.
The wrinkled seamless paper
If you are shooting on seamless paper, it needs to be perfectly smooth. The moment a crease, a smudge, or a rolled edge is visible in the frame, the illusion of a premium space collapses. The buyer is no longer looking at an isolated product. They are looking at an object sitting on dirty paper in a messy room.
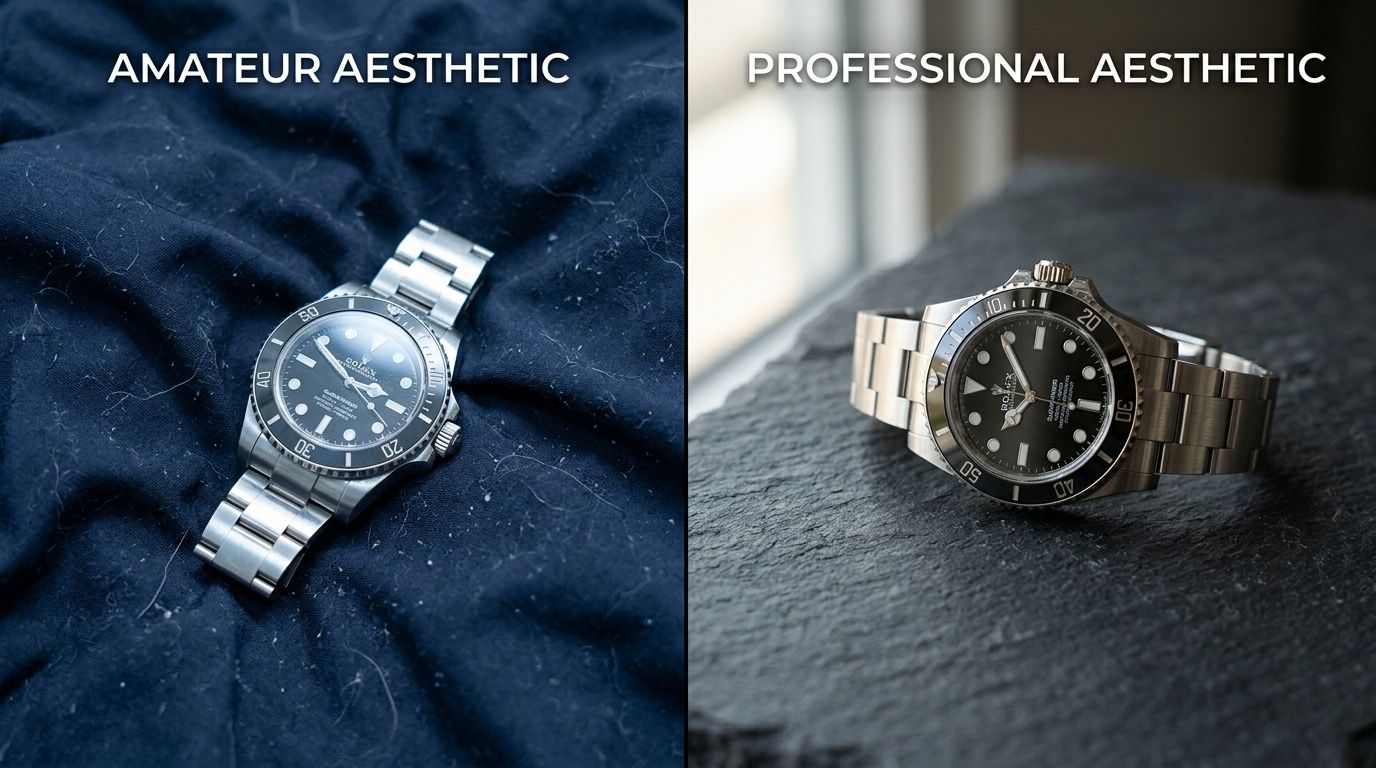
Mixed lighting temperatures and missing drop shadows instantly signal low production value to potential buyers.
Cluttered lifestyle staging
More props do not equal a better lifestyle image. A massive tell of cheap looking product photos is cluttered staging. Adding fake plants, random coffee cups, and scattered accessories around your product distracts the eye. The product must remain the absolute hero of the composition. Every single item in the frame needs a deliberate reason to exist. If a prop is not actively supporting the use-case or the mood of the core product, it is just visual noise. Understanding when DIY photography fails usually begins with reviewing highly cluttered lifestyle attempts that bury the actual product.
The Post-Production Tells
Bad editing ruins good photography. Modern ecommerce software makes it very easy to strip backgrounds out of images with one click. It also makes it very easy to completely destroy the visual integrity of your catalog in the process.
Floating objects without grounding shadows
This is the most frequent offense in modern ecommerce. A brand runs a photo through an automatic background remover, deletes the background, and leaves the product floating in pure white space.
Physical objects cast shadows. When you delete the shadow along with the background, the brain rejects the image. The product looks like a digital sticker. It feels weightless, fake, and cheap. A proper product image requires either the original natural shadow preserved during the masking process or an expertly recreated drop shadow that matches the angle of the light hitting the product. If your product does not look firmly planted on a solid surface, you are signaling to buyers that you do not care about the details.
Aggressive edge masking
When cutting out a product, cheap automated tools often leave a jagged, pixelated edge around the item. Sometimes they leave a faint halo of the original background color clinging to the edge of the product. This is incredibly obvious on dark websites or colored backgrounds. Professional retouchers spend hours carefully refining edges around fur, glass, and reflective metals. Jagged edges tell the customer that you rushed the process.
The Perspective Tells
Cameras alter reality based on the lens you choose. Professional photographers select focal lengths deliberately to flatter the specific geometry of the object they are shooting. Amateurs shoot with whatever lens is attached to their smartphone.
Unflattering lens distortion
Smartphones default to wide-angle lenses. If you place a wide-angle lens close to a product to fill the frame, the lens distorts the object. The parts of the product closest to the lens bulge outward. The edges aggressively warp away from the camera.
This distortion changes the actual physical shape of your item in the photograph. If you are selling a sleek, minimalist water bottle, shooting it up close with a phone makes it look bloated and bulbous. Professional product photography is usually shot on longer focal lengths, typically between 85mm and 105mm. These longer lenses compress the scene, keeping lines straight and rendering the product accurately. When a buyer sees a warped product, they assume the physical design is fundamentally flawed.
Fix the Aesthetics Without Starting Over
Ten years ago, fixing cheap-looking product photos meant booking a studio, hiring a new photographer, and writing a five thousand dollar check. You had to ship your entire catalog to a warehouse and wait three weeks for the edited files to return.
That requirement is dead. AI product photography completely changes the math for modern brands. You do not need to reshoot your physical inventory to fix amateur lighting or muddy backgrounds.
With CherryShot AI, you simply upload the flat, poorly lit images you already have. You pick a visual mode like Minimalist, Luxury, or Magazine. The platform rebuilds the lighting environment from scratch. It corrects color temperatures, generates perfect studio drop shadows, and places your item in a premium, campaign-ready context in minutes. You eliminate the visual tells that signal cheapness without paying a daily studio rate. You fix the bottleneck and you fix your brand equity simultaneously.
Refresh your catalog visuals
Review your current product pages and identify the top five items with the highest traffic but lowest conversion. You can run these specific product images through CherryShot AI to fix lighting and shadow issues today without a professional studio crew.
Try CherryShot AIFrequently Asked Questions
What makes product photography look cheap?
Product photography appears low-quality when it lacks consistent lighting, proper shadow logic, and clean color grading. Buyers immediately notice flat lighting that removes depth from the merchandise. They also spot poor clipping paths where the item looks pasted onto a background. These visual tells strip the perceived monetary value from the item being sold.
What are the signs of amateur product photography?
Common indicators include mixed lighting temperatures, distorted shapes from shooting too close with a wide lens, and missing drop shadows. An amateur setup frequently combines blue daylight from a window with yellow indoor bulbs. This creates color casts that are impossible to correct in post-production. You will also see wrinkled backdrops and muddy gray backgrounds that were intended to appear white.
How do I stop my product photos from looking unprofessional?
Control your light sources by eliminating mixed natural and office light. Use a longer lens to prevent shape distortion and keep proportions accurate. If you lack the budget for a professional studio setup, use AI platforms like CherryShot AI. You upload a basic reference image and the software renders it in proper studio lighting with accurate shadow logic.
What visual mistakes make products look cheap in photos?
A primary mistake is placing the product in a cluttered lifestyle scene that draws attention away from the item itself. Another error is the floating object effect. This happens when background removal software deletes natural shadows along with the background. The item ends up looking like a sticker rather than a physical object sitting on a surface.
Can AI photography fix cheap-looking product images?
Modern AI photography platforms replace amateur lighting with professional studio environments. When you run a flat image through a tool like CherryShot AI, the system rebuilds the scene entirely. It generates accurate reflections, applies consistent lighting ratios, and creates realistic shadows. This transforms a basic snapshot into a campaign-ready asset without needing a costly reshoot.