White-on-White Product Photography: Mastering the Hardest Background
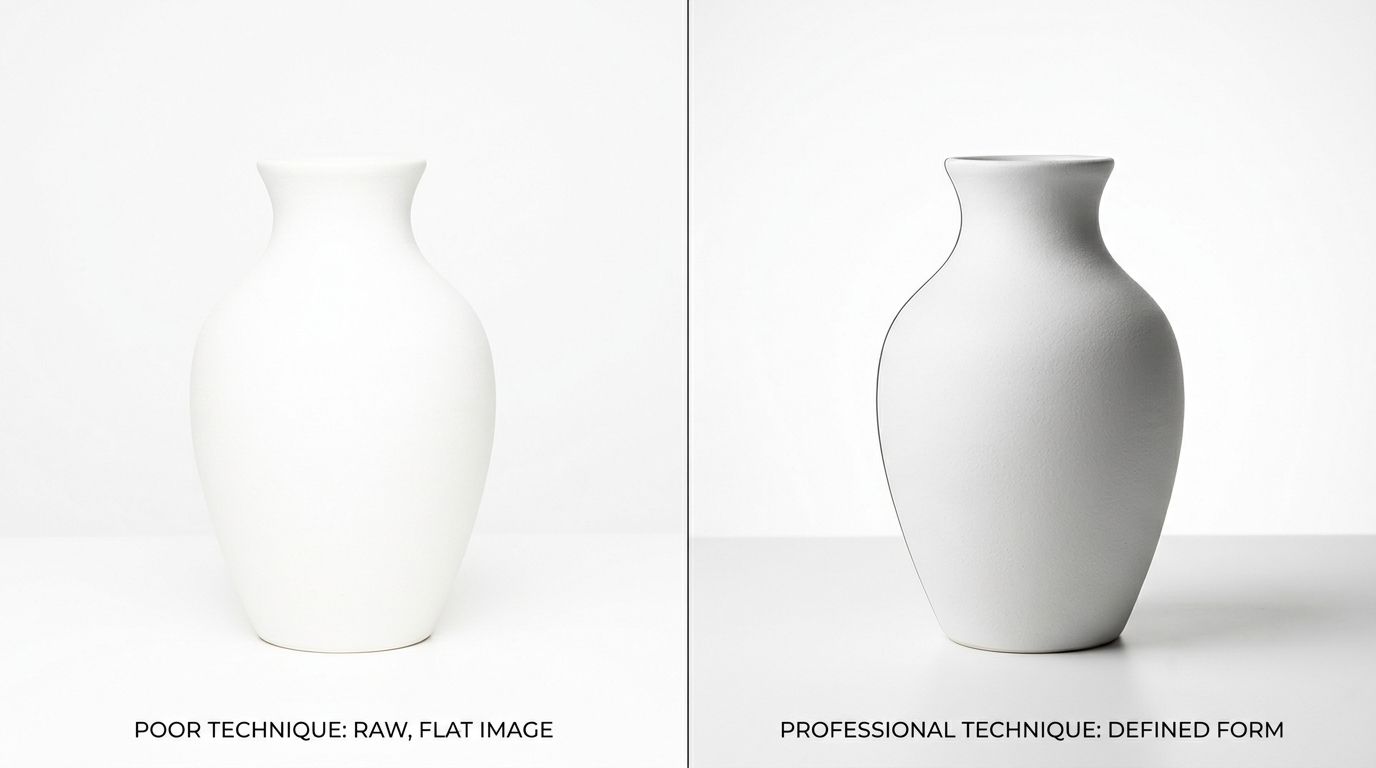
Photographing white items on a white background is the quickest way to find out if your studio photographer actually knows what they are doing. A white ceramic mug on a stark white backdrop usually ends up looking like a ghost floating in a snowstorm. The edges disappear. The texture washes out. You are left with a flat blob that completely ruins your conversion rate.
Definition
White-on-white product photography is the process of capturing light-colored items against high-key backgrounds. It requires precise control of lighting contrast and reflection to ensure the product edges remain visible to the viewer.
If you run a home goods or wellness brand, you cannot avoid white-on-white product photography. Your packaging is white. Your linens are white. Your hero products are white. Standard ecommerce requirements dictate a pure white background for product listings across almost every major sales channel.
The secret to photographing white products is that the background should almost never be the exact same shade of white as the product itself. You are not actually lighting the product. You are lighting the shadows that give the product its shape.
The physics of edge definition photography
To separate a white product from a white background, you need contrast. When both surfaces reflect maximum light back into the camera lens, the sensor cannot distinguish where the object ends and the background begins. This is a basic limitation of optical hardware.
This is why standard flat lighting fails immediately. If you place a white lotion bottle inside a cheap light tent and blast it with two softboxes from the front, you blow out the highlights. The edges melt into the background.
The fix requires a dedicated rim lighting technique. You have to place your lights slightly behind the product and angle them back toward the edges. This creates a tiny sliver of shadow along the curve of the item. That micro-shadow is what tells the customer they are looking at a three-dimensional cylinder instead of a flat graphic.
You do not want harsh shadows. You need feathered light white products. Feathered light means you point the strobe slightly past the product rather than directly at it. The soft edge of the light beam grazes the side of the white product, providing a delicate gradient of light to dark that perfectly maps the curvature.
Using negative fill to save your shape
Rim lighting is only half the battle. White backgrounds bounce light everywhere. If light bounces off the backdrop and hits the sides of your product, your edges disappear again. You have to block that light physically.
You do this with negative fill. Place black foam core boards just outside the camera frame on either side of the product. The black material absorbs the ambient light, creating a darker reflection specifically on the outer edges of the white item. If you are shooting on a white background at home, mastering negative fill is the single fastest way to make your images look like they came from a professional studio.
Without negative fill, edge definition photography is virtually impossible in a brightly lit room.
The gray background workaround
Most ecommerce platforms demand a pure hex code #FFFFFF background for standard catalog images. But if your background is pure white and your product is pure white, you have a physical impossibility inside the camera.
| Method | Pros | Cons |
|---|---|---|
| White Background | Ecommerce compliant | Loss of edge detail |
| Gray Background | Maintains sharp edges | Requires post-production |
The standard commercial workaround is shooting the white product on a light gray background. By doing this, you instantly secure crisp edge definition. The product stands out perfectly against the gray paper.
During post-production, your retoucher isolates the product and replaces the gray background with pure white. This workflow is incredibly common for major brands. Product photo retouching for ecommerce heavily relies on masking techniques to fix what physics will not allow.
This introduces a genuine trade-off. Paying a retoucher to manually clip out complex edges like white towels or fuzzy white blankets gets expensive very quickly. You preserve the shape of the product, but you double your post-production invoice and add a week to your delivery timeline.
Nailing exposure without blowing out details
Your camera is fundamentally stupid. When you point a lens at a frame filled entirely with white pixels, the internal light meter panics. It assumes the scene is far too bright and automatically darkens the exposure to compensate.
This is why amateur white-on-white product photography always looks muddy and gray. The camera is trying to average the bright scene down to a neutral middle gray.
You solve this problem with gray card exposure. Place an 18 percent gray card directly in front of your white product. Set your exposure manually based solely on the card. Lock those settings in, remove the card from the frame, and take the actual photo. The camera will stop trying to correct the brightness, and your whites will finally look bright and clean.
This process works for any highly reflective or tricky surface. Whether you are dealing with white porcelain or photographing transparent glass products, a gray card forces the camera to read light objectively instead of guessing.
Diffuse lighting white products
White products are rarely perfectly smooth. Think of ribbed ceramic vases, woven linen bed sheets, or matte skincare tubes. If you overexpose the image just to force a pure white background, you obliterate that beautiful texture.
Diffuse lighting white products is mandatory. You need massive modifiers. Large softboxes or scrims placed extremely close to the product wrap the light gently around the subject. The larger and closer the light source, the softer the shadows will fall.
You want just enough shadow to reveal the weave of the fabric or the grain of the ceramic. If you lose the texture, the customer loses trust in the material quality of the item.
The new math: AI versus the physical studio
Any brand still running a full studio shoot for standard catalog images in 2026 is paying for logistics, not quality. The invoice is not just the photographer. It is studio rental, the stylist's half-day, the art director's back-and-forth, and the three weeks between brief and delivery.
Two years ago, general-purpose AI image tools failed spectacularly at white-on-white. If you asked an early AI model to put a white jar on a white marble counter, the jar would fuse with the marble. It looked terrible and was useless for commerce.
That is no longer true. CherryShot AI changes that math completely. Upload a product image, pick a visual mode, and CherryShot AI generates campaign-ready photos in minutes. The system analyzes the distinct geometry of your item. It natively understands where the physical boundaries lie.
(Worth noting: this is less about replacing photographers entirely and more about eliminating the scheduling dependency that adds three weeks to every product launch. A good photographer still makes sense for major hero imagery. For catalog volume, the math simply does not work anymore.)
Instead of you spending forty-five minutes adjusting flags and negative fill to get a rim light perfect, CherryShot mathematically renders the correct micro-shadows. The background is pure white. The product shape is intact. The texture remains visible. The per-image cost drops to under $5. The turnaround goes from weeks to an afternoon.
Audit your product page images before your next campaign
Review your catalog to identify white products that lack clear edge definition. High-quality imagery is essential for customer trust. You can use CherryShot AI to generate clean, professional shots for your entire collection in minutes.
Try CherryShot AIFrequently Asked Questions
How do I photograph white products without losing edges?
Control light reflection by utilizing negative fill to maintain clear object boundaries. Placing black foam core boards just outside the camera frame creates necessary contrast on the product edges. This dark reflection provides a visual separation that prevents the white object from disappearing into a white backdrop. You can then clearly distinguish the shape and form of the product against the bright background without any loss of detail.
What lighting works for white-on-white photography?
Rim lighting with massive diffusion is the primary method for this specific setup. Positioning lights slightly behind the product allows you to create soft, subtle shadows that define the shape. Large modifiers positioned close to the subject help wrap the light naturally around the curves. These soft light sources are effective at preserving the texture and material details of white objects without creating harsh or distracting highlights.
Should I use a gray background for white products?
Shooting on a light gray background is the most reliable way to achieve perfect edge definition in-camera. This method gives the camera sensor enough contrast to define the product edges during the initial capture. A retoucher then isolates the subject and replaces the gray background with pure hex code #FFFFFF for ecommerce compliance. Professional studios favor this workflow because it avoids the physical impossibility of perfect white-on-white photography.
Can AI generate white-on-white product photography?
Modern AI tools like CherryShot AI calculate the geometry of your product to render realistic micro-shadows. The platform analyzes your uploaded image to determine the correct light falloff for specific shapes. This results in clean edges and consistent white backgrounds without the need for a complex studio lighting setup. Brands use this process to generate catalog imagery in minutes rather than spending hours managing physical flags or light modifiers.
How do I expose correctly for white products?
Use an 18 percent gray card to lock in your manual exposure settings. Placing the card in the frame allows your camera to read the light objectively instead of compensating for the brightness of the white subject. Removing the card after locking these settings prevents the camera from darkening the image into a muddy gray. Accurate exposure ensures that your white products appear bright and clean on your website.
The brands getting the most out of modern product photography workflows are not the ones with the biggest budgets. They are the ones launching the most SKUs per quarter. When you can generate perfect white-on-white imagery in twenty minutes instead of booking another shoot day, the bottleneck shifts from production to your own ideas.
Stop paying a premium for pure logistics. Upload your next white product to CherryShot AI and get campaign-ready images today.