Cocktail and Beverage Product Photography: The Bar Brand Visual Playbook
A cocktail photoshoot is a race against physics. You have about three minutes before the ice shifts, the glass frosts over incorrectly, and the garnish wilts under the heat of the studio lights. For DTC beverage brands selling spirits, non-alcoholic mixers, or ready-to-drink cans, getting high-quality drink photography ecommerce assets used to mean booking a specialized studio for ten hours just to capture a handful of usable shots.
Definition
Beverage product photography is the specialized process of capturing liquid items to highlight transparency, color, and texture. It involves managing complex reflections on glass and controlling light through fluids to ensure the final image looks appealing and accurate to the consumer.
You do not need to do that anymore. The logistics of alcohol product photography have completely shifted. Brands are no longer forced to choose between practical shoots with an astronomical day rate or generic 3D renders that look like video game assets. The modern playbook combines smart, isolated baseline photography with AI generation to scale catalog visuals.
I have signed off on invoices where a food stylist spent three hours perfectly placing water droplets on a single gin bottle. The result was beautiful. The ROI was terrible. Here is how you actually build a visual pipeline for beverage products without destroying your profit margins.
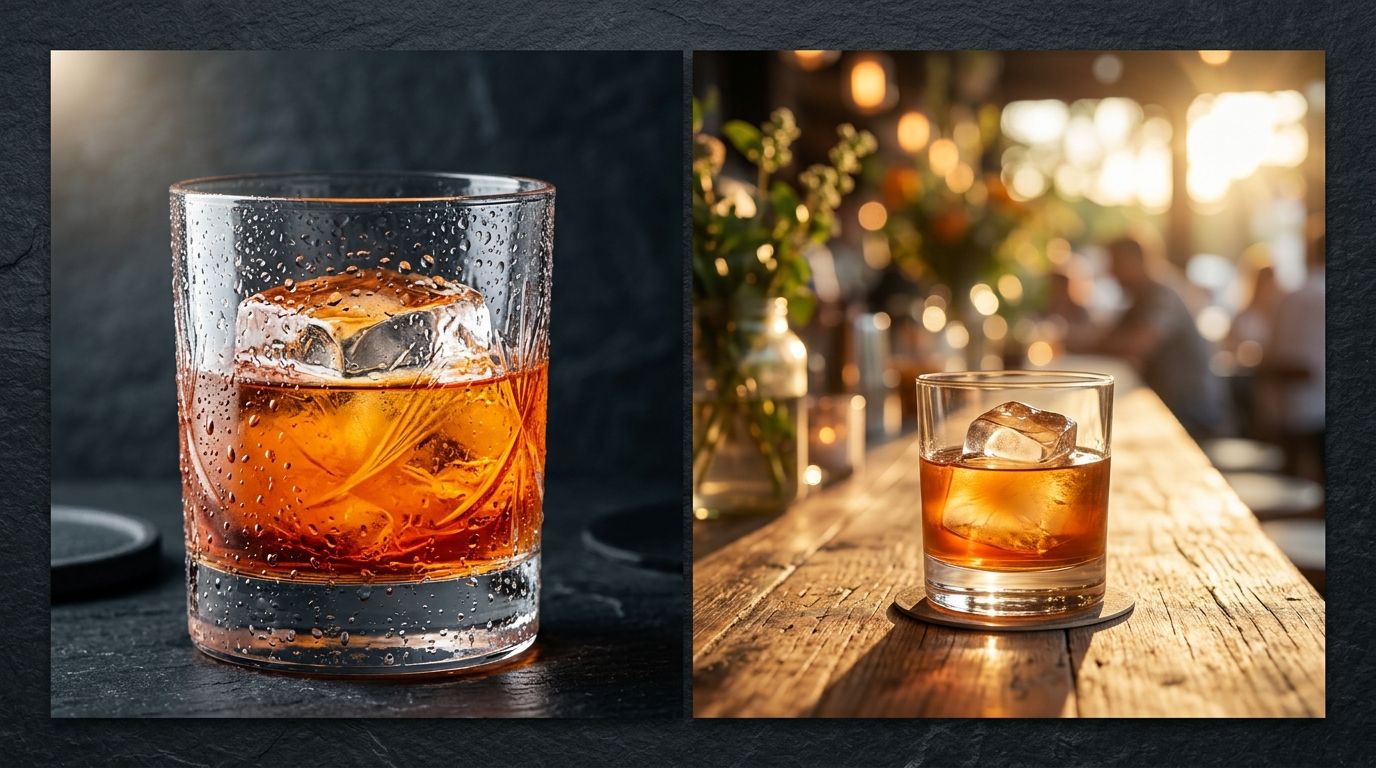
A properly styled cocktail photoshoot prioritizes lighting the liquid from behind to highlight texture and color.
The mechanics of the hero shot beverage
Before we talk about lifestyle environments, we have to solve the hero bottle. The hero shot beverage image is the anchor of your product page. It requires flawless execution because the customer is evaluating the quality of your liquid based entirely on the clarity of your glass.
| Feature | Traditional Studio | AI Workflow |
|---|---|---|
| Lighting Setup | Physical strobes/softboxes | Digital light adjustment |
| Environment | Physical set/location | Digital scene placement |
| Turnaround Time | Days or weeks | Minutes |
| Consistency | Hard to replicate | Exact brand match |
Mastering backlit beverage photography
Liquid absorbs light. If you hit a bottle of whiskey or a bright red spritz with a strobe from the front, the liquid will look muddy and dense. The secret to professional beverage product photography is backlighting. You must force the light to travel through the liquid toward the camera lens.
Place a large, heavily diffused softbox directly behind the bottle. This turns the liquid glowing and translucent. Then, place tall, thin strips of black foam core just outside the frame on the left and right. This creates dark reflections on the edges of the glass, defining its shape against a white background. Mastering glass product photography requires you to control what the glass reflects, not just what light hits it.
Fake ice and condensation styling
Never use real ice in a commercial cocktail photoshoot. Real ice melts under modeling lights in seconds, diluting the drink and ruining the color balance. Buy high-quality acrylic ice cubes. They sink perfectly, stack beautifully, and let light pass through without creating cloudy imperfections.
Condensation styling drinks is another area where reality is your enemy. Real condensation fades fast and drips, ruining the paper label on your hero bottle. Instead, mix a solution of fifty percent water and fifty percent vegetable glycerin. Spray it onto the bottle using a fine mist bottle. The glycerin holds the droplets in place for hours. They will not run, and they will catch the studio lights perfectly to communicate a chilled, refreshing temperature.
Capturing action and context
A static bottle is necessary for the main product carousel. But social media, email campaigns, and top-of-funnel ads require movement and context. Consumers want to see how the product is served.
The pour shot technique
The pour shot technique is notoriously difficult. Capturing a crisp splash requires a fast flash duration, not just a fast shutter speed. You need studio strobes capable of freezing motion at 1/4000th of a second. The alternative is shooting continuous video at a high frame rate and pulling a still frame, though you sacrifice resolution. The goal is to capture the viscosity of the liquid. A thick syrup needs to look entirely different mid-air than a carbonated soda.
Garnish styling photography
The garnish provides the scale and flavor cues. If your canned cocktail features blood orange and rosemary, those ingredients need to be visible in the frame. Cut citrus must be impeccably fresh. Brush it lightly with a clear corn syrup solution to keep it looking juicy under the lights. Using props effectively for beverages means choosing items that directly communicate the tasting notes of the drink.
Consumers buy the feeling of the drink as much as the liquid in the glass. The background textures and lighting mood do as much heavy lifting as the perfect citrus twist.
Scaling production with AI
The techniques above are mandatory if you are running a traditional shoot. But what happens when you launch a new seasonal flavor and need forty different lifestyle assets by next Tuesday? Organizing another shoot is a logistical nightmare. The timeline is too tight, and the per-image cost becomes unjustifiable.
This is where smart brands pivot. Instead of shooting every scenario practically, they shoot the baseline bottle perfectly once. Then, they use AI product photography tools to scale the output.
With CherryShot AI, you upload that clean, well-lit baseline photo of your beverage. You select a visual mode. If you are selling a vibrant, high-energy tequila alternative, you might choose the Loud Luxury mode to place the bottle in a high-contrast, neon-lit environment. If you are selling an elegant botanical gin, the Minimalist mode drops it onto clean marble with sharp shadows. You get campaign-ready photos in minutes.
This completely eliminates the need to rent a bar location just to get a blurred background of a bartender. The turnaround goes from three weeks to an afternoon.
There is a genuine trade-off here. If you have a highly complex, molecular gastronomy cocktail recipe that relies on a specific chemical reaction or a deeply intricate layered pour, AI will struggle to invent that precise physical structure out of thin air. You still need to shoot that practical reality. But for the massive volume of lifestyle scenes, background swaps, and contextual mood shots required to feed a modern performance marketing machine, AI is the only way the math makes sense.
You stop paying for the stylist's half-day rate just to arrange fake ice cubes on a slate board. The bottleneck shifts from your production budget to your creative testing strategy.
Audit your product images before your next seasonal campaign
Review your existing bottle shots to confirm they have the necessary clarity and lighting to be transformed by AI. You can create dozens of high-end lifestyle scenes from a single high-quality base image today.
Try CherryShot AIFrequently Asked Questions
How do I photograph cocktails for social media?
Use backlighting to illuminate your drink from behind the glass instead of relying on front-facing studio lights. Cocktails look flat and lifeless without light traveling through the liquid to create a glowing effect. Position your light source behind the subject and use dark foam core on the sides to define the glass shape. This approach highlights textures and makes colors pop while maintaining a clean, professional aesthetic for your social feeds.
What lighting works best for beverage photography?
Backlighting is the primary standard for all liquid-based product photography because it reveals clarity and color. Direct light through the container to create depth and highlight the viscosity of the liquid. Use a softbox directly behind your glass and place white reflectors on the edges to bounce light into the liquid. This ensures your product looks vibrant and transparent rather than dense or dark in the final output.
How do I create the condensation effect on bottles?
Apply a mixture of fifty percent water and fifty percent vegetable glycerin using a fine mist spray bottle. Real water droplets evaporate quickly or run down the glass, ruining paper labels and forcing constant restarts. Glycerin holds the droplets in place for hours under hot studio lights. This specific technique gives you enough time to capture the perfect chilled appearance without needing to rush your shoot or replace melted ice.
What background works for spirits and liquor photography?
Match your background texture to the specific brand identity and product category of your spirit. Aged liquors like whiskey or dark rum require moody surfaces such as slate, leather, or dark wood to communicate warmth. Clear spirits and vibrant mixers perform better on high-contrast marble or acrylic to emphasize purity. Keep the overall scene uncluttered so the viewer focuses on the glass reflections instead of distracting patterns in the environment.
Can AI generate lifestyle beverage photography?
Yes, you can generate professional lifestyle scenes significantly faster than traditional location photography. Start by uploading a clean baseline photo of your product to a platform like CherryShot AI. You select specific visual modes to place your bottle into environments like a summer pool deck or a quiet bar. This removes the need for hiring production crews, renting expensive locations, or styling fake ice cubes for every single individual social media asset.
Key Takeaways
- Backlight your liquids to prevent them from looking flat and muddy.
- Replace melting ice with high-quality acrylic cubes for consistent styling.
- Use a water and glycerin mixture to create condensation that will not evaporate.
- Shoot a perfect baseline bottle once, then use AI to generate lifestyle settings.
Speed and visual volume dictate who wins in beverage ecommerce right now. Stop letting studio logistics throttle your product launches. Upload your hero bottle to CherryShot AI and start generating the lifestyle assets your campaigns actually need.