How to Photograph Transparent and Glass Products: The No-Reflection Guide
Photographing glass is not about capturing the object. You are actually capturing what surrounds the object. If you point a light directly at a perfume bottle, you will just get a bright white hotspot, a washed-out label, and a highly frustrated art director. I spent my first two years running an ecommerce beauty brand convinced that clear product photography was an impossible dark art.
Definition
Transparent product photography involves capturing objects that transmit light, such as glass or clear acrylic. Because these surfaces act as mirrors, you must control the surrounding studio environment to manage reflections and create shape, rather than lighting the object itself.
It is not a dark art. It is just geometry. The secret to mastering product photography glass setups is understanding that glass acts as a mirror for your entire studio. You cannot simply blast it with light. You have to craft the reflections intentionally. Whether you are selling luxury fragrances, artisanal beverages, or skincare in clear acrylic jars, bad reflections will make a fifty-dollar product look like a drugstore knockoff.
Today, we are going to break down exactly how to photograph transparent products without unwanted glare. We will cover the physical studio setups that actually work, the specific lighting ratios you need, and exactly when to rely on AI to skip the studio altogether.
Clean glass photography requires heavy diffusion and deliberate edge control to define the shape of the product.
The Fundamental Problem With Clear Product Photography
When you place an opaque object on a table, light hits it, bounces off, and enters your camera. The texture and color of the object dictate what the camera sees. Glass does not work this way. Glass allows light to pass straight through, bending it slightly along the way. Simultaneously, the glossy outer surface reflects the room back at you.
If you are shooting in a room with white walls, the glass will look milky and flat. If you have an uncovered window behind the camera, the glass will show a miniature, distorted reflection of the window frame. To get professional results, you must take total control of everything the glass can "see" from its position on the table.
It is worth noting here, the classic light tent that beginners buy on Amazon is terrible for glass. Light tent glass photography surrounds the object in pure white light from all angles. The glass reflects that white light everywhere, resulting in a flat, ghost-like image with zero definition. Do not use a light tent for glassware.
Building an anti-glare product photography environment
To create shape and dimension, you need distinct areas of light and dark. This means you need a very controlled essential product photography setup. You need large diffusion panels, sturdy light stands, and plenty of black foam core.
The standard approach for bottle product photography involves placing a large sheet of diffusion material between your strobe and the product. This turns the harsh bulb into a massive, soft wall of light. By bringing this diffused light very close to the glass, you create a long, elegant, unbroken vertical highlight down the side of the bottle. This highlight tells the customer's brain that the surface is glossy and curved.
Technique 1: Backlighting for Liquids
If your product contains liquid, front lighting will ruin the color. Whether it is amber whiskey or pink perfume, shining a light directly at the front of the bottle will cause the label to cast a shadow straight through the liquid, and the front glass will reflect the light bulb directly into your lens.
The solution is to light from behind. Place your primary light source behind the bottle, aimed forward toward the camera. Place a diffusion panel between the light and the bottle.
This does three things simultaneously. First, it pushes light directly through the liquid, making it glow from within and displaying its true, vibrant color. Second, it completely eliminates hotspots on the front face of the glass, making your label perfectly readable. Third, it separates the product cleanly from the background. Getting your lighting setup for ecommerce dialed in with a strong backlight is the fastest way to elevate your imagery.
Adding black flags for edge definition
Backlighting alone will make the bottle look radiant, but the edges of the glass will disappear into the bright background. To fix this, you must introduce negative fill.
Take two pieces of black foam core. Cut them into long, vertical strips. Stand them up on either side of the bottle, just outside the camera's frame. The outer edges of the round glass will reflect these black boards. This creates crisp, dark lines down the left and right sides of the bottle, grounding the product and proving its shape to the viewer. This reflection control photography technique is mandatory for high-end catalog work.
Technique 2: Cross-Polarization Photography
Sometimes you cannot backlight a product. Perhaps the glass is opaque black, or maybe it is a thick skincare jar resting on a surface where backlighting is physically impossible. In these scenarios, you have to light from the front, but you still need to eliminate the glaring white reflections.
This is where cross-polarization photography becomes your most powerful tool. It requires two specific pieces of gear. First, you need a sheet of linear polarizing film taped over your studio strobe. Second, you need a circular polarizing filter screwed onto your camera lens.
When the light fires, the film forces the light waves to travel in a single parallel direction. When these parallel light waves hit the glossy glass, the direct reflection bounces straight back. However, you have the circular polarizer on your lens. By rotating the filter on your lens so that it is exactly perpendicular to the filter on your light, you create an optical block. The direct reflection simply cannot pass through the lens.
The result is almost magical. The blinding white hotspots vanish completely. You are left with the deep, true color of the packaging. You will still need to tweak your contrast later, and a good guide on editing product photos without Photoshop can help you restore the natural pop of the image without reintroducing the glare.
When to Use AI vs Studio for Transparent Products
We have established that shooting glass is highly technical. It requires space, specific gear, and a solid understanding of physics. Because of this, traditional studios charge a premium for glassware and clear packaging. If you are launching a new beverage line with twelve SKUs, the invoice to shoot every single bottle perfectly can easily hit five figures.
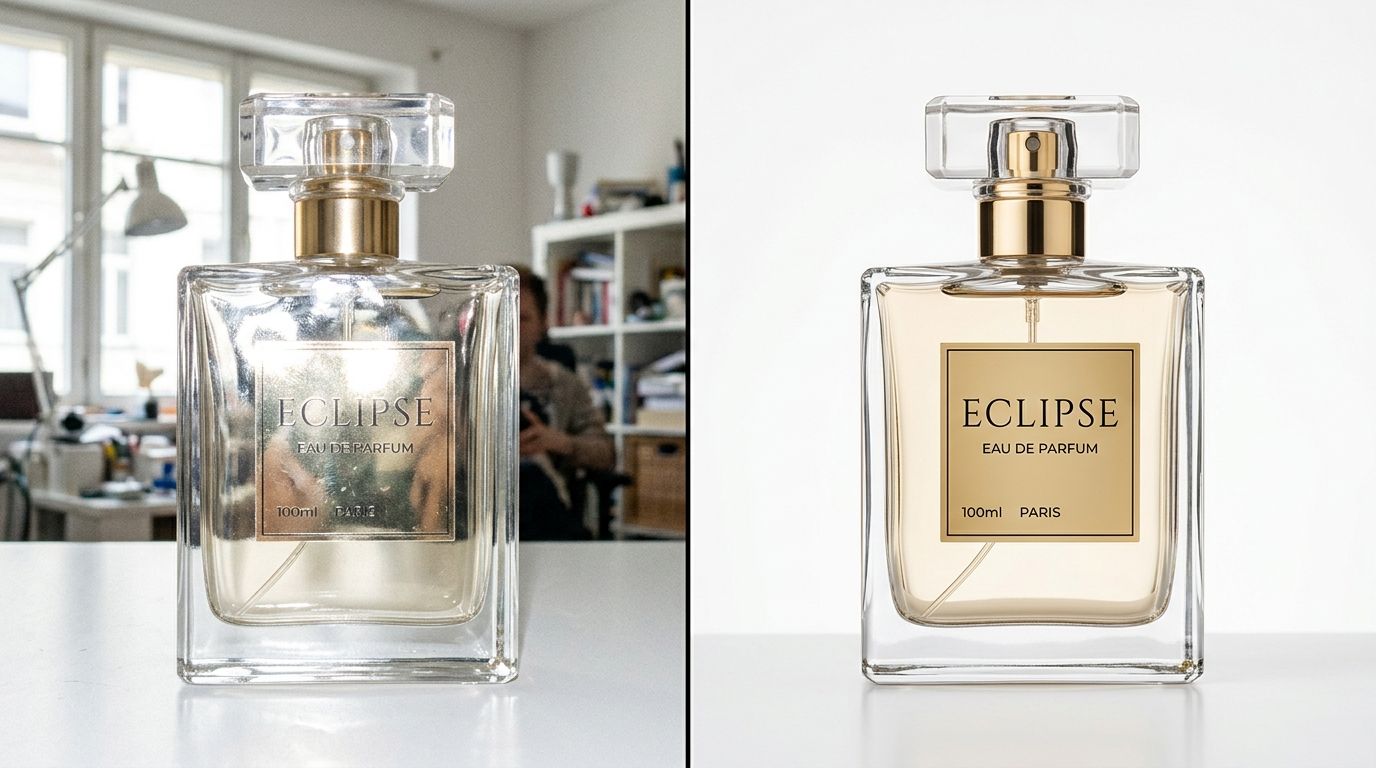
This is precisely where AI product photography changes the math. Tools like CherryShot AI allow you to upload a single base image of your clear product. You select a visual mode, such as Classic for clean catalog backgrounds or Lifestyle for environmental context, and the system generates campaign-ready photos in minutes.
The AI understands how standard glass behaves. It generates appropriate drop shadows, realistic background refractions, and clean environmental reflections. The per-image cost drops from hundreds of dollars to under five dollars. The three-week studio delay vanishes.
However, there is a genuine trade-off you must acknowledge. AI is incredible at standard clear packaging, smooth perfume bottles, and classic beverage silhouettes. Where AI currently struggles is with highly complex, faceted cut crystal. A vintage-style whiskey decanter with hundreds of deep geometric cuts bends light in a chaotic, highly specific mathematical pattern. AI tools will often hallucinate the internal refractions on heavy crystal, creating visual artifacts that look slightly wrong to the human eye. For those specific hero items, a professional photographer using physical lights remains the superior choice.
| Method | Best For | Limitations |
|---|---|---|
| Traditional Studio | Faceted crystal | High cost and time |
| CherryShot AI | Smooth packaging | Needs reference photo |
| Light Tents | Simple hardware | Flattens reflections |
Key Takeaways
- Never light the front of a glass product directly. Light the environment behind and beside it.
- Use large diffusion panels behind liquid products to make the color glow and kill front glare.
- Employ black flags outside the camera frame to create crisp dark edges that define the bottle shape.
- Use AI tools to rapidly scale imagery for smooth glass products, but retain traditional studios for complex cut crystal.
Frequently Asked Questions
How do I photograph glass without reflections?
Control the environment around the object instead of lighting the object directly. Large diffuse light sources placed behind or to the side of the product create consistent highlights. Positioning black foam core boards outside the camera frame helps you form dark edges that define the shape of the glass. Use a circular polarizer on your camera lens to cut glare completely in extreme situations.
What background works best for glass product photography?
Medium gray or pure white backgrounds perform consistently for ecommerce glass photography. A pure white background allows you to backlight the product effectively, which illuminates liquids and creates clear contrast. Dark backgrounds provide a luxury aesthetic for glassware but require precise edge-lighting to prevent the product from blending into the shadows.
How do I light a glass bottle for ecommerce?
The most reliable method is to light from behind the bottle, shining through a diffusion panel toward the camera. This illuminates the liquid and prevents front reflections from ruining your labels. Placing black cards on either side of the bottle creates crisp, dark reflections along the edges. This specific placement gives the bottle dimension and ensures it stands out against the background.
What is cross-polarization photography?
Cross-polarization is a technique used to eliminate unwanted glare on highly reflective surfaces. It involves placing a linear polarizing film over your studio lights and attaching a circular polarizing filter to your camera lens. Rotating the lens filter to be perpendicular to the light filter blocks direct reflections from entering the camera. This leaves the true color and texture of the product visible.
Can AI generate glass product photos?
Modern AI tools produce excellent glass product photos for standard clear packaging like cosmetics and smooth beverage bottles. You upload a reference image of your product and the AI generates it into various lifestyle environments. AI currently faces challenges with complex cut crystal or heavily faceted glass where internal light refraction is unpredictable. A traditional studio shoot remains the better choice for those specific items.
Getting glass photography right requires a shift in mindset. You are no longer pointing a camera at an object. You are building a controlled room, placing a mirror in the center of it, and taking a picture of what that mirror reflects.
Audit your product page images before your next campaign
Review your current site for distracting hotspots or missing edge definition on clear packaging. If you identify gaps in your catalog, you can use high-quality reference shots to generate professional-grade lifestyle imagery that keeps your brand aesthetic consistent across all channels.
Try CherryShot AI