How to Photograph Reflective and Shiny Products: The Anti-Hotspot Playbook
Photographing reflective surfaces is the ultimate trap for ecommerce brands. You set up a simple stainless steel watch or a chrome kitchen fixture. You press the shutter. You look at the monitor and see the reflection of your light stand, your camera lens, and your own face staring back at you from the product. To capture these items cleanly, you must stop lighting the product entirely. You have to light the environment around the product, then let the product reflect that environment. Or you can skip the physics puzzle entirely and generate the images.
Definition
Reflective product photography is the process of using environmental light manipulation to create clean highlights and contrast on shiny surfaces like metal, glass, or plastic. Instead of aiming light at the product, photographers illuminate the space around the object, controlling what the surface reflects to define its shape and material properties.
Most brands vastly underestimate the time required for metallic product photography. A standard matte box might take ten minutes to style and shoot. A polished chrome faucet can easily consume three hours of studio time and another two hours in Photoshop.
This guide covers exactly how to execute highlight control product photography using traditional studio tools. We will also look at when it makes financial sense to bypass the studio and use AI generation for your shiny inventory.
The physics of reflective product photography tips
Metal does not look like metal in a vacuum. It only looks like metal because it reflects contrast. If you put a shiny silver pan in a pure white box with perfectly even light, it will look like flat gray plastic. If you put it in a dark room with a single bare bulb, it will look like a black void with a blinding white dot in the center.
You need highlights and shadows to define the shape. Mastering this requires a fundamental shift in how you build your ecommerce lighting setups. You are no longer pointing lights at the object. You are creating large, bright, white surfaces near the object that the object can see and reflect.
A hot spot is an overexposed, blown-out area where the light source is too concentrated. When a customer zooms in on a listing image and sees jagged, blown-out glare instead of a smooth metallic finish, the perceived value of the product drops immediately.
Using large diffusion panels is the only way to create smooth, continuous highlights on curved metallic surfaces.
The studio playbook for highlight control product photography
If you are committed to shooting your shiny products in a physical studio, you need specific grip equipment. A basic ring light or a small umbrella will not work. Here are the core techniques used by commercial photographers to tame chrome, steel, and glossy plastics.
Diffuse light reflective products relentlessly
The golden rule of how to photograph shiny products is that the size of your light source dictates the softness of the reflection. A bare strobe creates a sharp, hard reflection. A strobe fired through a massive sheet of diffusion fabric creates a soft, wrapping gradient.
Photographers use large rolls of Savage diffusion paper or custom-built scrim frames. They place these diffusion panels as close to the product as possible without entering the camera frame. Then, they place the light source far behind the panel. This effectively turns the entire panel into a glowing wall of light. When the shiny object reflects this wall, it looks like a premium, smooth highlight.
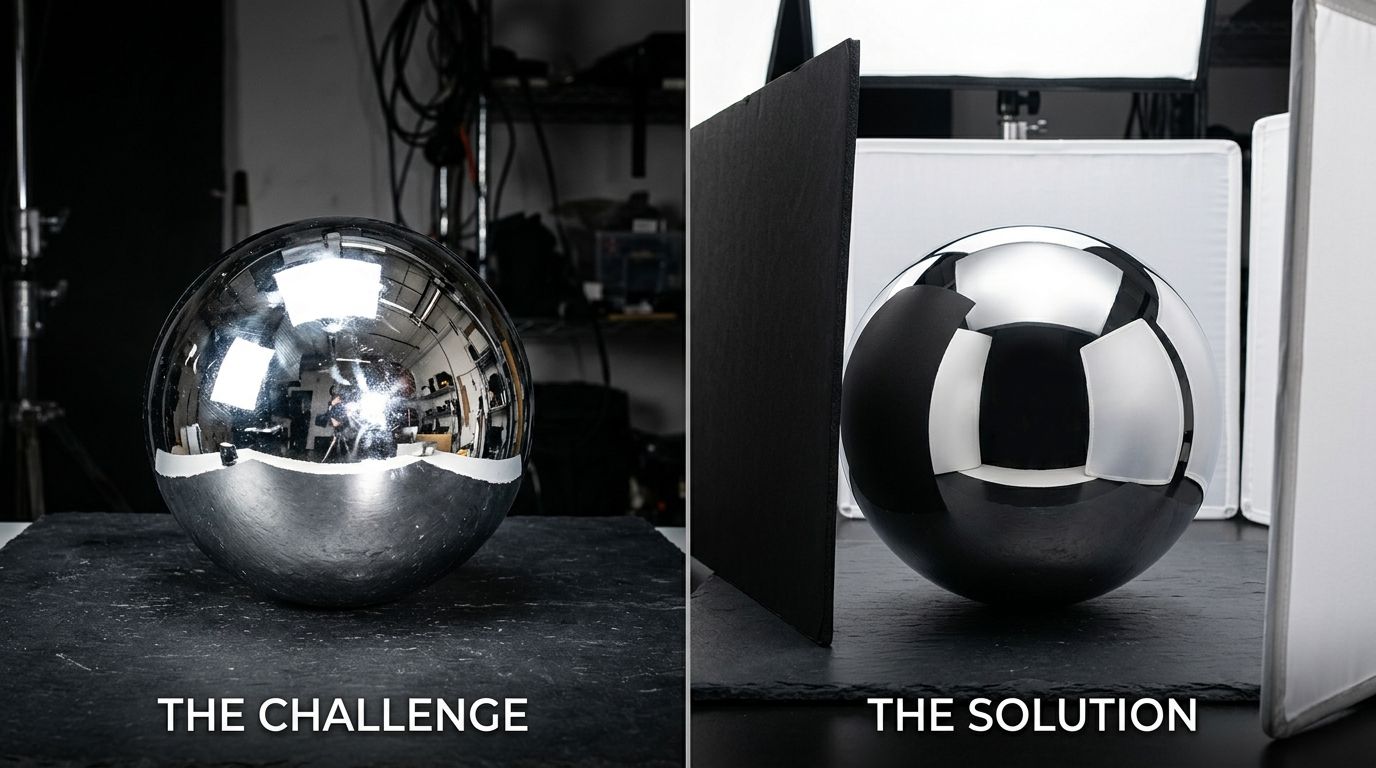
Use the black card photography technique
You do not always want to remove every single reflection. A completely matte piece of polished metal looks unnatural. You need to control the reflections, not erase them completely.
Once you have beautiful white highlights wrapping your product, it will likely lack contrast. This is especially true in stainless steel photography. To fix this, you introduce negative fill. This is known as the flagging photography technique.
You cut thin strips of black foam core and clamp them to light stands just outside the frame. You angle them so they reflect back onto the product. This creates sharp, intentional black lines down the edges of the metal. These black lines tell the viewer's brain that the object is round and metallic. Without negative fill, curved chrome objects disappear into white backgrounds entirely.
Master exposure bracketing product photography
Even with perfect diffusion and negative fill, you will often find that it is impossible to properly expose the bright shiny metal and the dark matte labels at the same time. This is a severe problem for automotive accessories and high-end electronics.
The solution is exposure bracketing. You lock your camera on a heavy tripod. You take one photo exposed for the bright metal highlights. You take another photo exposed for the dark shadows. You take a third photo with your hand physically holding a white card in front of the camera lens to block your own reflection from the chrome.
Then, you hand those files to a retoucher who painstakingly blends them together. Product photo retouching for complex metallics is why commercial studio invoices climb into the thousands so quickly. The camera clicks take five minutes. The compositing takes four hours.
| Method | Setup Time | Skill Required |
|---|---|---|
| Studio Shoot | Hours | Expert |
| AI Generation | Minutes | Novice |
The hidden financial drag of shiny products
Any brand running a full studio shoot for standard catalog images in 2026 is paying for logistics, not quality. This penalty multiplies when the catalog is full of reflective products.
A freelance photographer might charge $40 for a standard matte product on a white background. Hand them a reflective piece of cookware or a mirrored pair of sunglasses, and that rate often jumps to $150 per image. The equipment required to control the reflections is heavy, expensive, and takes significant time to tear down and rebuild for different product shapes.
When you launch a new SKU in three metallic finishes, you are looking at a scheduling dependency that adds three weeks to your product launch. For high-volume ecommerce brands, this bottleneck kills momentum.
Can AI replace the studio for metallic items?
General-purpose AI image tools struggle with metal. They hallucinate bizarre reflections, warp the product shape, or generate textures that look like gray plastic.
CherryShot AI is built differently. It fundamentally understands the material properties of chrome, polished steel, and high-gloss plastics. You upload a flat product image. You select a visual mode like Luxury, Minimalist, or Avant Garde. The AI generates campaign-ready photos in minutes, calculating the perfect light wrap and specular highlights automatically.
Pricing starts at $10 for 50 images. Your per-image cost drops to under five dollars. You completely bypass the need for massive diffusion panels, black flags, and hours of exposure blending.
CherryShot AI is incredibly fast for high-volume catalog work, but if you need a hyper-specific editorial shot featuring practical water splashes interacting with a chrome surface in real time, a specialized liquid photographer is still your best option. Trade-offs exist. For 95% of standard ecommerce hero images and catalog volume, the physical studio math simply does not work anymore.
Audit your product catalog for reflective items today
Identify which of your current items require complex lighting setups that delay your launch. You can test your existing product photos in our platform to see how AI handles your specific metallic finishes. Apply our reflection-aware models to your backlog to standardize your brand visuals across the entire catalog.
Try CherryShot AIFrequently Asked Questions
How do I photograph products with metallic finishes?
Capture metallic finishes by illuminating the environment surrounding the item rather than aiming lights directly at the metal. Because metal functions like a mirror, direct lighting creates harsh white circles and deep, muddy shadows. Utilize large diffusion panels to produce smooth, wrapping light across the surface. White bounce cards effectively fill in darker areas, while strategically placed black flags carve out clean edges to define the object's physical shape.
What lighting reduces glare on shiny products?
Large softboxes and expansive diffusion panels serve as the primary tools for reducing unwanted glare. Soft light scales with the size of the source, making larger panels essential for creating gentle reflections. Cross-polarization represents another method for managing difficult surfaces. Placing a polarizing gel over the strobe and adding a circular polarizer to your lens cuts through glare effectively, providing clear results for glossy electronics and plastic consumer goods.
How do I eliminate reflections from metal surfaces?
Control the entire room environment to remove unwanted reflections from your frame. Extinguish all overhead ambient lights and wear dark clothing to prevent your own image from appearing on the product. Construct a tent using white diffusion fabric around the object and photograph through a narrow slit. If stray reflections persist, capture multiple exposures on a stable tripod and remove the artifacts using masking techniques in photo editing software.
Is it possible to photograph stainless steel cleanly?
Clean stainless steel results occur when you adopt the black card photography technique. Stainless steel often resembles flat gray plastic under completely even lighting, so you must add structured black reflections to reveal the curvature of the object. Placing thin strips of black foam core just outside the camera frame creates sharp, elegant dark lines along the sides of cylindrical steel items like cookware, which helps the viewer perceive depth.
Can AI handle metallic product photography?
Purpose-built AI tools process flat reference images to render highly realistic metallic surfaces and accurate reflections. These systems replace hours of manual labor spent adjusting physical diffusers and flags with automated light calculations. You simply upload your product image, select a visual style, and the software manages the shadow density and highlights. This approach reduces the production cost for shiny product photography to under five dollars per image.
Stop paying a massive premium for a photographer to wrestle with light stands and Photoshop masking layers. Take control of your visual pipeline and start shipping faster. See how effortlessly your shiny products can look campaign-ready at cherryshot.ai.