Instagram Reels Dimensions 2026: Size, Length, and Format Guide
The exact dimensions for Instagram Reels in 2026 are 1080 pixels wide by 1920 pixels tall. The format uses a 9:16 aspect ratio. If you upload anything else, Instagram will automatically crop, stretch, or add black borders to your asset. The algorithm punishes files that do not fit the screen natively by limiting their organic reach.
Definition
Instagram Reels dimensions represent the standard pixel resolution and aspect ratio required to display full-screen vertical video on the platform. These specifications ensure content fits mobile devices without distortion, unwanted cropping, or interface overlap.
Most ecommerce brands still treat vertical video as an afterthought. They shoot horizontal campaigns for their website and tell a junior video editor to chop the footage into phone-sized slivers for social media. That approach is entirely lazy, and it actively tanks your conversion rates. When you crop a horizontal video, your product ends up shoved to the edge of the frame or entirely covered by the Instagram user interface.
Shooting natively for vertical format means you sacrifice peripheral context. It forces your photographer or set designer to build vertically instead of horizontally, which can feel restrictive for wide products like furniture or automotive accessories. You have to accept that trade-off if you want your content to perform on mobile.
(Worth noting: audio trends and editing styles change every week on social media, but the physical constraints of the phone screen have not changed in years. Mastering the visual space matters more than picking a trending background sound.)
The Core Instagram Reels Specs for 2026
You cannot hack the Instagram compression algorithm. You simply have to feed it exactly what it wants. Uploading a massive 4K file does not guarantee better quality. Instagram will aggressively compress large files to save server space, often resulting in a blurrier video than if you had just uploaded a properly sized 1080p file in the first place.
Video dimensions and format requirements
Your timeline needs to be set to 1080 by 1920 pixels before you start editing. The aspect ratio is 9:16. The platform prefers MP4 or MOV file formats. You should export your videos using H.264 or HEVC compression settings. These codecs strike the best balance between preserving product details and keeping the file size manageable for mobile networks.
Frame rate is an often overlooked specification. While you can upload 60 frames per second, 30 frames per second remains the standard for organic content. It looks more natural to the human eye. The only time you should export at 60 frames per second is when you are showcasing ultra-smooth slow motion details of a product, like water pouring or fabric dropping.
File size and length limits
Instagram limits Reel uploads to 4GB per file. If you are hitting that ceiling on a short video, your export settings are fundamentally broken. A standard 15-second product video at 1080p should rarely exceed 50MB.
Length limits currently max out at 90 seconds. Just because you have 90 seconds does not mean you should use them. Ecommerce data shows that videos between 7 and 15 seconds consistently drive the highest click-through rates. The goal is to hook the viewer, show the product clearly, and get them off the app and onto your website.
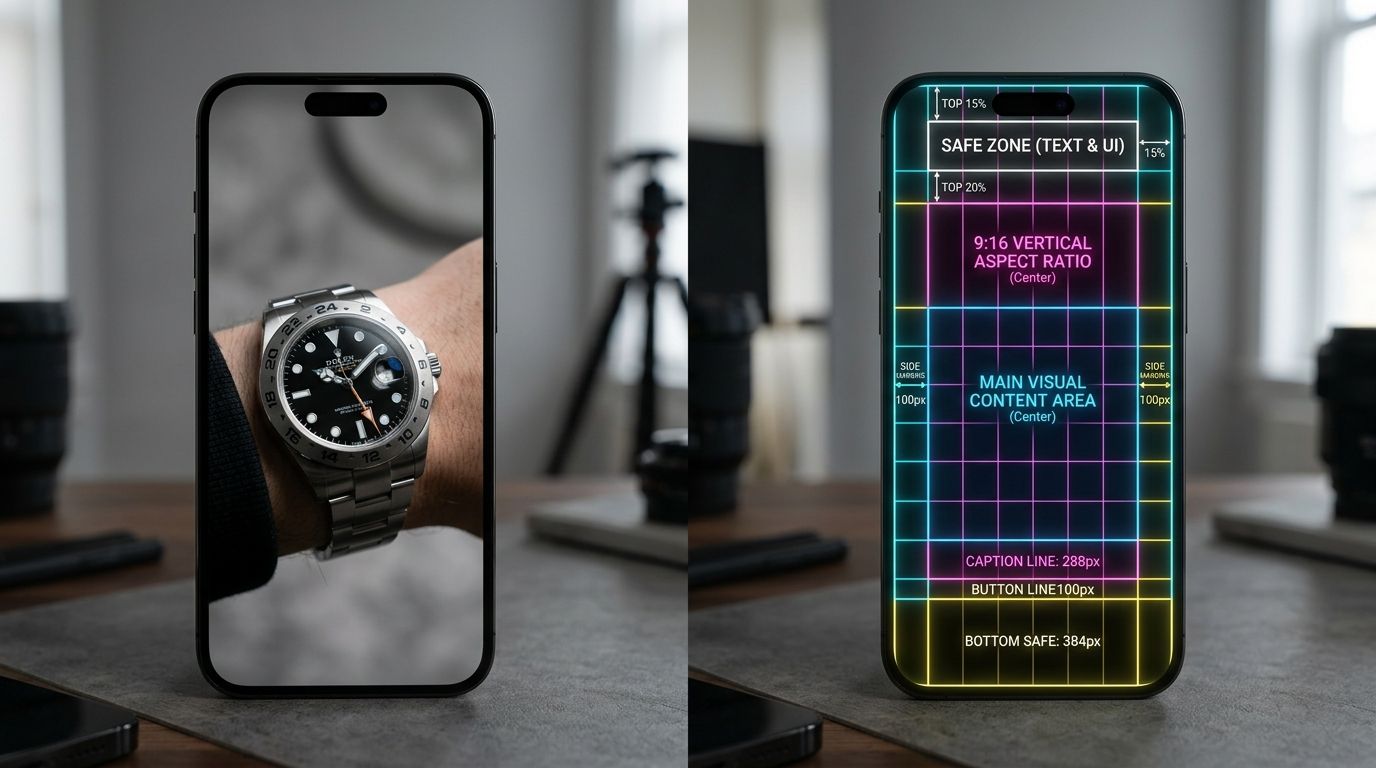
Understanding the Reels Safe Zone
The biggest mistake founders make when reviewing social content is watching the video file on their laptop. A video can look perfect on a desktop monitor and completely fall apart on a phone. The Instagram app overlays text, buttons, and icons directly on top of your video. If you do not account for these elements, your core message gets buried.
Navigating the UI overlay
The right side of the screen houses the engagement cluster. The heart, comment, share, and save buttons take up a significant vertical block on the right edge. The bottom of the screen holds the creator username, the audio track information, and the caption preview. The top edge often displays system icons like battery life or network signal.
If you place your product's key selling proposition in the bottom fifth of the video, nobody will be able to read it. If you put a discount code on the right side, the share button will obscure the numbers.
Margins you need to memorize
The definitive safe zone is the middle 1080 by 1350 pixels of the screen. You must leave roughly 250 pixels of empty space at the top and 340 pixels of empty space at the bottom. The sides require a much smaller buffer, usually around 35 pixels, just to keep text from touching the absolute edge of the glass.
When you are generating scroll-stopping social media images to use as video frames, keep the primary product dead center. Treat the outer margins like a physical picture frame. Let your background colors bleed into those margins, but keep the subject protected in the middle.
Adapting Product Photography for Vertical Video
Ecommerce catalogs are fundamentally horizontal or square. Shoe profiles, wide apparel layouts, and flat lays are designed for traditional website grids. Converting these massive asset libraries into 9:16 vertical video formats creates a logistical headache. You cannot just scale a square product shot up to fill a vertical screen. The edges chop off, the resolution falls apart, and the product loses all surrounding context.
The difference between a still crop and a native vertical asset
The easiest solution to the vertical problem is stacking. Place three horizontal product images on top of each other in a single 9:16 frame. It feels native to the platform. It shows off multiple angles at once. You get the vertical real estate without shooting new assets or awkward cropping.
The second approach is motion panning. Take an ultra-high-resolution landscape product photo and place it in a vertical sequence. Program your editing software to slowly pan from left to right across the image. It adds movement to a static asset. It qualifies as video for the algorithm and requires absolutely zero studio time.
| Approach | Effort | Visual Impact |
|---|---|---|
| Stacking Images | Low | High |
| Motion Panning | Medium | Medium |
| Original Vertical Shoot | High | Highest |
Turning static campaigns into dynamic Reels
Scaling this process manually takes hours of tedious editing work. You end up paying a freelancer to slice, keyframe, and expand still images. If you are serious about scaling ad creative production, you need to automate the formatting.
AI product photography changes how this workflow operates. Upload a raw product photo, select a vertical aspect ratio, and CherryShot AI generates a native 9x16 campaign image in minutes. You skip the awkward cropping phase entirely. The new asset is built for the exact dimensions of the phone screen from the first pixel. Drop that AI-generated image into your video timeline, add a simple text hook, and your catalog shot is now a ready-to-publish Reel.
The 2026 Thumbnail Strategy
Your video dimensions dictate the viewing experience in the feed, but your cover photo dimensions dictate your profile aesthetics. Reels live in three distinct places on the app. They appear in the home feed, the dedicated Reels tab, and your main profile grid. Each location crops the cover image differently.
Grid versus feed viewing
The dedicated Reels tab shows the full 9:16 vertical cover image. Your main profile grid takes that same image and crops it aggressively into a 1:1 square. If you design a beautiful vertical thumbnail with text at the very top, that text will vanish when users look at your main profile grid. It looks sloppy and unprofessional.
This dual-crop dilemma confuses many social media managers. You are forced to design a single file that looks perfect in two completely different aspect ratios.
Designing the perfect cover photo
The solution is simple. Design your thumbnail at 1080 by 1920 pixels. Place your product, your text hook, and all critical visual elements inside a 1080 by 1080 pixel square in the absolute center of the canvas. Treat the top and bottom 420 pixels as decorative background space.
When you are optimizing social ad image sizes and cover photos, consistency matters. If every Reel cover follows this center-weighted design rule, your profile grid will look flawless, and your feed distribution will maintain its full vertical impact.
Key Takeaways
- The mandatory dimensions for Instagram Reels are 1080 by 1920 pixels at a 9:16 aspect ratio.
- The UI safe zone requires 250 pixels of padding at the top and 340 pixels at the bottom.
- Uploading horizontal video and relying on automatic cropping destroys product visibility.
- Thumbnail covers must be designed to look good both as a 9:16 full image and a 1:1 center crop.
Frequently Asked Questions
What are the dimensions for Instagram Reels in 2026?
Instagram Reels require a resolution of 1080 pixels by 1920 pixels. Using this specific vertical size ensures your video fills the entire screen on modern mobile devices. You avoid automatic platform compression and poor display quality by adhering to these exact pixel counts for every single upload.
What aspect ratio should Instagram Reels be?
Vertical video on Instagram mandates a 9:16 aspect ratio. Sticking to this format prevents the app from force-fitting your content into a box or adding black bars to your visual space. Maintaining this ratio keeps your product footage front and center for every mobile viewer.
How long can Instagram Reels be in 2026?
Creators can upload video files lasting up to 90 seconds. Keep your brand clips between 7 and 15 seconds to drive the highest engagement from your audience. Longer videos frequently result in drop-offs before your core call to action reaches the viewer.
What is the safe zone for Instagram Reels?
The safe zone protects your content from being obscured by the Instagram interface buttons and captions. Center your product and essential text within a 1080 by 1350 pixel area. Respecting these margins ensures that your key visual details remain visible while users interact with the app navigation elements.
How do I turn product photos into Reels?
Create vertical video content by generating motion sequences from your existing high-resolution catalog images. Software can pan across still photos to simulate a dynamic video experience without a full studio production. This approach converts static product shots into platform-ready assets while maintaining the visual quality of your original photography.
Generate vertical campaign assets for your next Reel
Stop relying on awkward manual crops of your horizontal product photography. Use AI to create native 9:16 imagery that fits your video timeline perfectly.
Try CherryShot AIMemorizing pixels and aspect ratios is a tedious part of running an ecommerce brand, but ignoring platform specifications directly hurts your reach. When you build assets specifically for the vertical screen, you stop fighting the algorithm and start capturing attention where it actually lives.