Product Photography AI Generator: How Tools Work & Best Inputs
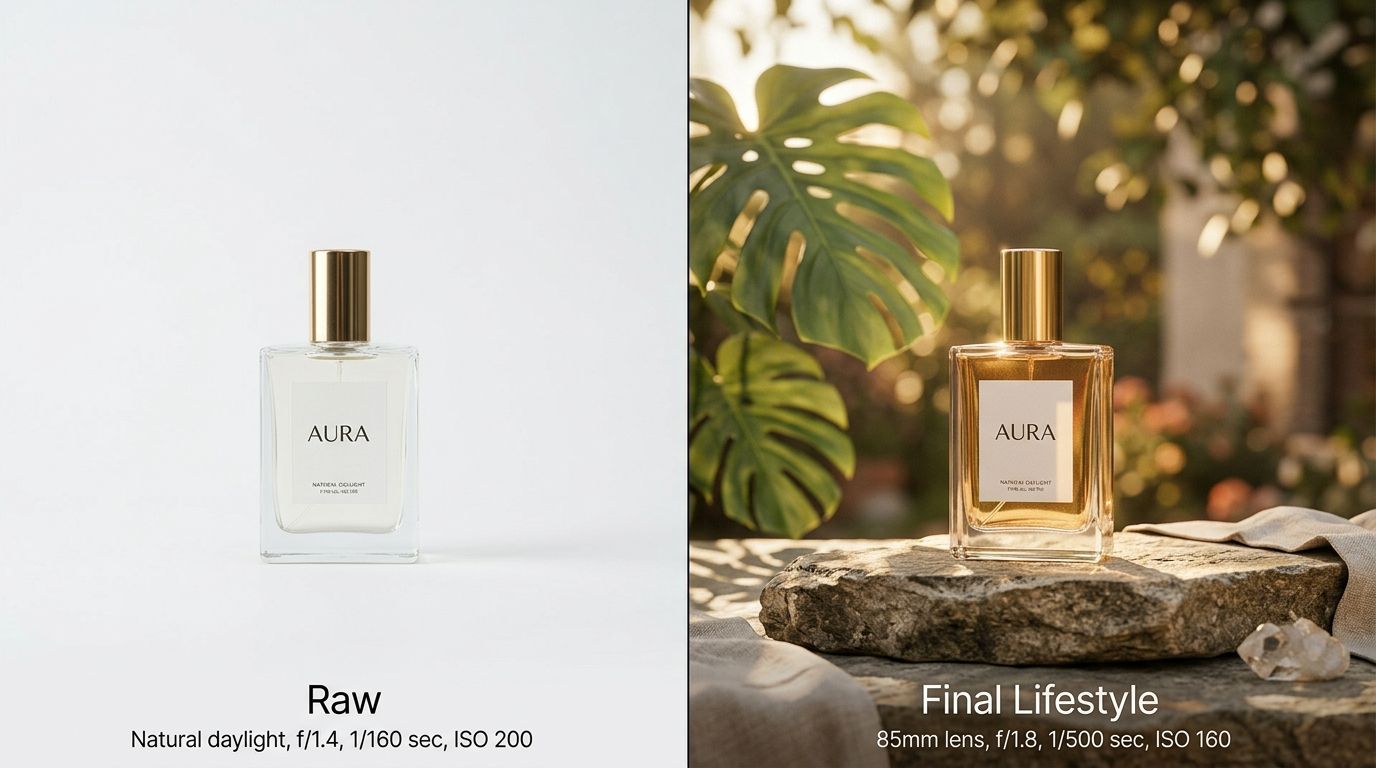
A product photography AI generator works by taking a single source image of your item and constructing a completely new commercial environment around it. You upload a flat photo. The engine isolates the product, analyzes its geometry, and drops it into a selected scene. The ambient lighting matches. The contact shadows align. The turnaround takes minutes instead of weeks.
Definition
A product photography AI generator is software that automatically extracts a physical product from a source photo and reinserts it into a new, synthetic background. These systems match the lighting and perspective of the original image to create a realistic composite image.
The biggest lie told by general-purpose AI image tools is that they can fix bad source material. They cannot. Bad inputs yield bad outputs, period. If you feed the machine a blurry iPhone photo shot under a yellow kitchen bulb, it will generate a blurry, yellow-tinted product sitting on a pristine marble countertop. The contrast between the flawless AI environment and the flawed product will make the image entirely unusable for commercial campaigns.
Some experimental tools will attempt to up-res a terrible photo, but they usually end up hallucinating brand logos or subtly altering the physical shape of your product. For an eCommerce brand, shape alteration is a non-starter.
AI excels at placing existing products into new contexts. It cannot invent a flattering physical angle out of thin air. You still have to position the camera correctly. Understanding the input requirements of these tools is the difference between generating a campaign asset that drives conversions and wasting an afternoon fighting with software.
| Feature | Studio Shoot | AI Generation |
|---|---|---|
| Time Required | Days to Weeks | Minutes |
| Cost | High | Low |
| Flexibility | Fixed Assets | Infinite Scenes |
How does an AI product photography generator work?
Understanding the basic mechanics of how AI product photography works helps set the right expectations for your own workflow. These tools do not just paste a sticker onto a background. They use complex diffusion models to create a cohesive image where the product and the environment react to each other.
The process from upload to generation
When you upload an image to an AI product picture generator, the software runs an automatic masking sequence. It finds the edges of your product and removes whatever background was in the original photo. This isolates the item as a clean layer. The engine then analyzes the geometry of the product. It notes where the item is tall, where it curves, and where it rests flat against a surface.
Next, the system reads your prompt or the visual mode you selected. If you chose a Minimalist mode in CherryShot AI, the system begins building a scene with clean lines and soft shadows. The crucial step happens during the merging process. The AI calculates where the primary light source in the new scene is located. It then generates contact shadows directly beneath your product, drop shadows falling away from the light source, and subtle ambient reflections on the surface the product sits on.
The goal is anchoring. Without accurate shadows and light spill, the product looks like it is floating. The AI calculates these environmental interactions so the item looks grounded in physical reality.
What input image do I need for AI product photography?
You do not need an expensive DSLR to generate a great AI product image. A modern smartphone is perfectly capable. The hardware is less important than the environmental conditions in which you take the photo. The AI engine needs clean data to work with.
Lighting, angles, and camera hardware
Flat, even lighting is mandatory. This is the single most important rule of AI image generation. When you take the input photo, you want soft light hitting the product from all sides. A cloudy day next to a large window is ideal. Direct sunlight or a harsh desk lamp will cast deep, dark shadows directly onto the product itself. The AI cannot un-bake those shadows. If your input has a hard shadow baked into the left side of the bottle, and the AI generates a scene where the sun is shining from the left, the resulting image makes no visual sense.
Angles matter just as much. The camera angle of your input dictates the camera angle of the output. If you want an image of your product resting on a coffee table viewed from a low, dramatic angle, you must photograph your physical product from a low, dramatic angle. You cannot shoot a top-down flat lay and ask the AI to generate a side-profile lifestyle shot. The perspective will clash and break the illusion.
Reflections are the silent killer of good inputs. If you are photographing a glossy product like a glass perfume bottle or a polished metal watch, look closely at the surface. Shiny objects capture the room around them. If your reflection is visible in the chrome bezel, the AI will keep that reflection. It assumes that shape is part of the product design. Use a large piece of white poster board to bounce light and block your own reflection when shooting glossy items.
Does input image quality affect AI product photography output?
It absolutely does. The AI acts as a multiplier. It scales the quality of whatever you give it. If you give it a sharp, clean asset, it will build a commercial-grade campaign around it. If you give it a messy asset, it will build a beautiful room around a mess.
Garbage in, garbage out
Resolution is the baseline. Your input photo should be as high resolution as possible. Most platforms require at least a 1080x1080 pixel image, but larger files give the edge detection algorithms more data to work with. Before you shoot, physically wipe your phone lens. Finger smudges cause light blooming and soften the edges of your product. Soft edges confuse the automatic background removal tool, leading to jagged borders in the final image.
Ignoring basic input cleanliness is one of the most common mistakes in AI photography. Brands assume the tool will magically sharpen their blurry logo or clean the dust off their packaging. A product photography AI generator is designed to preserve your product, flaws and all. If there is a scuff on your leather bag in the source photo, there will be a scuff on the leather bag in the final output. Clean your product before you photograph it.
How do I get the best results from an AI product photography generator?
The difference between an average result and a great one comes down to a deliberate workflow. You have to treat the software like a collaborator rather than a magic wand. Provide clear instructions, give it clean materials, and guide the aesthetic.
Perfecting the product photography generator workflow
Start by staging your shot. Place your product on a neutral, solid-colored surface. White poster board works best. This high contrast makes it incredibly easy for the AI to cut the item out cleanly. Avoid photographing products on busy rugs, textured blankets, or cluttered desks.
Once you upload the image, pay close attention to the masking preview. CherryShot AI will show you exactly what it intends to keep. If the mask accidentally trims off the corner of your product box, adjust it. Do not proceed with a bad mask expecting the engine to fix it later.
Finally, align your scene selection with reality. If you are photographing a heavy cast-iron pan, choosing a visual mode that places it floating in the sky will look absurd. Select environments that logically fit the weight, scale, and utility of your item. If you are trying to understand the tipping point for AI replacing studio photography, it starts with brands treating AI tools with the same creative rigor they bring to a physical set.
Audit your product page images before your next campaign
Review your existing catalog to identify products that lack high-quality lifestyle context. You can use your existing assets to quickly generate professional scenes that align with your brand standards.
Try CherryShot AIFrequently Asked Questions
How does an AI product photography generator work?
AI product photography generators function by isolating your item from its original source file and integrating it into a computer-generated environment. These engines evaluate the physical geometry and existing light properties of your item to ensure realistic shadows and reflections appear in the final scene. This digital reconstruction process allows the product to look physically present within a new, high-quality background without requiring a traditional photography studio setup.
What input image do I need for AI product photography?
Submit a high-resolution, sharp photograph of your product staged against a flat, neutral background. Smartphone cameras provide sufficient quality if the lens is clean and the focus is sharp. Avoid using images with harsh shadows or high-contrast backgrounds, as these elements hinder the AI's ability to cleanly mask the object. Position your product so the camera angle matches the specific aesthetic you want to achieve.
Does input image quality affect AI product photography output?
High-quality source images are the primary determinant of successful final outputs. Because the AI preserves every detail captured in the original photo, any blurriness, pixelation, or dust will appear magnified in the generated scene. Professional results demand clear, well-lit input files. Providing sub-par source material consistently results in images that appear disjointed or visually unconvincing, regardless of the sophistication of the underlying generation engine or model.
What is the best AI product photo generator?
The most effective tools prioritize commercial accuracy over artistic interpretation for product photography. CherryShot AI focuses on maintaining strict color fidelity, sharp edges, and consistent lighting models suitable for eCommerce catalogs. General art generators often distort product shapes or introduce inaccurate physical details that fail commercial standards. Prioritize platforms that allow for specific lighting adjustments and provide reliable, realistic masking of your physical goods.
How do I get the best results from an AI product photography generator?
Capture your source photo using soft, diffused lighting to minimize unwanted glare or dark shadows on the product surface. Ensure the camera lens is clean and the product remains in sharp focus throughout the entire frame. Aligning your original shooting angle with your desired final composition prevents perspective clashes. Following these precise preparation steps ensures the AI seamlessly anchors your product into the newly generated virtual environment.
A fast workflow relies on a solid foundation. If you spend five extra minutes preparing your input image, wiping the lens, and finding flat lighting, you will save hours of generation time. CherryShot AI handles the heavy lifting of lighting and scene construction, but you still control the product. Get the input right, and the output will take care of itself.