Product Photography Tips: 15 Techniques That Separate Good Product Photos from Ones That Convert
You either have a technical problem or a conversion problem. If your photos are blurry or poorly lit, you have a technical problem. But if your shots are crisp and in focus and your product page still converts at half a percent, your images are failing to do the actual job of selling. Most guides focus entirely on camera gear. They assume buying a better lens will fix a stagnant listing. It will not.
Definition
Product photography conversion refers to the rate at which visitors purchase an item after viewing its images. High-converting photography acts as visual customer support by preemptively answering shopper questions about physical scale, texture, and utility. Rather than just looking pretty, these images serve as functional tools that actively persuade a browser to add the item to their cart.
I spent eight years running ecommerce brands and paying invoices for studio shoots that delivered technically flawless images that did nothing for our margin. The shift happened when we stopped evaluating photos based on aesthetics and started evaluating them on how well they answered customer objections.
Technical perfection does not guarantee conversion. Your imagery must explicitly answer the buyer's unasked questions.
Here are fifteen practical techniques that pull product photography out of the art department and put it to work for your bottom line.
Core Techniques for Higher Conversions
1. Establish visual scale immediately
A customer browsing on a mobile screen has no idea if your ceramic vase is four inches tall or fourteen inches tall. Measurements in the description are helpful but people rarely read them before making a judgment. Put a human hand in the frame. Place the item next to a standard object. Give the brain an immediate shortcut to understand the physical reality of the product.
2. Map the hero image to the ad click
If your Facebook ad features a model holding a specific olive green tote bag in the rain, the first image on the landing page must feature that exact olive green bag. The disconnect between an ad creative and a generic catalog hero image is the leading cause of bounce rates. The photo must validate the promise that got them to click.
3. Ditch the pure white background
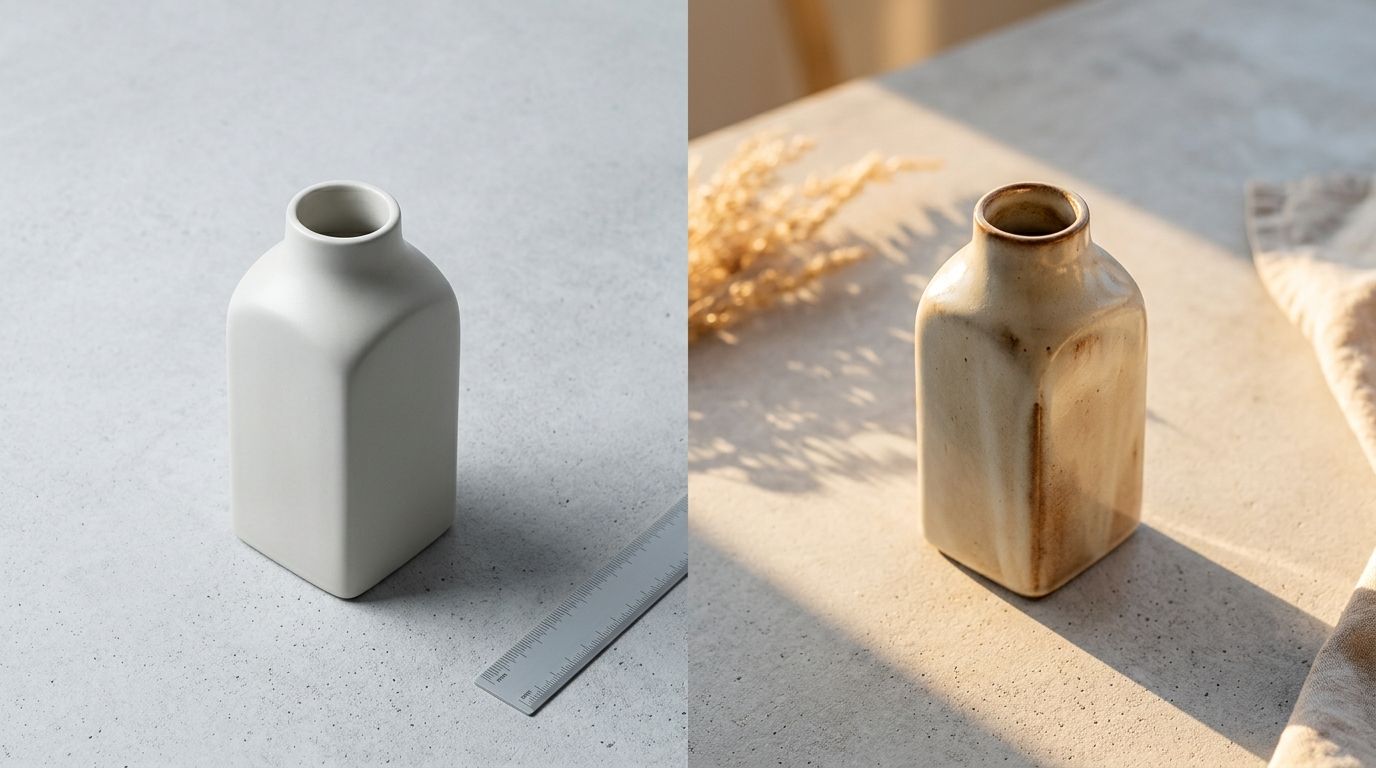
Unless you are selling on Amazon where pure white is mandated by platform rules, a stark white background often looks clinical. Many founders overcomplicate choosing product photo backgrounds when launching a new collection. A subtle off-white, a soft grey, or a contextual lifestyle environment instantly elevates the perceived value of the item. Pure white screams mass production. Soft tones suggest curation.
4. Reveal texture with directional lighting
Flat, even lighting is the enemy of texture. If you sell leather goods, knitwear, or anything where the tactile feel justifies the price tag, you have to prove that texture visually. Move your light source to the side. Let shadows rake across the surface. Shadows are what give an image depth and communicate the quality of the material.
Answering Customer Objections Visually
5. Document the micro-details
No one buys a premium jacket without inspecting the zipper quality. Stop hiding the hardware. Dedicate at least two images in your carousel strictly to macro shots of the stitching, the clasps, and the inner lining. If your product is built well, those extreme close-ups do heavier lifting for your conversion rate than any wide lifestyle shot ever will.
6. Build a deliberate carousel hierarchy
Do not just upload six photos randomly. Tell a logical story. Image one is the hero shot. Image two shows scale. Image three reveals the interior. Image four breaks down the material. Image five shows it in use. You want to walk the customer through a virtual unboxing. Understanding what makes product photos convert is entirely about structuring this visual narrative to preemptively handle doubts.
7. Stop relying on the model
Apparel brands fall into a trap where they sell the model's lifestyle rather than the garment. A beautiful portrait of a model looking wistfully out a window is great for Instagram. It is terrible for a product page. Crop closer. Cut the model's face out of the frame if it distracts from how the shoulder seam sits. The product is the star.
8. Show the "messy" reality
A perfectly packed travel backpack looks great. A backpack spilling out cables, a laptop, three notebooks, and a water bottle proves utility. Buyers want to see the capacity. Show the product doing the actual job it was designed for, even if the composition feels slightly cluttered.
Escaping the Production Bottleneck
9. Break free from the logistics trap
Any brand still running a full studio shoot for standard catalog images in 2026 is paying for logistics rather than quality. The traditional process requires booking a photographer, securing studio time, waiting three weeks for edits, and fighting over minor revisions.
This is exactly why we built CherryShot AI. You upload a basic product image, select a visual mode like Minimalist or Lifestyle, and generate campaign-ready photos in minutes. The per-image cost drops from $150 to under $5.
| Production Aspect | Traditional Studio Shoot | AI Image Generation |
|---|---|---|
| Per-Image Cost | $100 to $150 or more | Under $5 per image |
| Turnaround Time | Three to four weeks | Generated in minutes |
| Logistics Needed | Physical sets, props, and photographers | A base image and a text prompt |
| Scalability | Severely bottlenecked by physical time | Instant output across multiple variants |
Using AI for product photography speeds up the process, but you do lose the happy accidents that sometimes happen when a stylist drops a prop by mistake. (To be fair, traditional studios still have a place when you need a massive hero campaign for a brand re-launch.) But for scaling catalog volume across multiple colorways, the old model simply burns cash.
10. Maintain angle consistency
Your collection page looks chaotic when every product is shot from a slightly different elevation. Establish a baseline camera angle for all primary images. A tidy, uniform grid communicates professionalism. When the layout is predictable, the customer's eye can actually focus on the differences between the products.
Post-Production and Final Polish
11. Photograph the unboxing experience
Include one image that shows exactly what arrives in the mail. If you spend money on custom tissue paper, branded boxes, or premium dust bags, show them off. This sets correct expectations and adds a layer of premium perception before the customer even adds the item to their cart.
12. Color-correct to reality
Aesthetic color grading is dangerous. If you warm up the photo to make the lifestyle scene look cozy, you might accidentally turn a crisp white shirt into a cream shirt. When the customer opens the box and sees white, they return it. True color representation protects your profit margin.
13. Add text callouts to secondary images
Do not assume people will read the bullet points below the fold. Take your fourth or fifth carousel image and overlay text directly onto it. Draw an arrow pointing to the reinforced heel of a boot. Add a small text box explaining the waterproof rating. Put the sales copy directly inside the visual real estate.
14. Crop relentlessly
Dead space kills impact. You want the product to command the frame. You can absolutely handle editing photos without Photoshop if your initial raw captures are properly lit. Most of the time, the only edit you truly need is a tighter crop that forces the viewer to look exactly where you want them to look.
15. Treat the FAQ as a shot list
Look at your customer support tickets. What are the most common questions people ask before buying? If people constantly ask if a water bottle fits in a standard car cup holder, take a photo of the bottle sitting in a car cup holder. Let your visual assets do the talking.
Key Takeaways
- Technical perfection is useless if the image fails to answer the buyer's unasked questions.
- Always include visual proof of scale and tactile texture within the first three images.
- Treat your image carousel as a step-by-step unboxing narrative rather than a random gallery.
- Use AI generation to clear the catalog logistics bottleneck and scale volume affordably.
Frequently Asked Questions
What makes product photography convert?
A high-converting product photo actively removes purchasing friction by visually answering unasked shopper questions. Flawless technical lighting matters very little if a potential buyer cannot comprehend the true physical scale or the tactile surface texture of your item. Photograph the product sitting next to a recognizable everyday object to give the human brain an immediate shortcut for understanding its real-world dimensions.
What are the most important product photography tips for ecommerce?
The most critical requirement is matching your landing page hero shot directly to the exact visual promise made in your initial advertisement. Shoppers will bounce instantly if the specific colorway or angle they clicked on does not immediately validate their decision upon arrival. Construct a deliberate visual sequence in your carousel that starts with that hero shot, proves scale, highlights micro-details like stitching, and finishes with lifestyle context.
How do I improve my product photos without buying new equipment?
Better context matters far more than an expensive new camera body or premium lens. Customers crave reality, meaning you must show your item functioning in its intended environment rather than resting silently in a sterile white studio setup. Introduce a human hand directly into the frame to instantly communicate accurate size proportions while aggressively cropping out empty background space to focus attention solely on the product.
What product photography techniques improve conversion?
Raking directional light across your item to expose its tactile surface texture drastically improves buyer confidence. Shoppers trust accurate representations over trendy aesthetic filters, making true-to-life color correction vital for minimizing costly post-purchase return rates. Overlay explicit text notes and arrows directly onto your secondary carousel images so mobile users cannot skip past your most important material specifications or hidden hardware details.
How many product photos do I need per listing?
Six to eight highly intentional images serve as the standard baseline for optimizing an ecommerce listing. Pushing past this limit frequently introduces redundant visual noise that frustrates shoppers and causes them to abandon the page entirely. Structure your upload limit to include one primary hero visual, two alternate angles, two extreme macro close-ups of specific hardware, one contextual lifestyle shot, and one clear demonstration of scale.
Upgrading your imagery is the single highest-leverage task you can execute to lift conversion rates this quarter. Stop relying on tedious studio schedules to get the assets you need. Upload a base shot to CherryShot AI and start generating high-converting catalog visuals in minutes.
Audit your product page image carousel
Open your top-selling product listing on a mobile phone right now and review the image sequence. If your photos fail to establish scale, demonstrate texture, or show the item in use, you are actively losing sales. Drop your existing base photo into CherryShot AI to instantly generate the missing contextual shots your customers need.
Try CherryShot AI