**How to Batch Product Photography Efficiently: Shoot 50 SKUs in a Single Day**
Shooting 50 SKUs in a single day is a logistics challenge, not a creative exercise. You have exactly eight minutes per product in a standard eight-hour session. If you are adjusting lighting setups between every shot, you will fail. To batch product photography efficiently, you have to treat the studio like a factory line. You lock the camera, set the lights, and push inventory through the frame as fast as physically possible.
Definition
Batch product photography is the process of photographing multiple SKUs in one session by standardizing lighting, angles, and camera settings. It minimizes the time spent on manual adjustments to maximize throughput during a studio day.
Getting through that volume requires rigid preparation. The moment the photographer pauses to ask which angle comes next, you have lost money. Every minute spent unboxing a product while the camera sits idle destroys your margin. I have run studio days where we burned through a thousand dollars of studio time just dealing with wrinkled fabric and disorganized shot lists. High volume product photography is entirely about what happens before the shutter ever clicks.
The math dictates the workflow. If your customers demand four angles per product, those 50 SKUs instantly become 200 distinct images. That leaves you with 2.4 minutes per final shot. That timeframe leaves absolutely zero room for creative exploration on set.
**Pre-shoot: Building the product photography batch workflow**
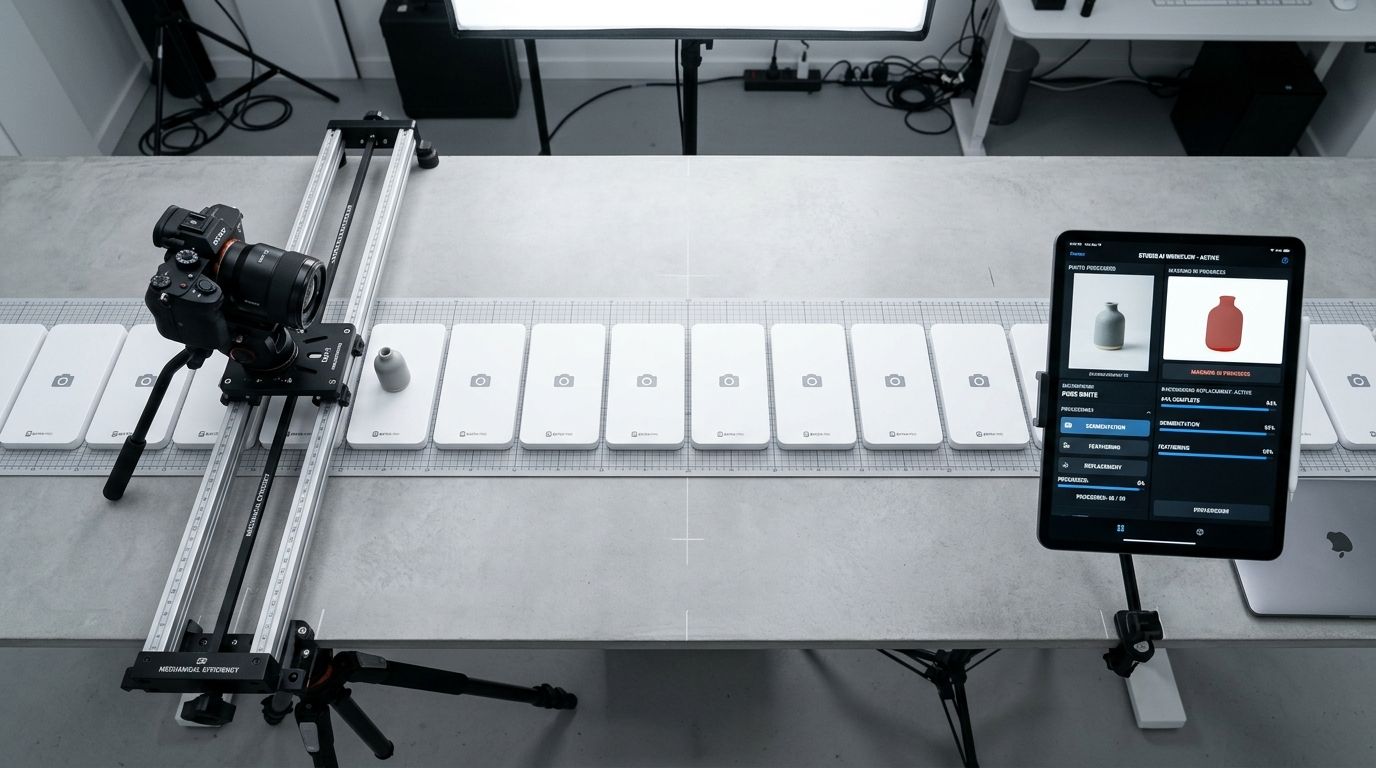
Efficiency on set requires physical tape marks, locked tripods, and a completely tethered workflow.
Organization happens days before the studio door unlocks. You need a master spreadsheet that lists every single item entering the building. This document is your single source of truth. It must include the SKU number, the product description, the exact angles required, and styling notes. Handing the photographer a raw spreadsheet is fine, but writing consistent photo briefs ensures nobody is guessing about how the product should sit in the frame.
Do not open boxes on the clock. All unboxing, steaming, dusting, and tag-cutting must happen the day prior. Every item should be lined up on a rack or a staging table in the exact order it will be photographed. When you are paying freelance day rates, paying someone to peel protective film off acrylic is a massive waste of capital.
**Grouping by lighting and camera angles**
Never sort your shot list by product category. Sort your shot list by the lighting setup required. Moving a softbox and adjusting the strobe power takes ten minutes. If you switch from a flat lay to a standing product and back to a flat lay, you are bleeding time.
| Strategy | Traditional Method | Batch Optimization |
|---|---|---|
| Product Sorting | By Category | By Lighting Setup |
| Equipment | Move for every SKU | Locked for entire batch |
| Setup Time | High | Low |
| Throughput | Slow | High |
Shoot all flat lays first. Then raise the camera, adjust the lights for a 45-degree angle, and shoot every product from that perspective. Then move to straight-on hero shots. Before you even book the studio, you need an essential photography setup that prioritizes speed over complexity. The goal is to set the lights once per angle and leave them alone. Lock the tripod down. Put tape marks on the shooting table so you know exactly where the base of each product belongs.
Note: highly reflective products like jewelry or mirrored sunglasses will inevitably ruin your timeline and require their own dedicated half-day. Do not mix them into a standard catalog batch.
**Structuring the product photo shoot schedule**
A successful day relies on a strict photography shoot schedule. Do not estimate times loosely. Give every phase of the day a hard boundary.
Load-in and basic setup usually consume the first hour. By 9:00 AM, the first test shots must be on the screen. From there, you work in ninety-minute sprints. Tethering your camera to software like Capture One or Lightroom is mandatory for this pace. Tethering allows your digital tech or assistant to review focus and apply a baseline color preset the second the shutter fires. If you wait until the end of the day to review the files on an SD card, you will inevitably discover that a strobe misfired on twenty products.
**The styling efficiency products demand**
The photographer should never touch the product. Their eyes belong on the monitor and their hands belong on the camera. You need a dedicated stylist or a highly capable assistant running the physical inventory.
The workflow should look like a conveyor belt. The assistant places the first product on the tape marks. The photographer shoots the required angles. As the photographer reviews the final shot on the monitor, the assistant swaps the product for the next item on the rack. This assembly line is the secret to studio day rate optimization. If you are a solo founder trying to do this alone, you will naturally max out around 20 SKUs before exhaustion sets in.
A factory-line approach sacrifices bespoke, dramatic lighting for sheer speed, but catalog volume demands this compromise. Consistency across the category page is much more valuable than one perfectly lit hero shot mixed with fifty mediocre ones.
**When physical studio math stops making sense**
Even with a perfect photography checklist and military precision, physical studio days have a hard ceiling. You are paying for studio rental, equipment transport, catering, the photographer, and an assistant. The invoice easily crosses two thousand dollars for a single day. When you divide that by 50 SKUs, you are paying roughly $40 per item just for standard white-background catalog shots.
That math hurts margins, especially for fast-fashion or high-turnover hard goods. When you finally decide to cut photography costs moving catalog volume to AI is the clearest path forward.
**AI batch processing vs traditional studio days**
AI product photography completely eliminates the physical scheduling dependency. You do not need to wait three weeks for your photographer to have an open Tuesday. You do not need to steam fabric or rent a van to transport inventory.
With CherryShot AI, you upload a basic reference image of your product. You select a visual environment like Classic, Minimalist, or Magazine mode. Within minutes, the system generates campaign-ready photos. You can process an entire new product line while eating lunch at your desk. The per-image cost drops from $40 to under $5.
Physical studios still make sense for complex, conceptual hero imagery that requires specific human models or elaborate set builds. But for the core catalog volume that clogs up your marketing pipeline, forcing 50 SKUs through a physical studio is a legacy habit. Batching digitally shifts your bottleneck from logistics back to product creation.
Audit your product images before your next campaign
Review your current category pages to see where inconsistent lighting or outdated imagery is impacting your conversion rates. You can quickly replace or standardize these assets using digital tools to prepare your store for high-traffic periods.
Try CherryShot AI**Frequently Asked Questions**
How many products can I photograph in a day?
A well-organized studio handles between 40 and 60 standard SKUs in an eight-hour session. You achieve this volume by keeping a static lighting setup and capturing consistent angles for every item. Reflective materials or jewelry require extra care and will naturally slow your pace to roughly 15 items per day.
How do I organize a product photography shoot?
Create a master spreadsheet that defines every SKU, required angle, and specific styling instruction. Grouping items by shape or material prevents constant equipment adjustments throughout your shoot. Completing all cleaning and unboxing tasks the day before ensures your team spends the actual session time only on capturing images.
What is the most efficient workflow for product photography?
Adopt a factory-style assembly line where one person handles prep while the photographer focuses strictly on the camera. Locking your tripod and using tape to mark precise product placement on the table keeps your framing identical for every shot. Reviewing files on a tethered monitor provides immediate quality control.
How do I maintain consistency across a batch product shoot?
Secure your camera on a heavy-duty tripod and mark your studio floor to fix the exact staging area. Tethering the device allows you to apply color presets and check focus instantly after every click. This immediate feedback loop prevents lighting shifts or technical errors from impacting your final output.
How does AI compare to batch photography sessions?
Traditional sessions demand expensive studio rentals and long-term scheduling that hinders your marketing speed. Digital tools like CherryShot AI remove these physical barriers by generating high-quality angles from a single source file. You skip the logistical burden of transporting inventory and managing crews for simple catalog shots.
Key Takeaways
- Shooting 50 SKUs a day gives you roughly 2.4 minutes per final image.
- Group your shot list by lighting setup, not by product category, to save hours of physical adjustments.
- Implement a strict assembly line workflow where the photographer never touches the inventory.
- Use AI tools to process core catalog imagery and eliminate the studio scheduling bottleneck entirely.
Batch product photography only works when you remove human hesitation from the process. If you are exhausted by the logistics of moving physical goods through a studio, it is time to upgrade your toolkit. Explore how CherryShot AI can turn your raw product references into campaign-ready assets in minutes.